This unit was designed in collaboration with teachers from the Campbell Union School District
![]()
Unit Overview
How can we use natural materials to create new and useful synthetic materials? Student teams will investigate various natural resources that undergo a chemical process to form synthetic materials and new materials that could be made from them, including new medicines, foods, and alternative fuels. They will be challenged to deconstruct material(s) and reconstruct with the same material to mimic the process of chemical reaction. Students will research and organized information and create a Life Cycle Analysis to determine the environmental impact of a selected piece of clothing. In the Design Challenge student teams create a product for younger students from both natural and synthetic materials.
Content Standard addressed in this inquiry unit:
This inquiry unit takes students through a sequence of lessons that focus on NGSS standard MS-PS1-3: Gather and make sense of information to describe that synthetic materials come from natural resources and impact society.
Educational outcomes
- Lesson 1: Students learn the importance of electricity and write a narrative about a world without it
- Lesson 2: Students investigate and explain the role of electrons in producing electric forces
- Lesson 3: Students build series and parallel circuits and explain observations in terms of electric forces
- Lesson 4: Students use the attributes of diodes to control electric current flow through a parallel circuit
- Lesson 5: Students build two LED circuits and explain observations in terms of electric forces
- Lesson 6: Students read resistance color code values and build LED circuits having different resistors
- Lesson 7: Students build an LED circuit that includes capacitors and resistors of different values
- Lesson 8: Students build circuits that include transistors and other electrical components
- Design Challenge: Students design, build, and test a board game containing circuitry that creates light and sound as evidence of energy transfer
Design Thinking Integration
This unit begins with an Empathy lesson that connects the difference between natural and synthetic materials, and dives deeper into why we create synthetics, and deeper into the benefits and dangers of creating synthetics. In first Define phase, the unit introduces the basics of chemistry, where chemical reactions take place, and challenge students in a mini-design challenge that replicates the 4 basic types of chemical reactions. In the second Define phase, the unit covers the dangers of creating synthetics and introduces students to the Life Cycle Analysis (a tool used to measure environmental impact), students will research and organized information and create an LCA to compare the environmental impact of an article of clothing. In the Design Challenge, student teams create a product for younger students from both natural and synthetic materials.
Design Thinking Overview
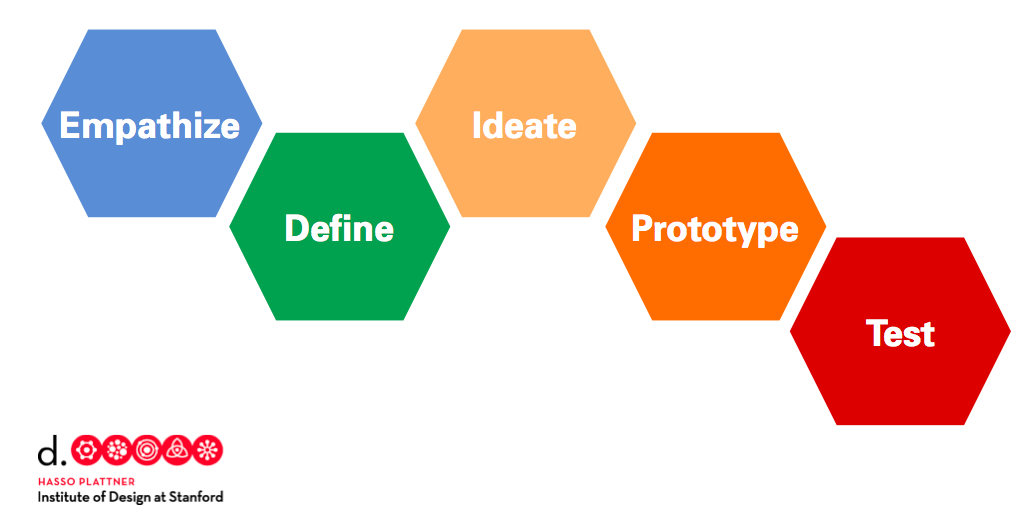
Our design thinking units have five phases based on the d.school’s model. Each phase can be repeated to allow students to re-work and iterate while developing deeper understanding of the core concepts. These are the five phases of the design thinking model:
EMPATHIZE: Work to fully understand the experience of the user for whom you are designing. Do this through observation, interaction, and immersing yourself in their experiences.
DEFINE: Process and synthesize the findings from your empathy work in order to form a user point of view that you will address with your design.
IDEATE: Explore a wide variety of possible solutions through generating a large quantity of diverse possible solutions, allowing you to step beyond the obvious and explore a range of ideas.
PROTOTYPE: Transform your ideas into a physical form so that you can experience and interact with them and, in the process, learn and develop more empathy.
TEST: Try out high-resolution products and use observations and feedback to refine prototypes, learn more about the user, and refine your original point of view.
The Design Thinking Process | ReDesigning Theater. (n.d.). Retrieved April 2, 2016, from http://dschool.stanford.edu/redesigningtheater/the-design-thinking-process/
STEAM Integrated Standards
NGSS MS-PS1-3: Gather and make sense of information to describe that synthetic materials come from natural resources and impact society.
Unit Materials
-
- RAFT Makerspace-in-a-box
- Various adhesives, connectors, and fasteners (e.g., paperclips, binder clips, thread, yarn, adhesive foam pads, wooden stir sticks, straws, spoons, pipettes, labels & stickers, rubber bands, etc.)
- Materials (e.g., laminate samples, dust covers, foam pieces, deli containers, fishboard, cardboard tubes, plascore scraps, posters, shower caps, scrap materials, cards, etc.)
- Tape, glue, scissors, timer
- Recording materials: RAFT Makerspace Journal Pages (for each lesson)
- Optional: a binder for each student to keep their Makerspace Journal pages in.
- Tech: Classroom computer or TV to show videos.
- RAFT Makerspace-in-a-box
Maker Journal Pages
Lesson 1 Maker Journal: Natural vs Synthetic
Lesson 1 Maker Journal: Benefits and Dangers of Synthetic
Lesson 2 Maker Journal: 4 Basic Types of Chemical Reactions
Lesson 3 Maker Journal: Life Cycle Analysis Tool
Lesson 1: Empathy: Why do we need to create synthetic materials?
Empathize – Understanding a real-world situation and feeling what another person is feeling.
Empathy lesson(s) – aims to develop, engage, and provide student ownership of understanding the problem and subject deeply.
Essential Questions:
-
-
- What is the difference between natural and synthetic materials?
- Why do we need to create synthetic materials?
-
Lesson Overview:
This lesson begins by having students think about the materials they have in the classroom and how these materials were produced. The lesson continues with an introduction to key concepts that will be further explored in define phase such as differences between natural and synthetic materials, and the chemical process of synthesis. Students will then watch a quick video of Percy Julian, and follow up with a discussion on how his work in chemistry help to create the ingredients that are needed in a wide range of medicine used over the years to save millions of lives.
Lesson Procedure:
-
-
- Introduce students that this unit will be covering the process of taking natural materials and synthesizing them to create new products- synthetics.
- Asks students to look around the classroom and pick one item, and write down or draw how they imagine that item was produced and from what materials that item was produced with.
-
![]()
-
-
- Lead a discussion that introduces these key concepts:
- synthetic materials are made by humans
- natural materials are elements and compounds that comes out of the earth
- using a chemical reaction process, we alter natural resources to create synthetic resources
- Have students look at their writing exercise from before and circle any mentions of a natural resource.
- Ask students to work in groups and write why we as a society would need to create man-made materials from natural materials. Have groups share to their peers. Ask students brainstorm what are the downsides of producing synthetic from natural resources.[Learn More] Have students share out.
- Lead a discussion that introduces these key concepts:
-
![]()
-
-
- Show Missouri Department of Health’s biography on Dr. Percy Julian, an African-American chemist, who used natural resources in soybean and yam to synthesize a molecule that would be mass produced and go into medicine and save millions of lives. [Learn More] Optional: show the entirety of NOVA’s Forgotten Genius to students.
- Follow-up discussion and reflection from students about their learning experience so far.
-
Sample teacher and student dialog
T: The stuff that you own, the phones, the clothes, the games, our lesson going forward will be about how those products get made. Can someone give me an example of how something in this room was made?
S: The clothes we have were grown and probably made in China, people probably had to grow it, and someone had sew it, and it was shipped here, where we picked it up at the mall.
T: Good. But there’s more to it. What about your phone, how was that made, and from what?
S: The electronics was made overseas, from materials like plastics, and metal.
T: How does something like plastics get made? Let’s take a moment, I want you to to pick out an object (or a product) from this room, and I want you to imagine all the steps that were needed for that product to get made. I want you to use this worksheet, which will be a part of our science/maker journal through the lesson.
![]()
T: When we talk about materials like plastic, it is considered a synthetic. Synthetic materials are man-made stuff. Plastic doesn’t grow on a true, and you can’t dig it up from the ground. What’s do we call stuff that comes from the earth?
S: I think it’s called natural or organic materials.
T: Synthetic materials, which are materials we make, but what do we make those materials from?
S: “From the earth?”
T: And what do we call stuff that comes from the earth? Yup, natural material. The synthetic material we use, comes from the natural material the earth provides for us. We create synthetic materials from natural materials, through a chemical reaction process. Let’s a take a moment to think and write.
T: Let’s take a moment to think and write about our synthetic products. Why do we need them? How are they beneficial to us? And also, at the same time, how are they harmful to us? We’ll write down our thoughts in our science/maker journal. We’ll share out with each other after we’re done.
![]()
T: Thanks for sharing your journal everyone. What I am hearing rings true. The benefits in synthetics are many, they have properties that we can’t find in nature, they allow us to make things stronger, lighter, more fuel-efficient, shiner, longer lasting. And at the same time, we do add to the pollution of our world, affect the health of animals and humans, and requires energy to make.
T: I don’t want everyone to think it’s all bad. Good things have come out of our work in synthetics. Who here has heard of Dr. Percy Julian?
S: We have no idea.
T: It’s okay, not a lot of people have, but he was a chemist who created the synthetic ingredients in medication that helped save millions of lives. You and your parents have probably taken a medicine, and it was through his work that those medications are now possible.
External Resources
Missouri Department of Health’s Dr. Percy Julian
Maker Journal Pages
Lesson 1 Maker Journal: Natural vs Synthetic
Lesson 1 Maker Journal: Benefits and Dangers of Synthetic
Teacher Notes
Key concepts to remember and highlight:
-
-
- Synthetic materials are made by humans
- Natural materials are elements and compounds that come out of the earth
- Natural materials are changed to synthetic by chemical reactions
- Synthetic materials have different properties than natural materials, we add strength, reduce weight, prevent rust, create combustion through synthetic materials.
- Creating synthetic material reduces our natural resources, adds pollution to our environment, demands more energy, and endanger the health of animal and human life.
-
Assessment
Formative Group-Assessment
Using group assessment tools such as Kahoot or Sporcle, teachers can create a quiz on which material is natural vs synthetics.
Formative Individual Assessment
Using assessment tool such as Google forms, teachers can create a test to assess learning objectives of this lesson.
Lesson 2: Define: What is the process of synthesis?
Essential Questions:
-
-
- What are chemical reactions?
- What are the basic types of chemical reactions?
- How are biology and chemistry connected?
-
Lesson Overview:
In this define phase, students will connect that synthetic material is made through chemistry, and that chemical reactions are natural processes that happen constantly, especially in nature. Students will participate in a discussion that will highlight the basics of chemical reaction. Students will participate in the process through a design challenge where they must break apart materials and recombine it into another product
Lesson Procedure:
-
-
- Active students’ prior knowledge from lesson one by asking students the difference between natural and synthetic materials.
- Show TED-Ed’s What Triggers A Chemical Reaction.
- Remind students that the process of creating synthetic materials requires a chemical reaction, and lead students on a discussion about chemical reactions that guide their understanding on these concepts:
- chemical reactions involve more than just dangerous chemicals
- chemical reactions take place:
- in living organisms when food is turned into fuel (biology),
- in cooking ingredients change texture [Optional: show TED-Ed The chemistry of Cookies]
- in the environment when air becomes polluted, ocean more acidic
- in space where atoms fused
- chemical reactions happen when atoms and molecules are combining or separating
- Have students’ participate in a mini-design challenge that will represent the basic four chemical reactions. Assign groups and pass out Make Journal with directions. Time each build, and have students share out what they were building, and identify the materials they started out with as reactants and design they finished as a product.
-
![]()
-
-
- Follow-up with discussion and reflection from students on the core concepts covered and about their learning experience so far.
-
Sample teacher and student dialog
T: We know the differences between natural and synthetic materials, and that through a chemical reaction we can turn natural materials into synthetics, but what do we know about the chemistry and chemical reaction?
S: Chemical reactions is when things change, like when a solid becomes a liquid.
T: That’s changing the state of matter, and it’s close, but chemical reactions are interactions between molecules where there is a rearrangement of their parts. Let’s take a look at this video for a brief introduction to chemical reactions.
T: In a typical day, how often does a chemical reaction take place around you? Are there chemical reactions happening now as we speak.
S: I am sure there’s a few, we are at a school, there’s a lab over there.
T: It’s true we have a lab, but the chemical reactions aren’t just restricted to the lab or test tubes, they actually happen everyday and everywhere. It happens in natural when plants use energy from the sun to make sugars, it happens when you use that sugar to fuel your body, it happens when we use our cars, it happens in space. Let’s take a look at this video to see how the act of cooking is actually a process of chemical reaction.
S: What happens in a chemical reaction?
T: There are many types of chemical reactions, but we’re going to focus on the very basic 4 and try to see how each chemical reaction is a little bit different. Let’s note this activity in our MakerJournal. You are going to find materials from our makerspace and classroom and break it down to represent the four types of reaction. Those four reactions are 1. synthesis 2. decomposition 3. single replacement 4. double replacement.
![]()
Atoms are the building blocks of all matter. There are hundreds of different atoms that combine to form molecules, becoming everything that we see and touch. They are VERY small but in order to understand electricity it is necessary to go even smaller, into the realm of subatomic particles.
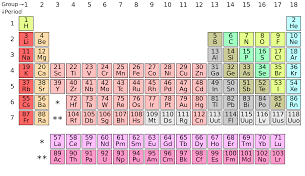
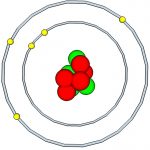
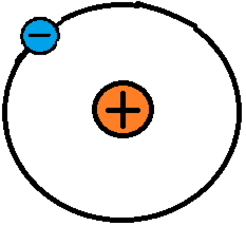
There are three main subatomic particles: electrons, protons, and neutrons. Protons and neutrons form the nucleus of an atom. Electrons orbit around the nucleus, although not in nice circular orbits like planets. Instead, they quickly buzz around the nucleus in a space called an electron cloud. It is easier to understand electricity in terms of the familiar atom model that has the nice circular orbits, called the Bohr model of the atom (see below).The number of protons in an atom determines its atomic number. This number is one of the main pieces of information people see when looking at a periodic table. Boron, pictured above, has five protons and has an atomic number of five. Stable atoms have the same number of electrons as protons, meaning boron has five electrons. Neutrons keep the protons in the nucleus. The number of neutrons can vary, which is why atoms can have other forms called isotopes.
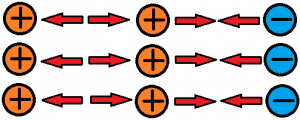
All matter has something called charge that is measurable. Charges are either positive or negative. Protons have a positive charge while electrons have a negative charge. Neutrons have no charge (neutral). Protons attract electrons because they have opposite charges. Protons repel other protons because they carry the same charge (see below). Electrons behave in much the same way towards other electrons. The force doing the attracting and repelling, or pulling and pushing, is called the electrostatic force. Electrons are attracted to the nucleus of an atom because it contains the positively charged protons. Electrons that are closer to the nucleus of an atom feel a stronger electrostatic force towards the nucleus than those further away from the nucleus. The distance between the charges greatly affects the electrostatic force generated between them, whether it is an attractive force or repulsive force!
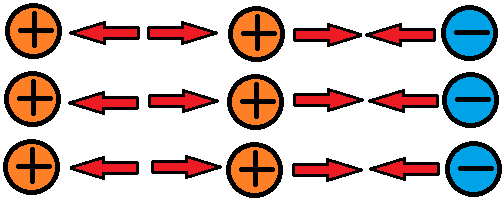
When the outermost electrons in an atom, called valence electrons, experience a strong enough electrostatic force, they can be bumped away from the atom. These electrons are free electrons because they travel through free space. Remember that atoms are so small that there is space between them, even in solid objects. The bumped electrons can be continuously attracted and repulsed along in a particular direction by electrostatic forces. This is a chain-like electron flow called electric current. Without electrostatic forces there would be no electric current. In the image below, the valence electron in the left-most atom is being bumped to the adjacent atom to the right, so in this example the attractive and repulsive electrostatic forces are pushing the electron from left to right.
The electrostatic forces pushing and pulling the electrons are generated by an electric field. Electric fields are models of physical interactions between objects of charge, just like a gravitational field is a model of the interaction between objects of mass (e.g., Earth and the Moon). Notice below that the field lines indicate the charges are attracted to each other. Had the red charge been a positive charge the field lines would point away, indicating a repulsive interaction. The difference between these models is that in electric fields the charges can move towards or away from each other whereas with gravity objects of mass only move towards each other. We cannot see electric fields just as we cannot see gravitational fields, but we can see the real effects they have on objects. It is relatively easy to provide evidence of the existence of electric fields by rubbing different materials together to generate static.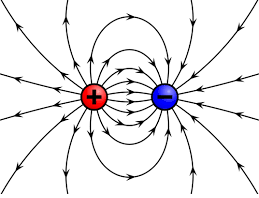
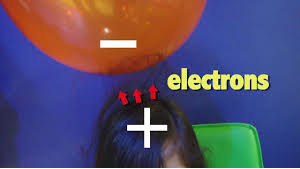
Touching two items together and then separating them can move electrons from one item to the other. The item that gains electrons will have a net negative (-) charge if the item has more electrons than protons. The item that loses electrons will have a net positive (+) charge if the item has fewer electrons than protons. When a balloon is rubbed on a person’s hair, for example, the balloon has a strong affinity for electrons and acquires more electrons from the hair. This gives the balloon a net negative charge. Meanwhile, the hair strands that have lost electrons to the balloon have a net positive charge (see image below). The opposite net charges are attracted to each other. Note that electrons are moved, not created, in this process. Charges will “stay put” unless the item is a conductor that lets electrons move about easily. An item with a net charge (positive or negative) is said to be charged or to have a charge imbalance. Different materials vary in how strongly they “hold on” to electrons. For solid materials the positive charges (protons) cannot leave or move about like the electrons.
Lesson Materials
Building Materials
-
-
- RAFT Makerspace-in-a-box
- Various adhesives, connectors, and fasteners (e.g., paperclips, binder clips, thread, yarn, adhesive foam pads, wooden stir sticks, straws, spoons, pipettes, labels & stickers, rubber bands, etc.)
- Materials (e.g., laminate samples, dust covers, foam pieces, deli containers, fishboard, cardboard tubes, plascore scraps, posters, shower caps, scrap materials, cards, etc.)
- Tape, glue, scissors, timer
- Recording materials: RAFT Makerspace Journal Pages (for each lesson)
- Optional: a binder for each student to keep their Makerspace Journal pages in.
- Tech: Classroom computer or TV to show videos.
-
External Resources
TED-Ed’s What Triggers A Chemical Reaction?
TED-Ed’s The Chemistry of Cookies.
Maker Journal Pages
Maker Journal Student Page: 4 Basic types of Chemical Reactions
Teacher Notes
Key concepts to highlight in this lesson:
-
-
- A common representation of the word “chemical reaction” invokes images of fluids being mixed in labs, but chemical reactions take place every day in biology, cooking, and the natural environment.
- 4 basic chemical reactions below:
- A synthetic reaction can be represented when students combine two objects together.
- A decomposition reaction can be represented when students take an object and break it down into parts.
- A single replacement reaction can be represented when students take two objects, break down one object down into parts, and attach those parts to the second object.
- A double replacement reaction can be represented when students take two objects, break down both objects into parts, and recombine the parts to create two new objects.
-
Learning Targets
-
-
- Students will ask questions and formulate hypotheses regarding the factors that affect the strength of electric forces
- Students will conduct an investigation to provide evidence that fields exist between objects exerting forces on each other even though the objects are not in contact
-
Assessment
Student Self Assessment
During the kinesthetic modeling activity, ask students to describe in their own words how they knew when and how quickly to move towards particular electric charges in the model. They should describe explicit instances of cause and effect relationships in terms of attractive and repulsive electric forces. The facilitator can address conceptual misunderstandings and clarify where needed.
Peer Assessment
Students in each group test the effect of 3-6 different materials on the merry-go-round and explain to a partner the relative rates of spin. Then they collaboratively arrange the materials from left to right in terms of increasing electric force generated by the material. Students apply their learning to clarify concepts for each other with facilitator input where needed.
Teacher Assessment
Ask students to do/answer the following:
-
-
- When using the static merry-go-round, describe instances where electric forces are repulsive and attractive. Students should correctly use the terms electric charge, electric field, and magnitude in their description.
- In what ways can the materials used in the static investigation be used to make predictions about the behavior of the merry-go-round?
- Describe specific examples of how you might investigate the hypothesis you developed as part of this lesson. Be as specific as possible!
-
Lesson 3: Define: What is the cost of making synthetic materials?
Define – state or describe exactly the nature, scope, or meaning of.
Define phase – Lessons that builds on student’s methods, skills, knowledge of core concepts.
Essential Questions:
-
-
- What’s the impact of creating synthetic materials?
- What is a Life Cycle Analysis (LCA)?
-
Lesson Overview
This define phase highlights the dangers of creating synthetic materials, and introduces students to the industry-standard of determining the environmental impact of products we use. Students will take part in filling out an LCA to compare two article of clothing, and report their findings to their peers.
Lesson Procedure:
-
-
- Remind students that in the empathy stage we discussed the potential dangers in creating synthetic materials from natural resources. Have students recall their reasons, and highlight the following dangers if students did not:
- the depletion of natural resources
- the impact of pollution and biodegradability
- the energy needed to create new materials
- Introduce to students that to understand the dangers we are creating when we use natural resources to create synthetic resources, we created a system to gather and sort information to understand the environmental dangers of the products we create. This process to gather and sort information is called the Life Cycle Analysis or LCA.
- Show This is Your Lifecycle and discuss with students the five categories that are assessed.
- Break students into groups, introduce assignment and pass out MakerJournal. The assignment asks students to determine the environmental impact of two pieces of clothing by filling out an LCA for each, by researching the information needed for the five categories. Once information is filled out, follow the grading system to determine the environmental impact.
- Remind students that in the empathy stage we discussed the potential dangers in creating synthetic materials from natural resources. Have students recall their reasons, and highlight the following dangers if students did not:
-
![]()
-
-
- Follow-up with discussion and reflection from students on the core concepts covered and about their learning experience so far.
-
Sample teacher and student dialog
T: We touched upon this already, but today we will dive deeper into the impact of creating synthetics. What were some lessons we talked about?
S: We talked about pollution, we talked about the health of animals and life, we talked about depleting our natural resources.
T: That’s right. These are things we must think about as move forward, but just thinking about it won’t help solve the problem, we have to understand it more deeply. Scientists have many tools to organize information that they learned through their experiments, or information learnt through their research and experiments. Let’s watch this video and we’ll talk about it afterwards.
T: It was mention in this video that there were five areas where we want to get data about. What were those five areas?
S: It said, there it has 5 stages, as a natural resource, to its manufacturing, then its distribution, then to its stage being used by consumers like us, and finally to it’s end in the dump or the recycling center.
T: Exactly, we are going to take an article of clothing, one that you don’t have to take off, maybe a jacket or something. Your group is going to use that tag that it comes with, and we’re going to create an LCA for that selected piece of clothing. Then we’re going to compare it with each other to see where their environmental impact.
![]()
Lesson Materials
Tech
-
- Computers or mobile devices
- Internet access
External Resources
Disrupt Design’s “This is Your Lifecycle”
Maker Journal Pages
Maker Journal Student Page: Life Cycle Analysis (LCA) Tool
Teacher Notes
Key concepts to highlight:
-
-
- LCA is a real-world tool used to measure environment impact
- A real LCA will have much more variables and information
- This practice LCA allows students to practice finding information and organizing information with a scoring system.
- Ask students what other variables they would put in to make the LCA even more useful.
-
Model Digital Citizenship:
-
-
- Highlight to student good researching practice, Common Sense Media has developed grade-appropriate resources to teach this.
- Practice citation of information and using multiple sources.
-
Learning Targets
-
-
- Students will gather and make sense of information using the LCA as a tool.
- Students will use good practices in finding and vetting information online.
-
Assessment
Student Self Assessment
Have students access the LCA tool, and what they would do to improve it, what more information would they want in it, and what other variables can shape the how we use the tool.
Design Challenge: Can your group create a product that addresses a school need from natural and synthetic materials?
In the culminating project, students are challenged to work as a team and create a product that addresses a need at their school; the product should use both natural and synthetic materials and come with a Life Cycle Assessment.
Essential Questions:
-
-
- Can your group create a product that addresses a school need from natural and synthetic materials?
- What were you able to learn by testing your design? How can you use that knowledge to iterate your design?
- What methods did you use to understand the needs of your school?
-
Lesson Procedure
-
-
- Remind students that we have learned so much about the process in which natural materials are converted into synthetic materials, and why that process is beneficial and how it can be harmful to the environment.
- Assign groups, and present the design challenge: Can your team create a product that addresses a need for this school that uses both natural and synthetic material?
- Introduce students to suggested criteria and constraints of their Design Challenge:
-
Criteria (design requirements)
-
-
-
- Must research from fellow schoolmate what they think can contribute to the school.
- Must use a combination that is both synthetic and natural.
- The product must come with an LCA.
-
-
Constraints (design limitations)
-
-
-
- Product can not be too heavy.
- Product should not be harmful to other students.
- Product should not be harmful to environment.
- Allot time for groups to interview their schoolmates and teachers, and get an understanding of what product students and the school might need.
- Allow students time to brainstorm, and sketch ideas in MakerJournal (Define and ideate stage).
- Allow students to build an initial design (prototype stage).
- Allow students to test and reflect (test stage).
- Allow students to iterate on their design (iteration cycle).
- Ask students to recap by sharing their reflection and curiosity about the core concepts and their learning experience so far.
-
-
T: We are going to conclude our lessons on synthetics with a design challenge. We have learned what goes into our products, and in this design challenge we’re going to build something for our school, for our fellow schoolmates. We want to create a product that can be useful for the school, but how do we find that out?
S: We can do some research, maybe a survey, to get an idea.
T: We’ll be working with another class, and we’re going to do what companies do, interview people to gather information for our product. What are some questions you might ask?
S: What is it you need? What concerns you? What do you want to fix?
T: Now that we have gathered our data on what your fellow schoolmates might need, let’s a take a minute to compile that. Your challenge is: Can your team create a product that addresses a need for this school that uses both natural and synthetic material?
Remember, every design has to have rules, and those rules are set in the Criteria and Constraints. The criteria are must-haves in your design, the constraints are things you can not have, can not do.
Criteria (design requirements)
-
-
- Must research from fellow schoolmate what they think can contribute to the school.
- Must use a combination that is both synthetic and natural.
- The product must come with an LCA.
-
Constraints (design limitations)
-
-
- Product can not be too heavy.
- Product should not be harmful to other students.
- Product should not be harmful to environment.
-
Ideate
Have students work in groups, and brainstorm then sketch out their game board and circuitry on paper. Ask students to label key components of their game and of the circuitry of theeir game. Explain to students their sketches will be a part of their journal, and will be used to mark down where the device needs improvement.
T: Let’s take a moment to talk to each other. Think about the challenge, the criteria and the constraints, and think about what your product will look like and how it will work?
S: [Give students 5 minutes to talk to each other.]
T: Okay, now let’s take 5-10 more minutes and draw out a sketch of what important materials you have in your product and how they work. Remember this sketch will be important later when we identify what might have failed, and what might need some improvements on.
S: We have too many ideas and no one is listening.
T: Let’s follow some important brainstorming rules. 1. One person talks at a time. 2. When sharing ideas, try to summarize your idea like a heading of a newspaper. 3. Write down every single idea. 4. Group all the ideas together on the commonality.
Prototype
If a makerspace is available at your site, the prototyping phase is most conducive in this environment. Alternatively, supplies from RAFT’s Makerspace-in-a-box can be presorted on a table so that students can easily see, take, and return materials. Have students select a materials manager to bring supplies and avoid any potential traffic jams in the classroom.
Display criteria and constraints rules somewhere visible to all students. Allow students 10-15 minutes of build time, and then 10 minutes of testing in front of the class. This structure works for classrooms with less space, limited the testing area. This encourages group presentation during the testing phase where everyone gets to see each group test and present their design.
Alternatively, allow for 20-25 minutes of combined build and testing time. This structure works for larger classroom with more available testing areas, and students who work better through self-organizing. In this model, students get to test freely as they build, and can go through more iterations.
T: Let’s take our sketches and start creating our prototypes. Remember, only the supply coordinator should make it up to get supplies. We’ll have 15 minutes to try to create our first prototype. Don’t worry about if you can’t finish on time, remember it’s our first prototype but we’ll have a second iteration.
S: We can make anything we want.
T: Yes, but remember it has to fit into the criteria and the constraints.
S: What happens if we need help?
T: First ask your team members, then if your whole team still need a bit of help, let an adult know.
Test and Reflect on your Design
Testing can be done in groups with each group taking turns to present in class, this helps to build public speaking and is a fun way of learning that failure points in your device are completely a natural part of engineering. Testing can also be done during build time to reduce pressure and induce more participation. Have students come up to testing area, and demonstrate their completed circuit boards.
Guiding Questions:
What need was your product trying to address? How is it suppose to work?
Were you able to use both natural and synthetic materials?
How were you able to connect your materials together?
What would you improve on your design for the next time?
T: Okay everyone, let’s stop for a moment and take some time to do a test of our devices. Remember testing in engineering really isn’t for a grade, it’s for us to understand how our device is working and how we can improve on it. Let’s get a group to come up and test their design.
S: Our design isn’t done yet, but here is how we planned it out with our sketch.
T: It’s okay, remember these are models and right now we’re just curious what you have in mind, how the building process is going for you, so you can show us the sketch of whatever you might have. Tell us about your design. How did it meet the criteria and constraints?
Engineering Design Process
The engineering design process is an iterative process. Through testing, and data collecting (or lessons learned) engineers recreate through several iterations the design changes progresses incrementally until a final solution is created. There are many examples of the engineering design process, but all will follow the same principles of understanding a problem, brainstorming ideas, prototyping a solution, testing the solution, and reiterating the process.
Design Challenge Materials
-
-
- RAFT Makerspace-in-a-box
- Various adhesives, connectors, and fasteners (e.g., paperclips, binder clips, thread, yarn, adhesive foam pads, wooden stir sticks, straws, spoons, pipettes, labels & stickers, rubber bands, etc.)
- Materials (e.g., laminate samples, dust covers, foam pieces, deli containers, fishboard, cardboard tubes, plascore scraps, posters, shower caps, scrap materials, cards, etc.)
- Tape, glue, scissors, timer
- Recording materials: RAFT Makerspace Journal Pages (for each lesson)
- Optional: a binder for each student to keep their Makerspace Journal pages in.
- Tech: Classroom computer or TV to show videos.
-
Tech
-
-
- N/A
-
Other
-
- Batteries
Maker Journal Pages
![]()
Teacher Notes
Normalize that failing is a way of learning that is common for all people, even professionals such as engineers, scientists, doctors, lawyers, and athletes. Have signage around the class that supports growth mindsets. Use acronyms such as First Attempt In Learning (F.A.I.L).
Allow students to work through challenges, even if it seems they are having a tough time. Reference criteria and constraints to students as guideline, rules, and instructions for their design, and refrain from giving too much clarification. Students will get it.
Active Classroom
Tips for success in an active classroom environment:
Communication is critical in the design process. Students need to be allowed to talk, stand, and move around to acquire materials. Help students become successful and care for the success of others by asking them to predict problems that might arise in the active environment and ask them to suggest strategies for their own behavior that will ensure a positive working environment for all students and teachers.
Practice and predict clean-up strategies before beginning the activity. Ask students to offer suggestions for ensuring that they will leave a clean and useable space for the next activity. Students may enjoy creating very specific clean-up roles. Once these are established, the same student-owned strategies can be used every time hands-on learning occurs.