Unit Overview: Have a Ball with Polygons!
Can you make a soccer ball out of recycled materials?
Have you ever thought about designing a soccer ball? What would it look like? What would it be made from? What kinds of polygon shapes make suitable surfaces for soccer balls? What are the criteria and constraints of a soccer ball?
This inquiry unit takes students through a sequence of lessons that focus on polygonal properties addressed in CCSS.Math.Content.6.G.A.1 . Students inspect a need to create a different type of soccer ball out of recycled materials. Students investigate polygons that compose into rectangles and those that decompose into triangles and other shapes, and they find the areas of right triangles, other triangles and other shapes. Students analyze polygons that fit together on a flat plane and those that fit together to approximate curved surfaces. In the final Design Challenge, students prototype, test, retest, and design “soccer balls” that meet all criteria and constraints.
Educational Outcomes
- Lesson 1: Empathy: Students watch a video about a boy from another country who doesn’t have the means to acquire a real soccer ball but is determined to make his own soccer ball with readily available recycled materials. Further inquiry leads students to empathize with a real-world reason for recycling and for repurposing materials to help solve problems; such as making a soccer ball out of plastic bags and string!
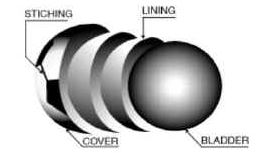
- Lesson 2: Define: The surfaces of actual soccer balls are comprised of adjoining polygons. In this lesson students explore and define polygonal attributes; including the area of right triangles, other triangles, special quadrilaterals, and polygons by composing them into rectangles and/or decomposing them into triangles and other shapes; students demonstrate understanding of polygonal attributes in the process of constructing all 7 parts of a Tangram puzzle.
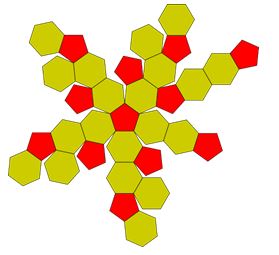
- Lesson 3: Define: Real soccer ball surfaces are made out of (slightly curved) pentagons and hexagons that adjoin without spaces and without overlaps. In this lesson, students investigate characteristics of polygons that fit together on a flat surface without spaces or overlaps (e.g., those that “tessellate”) and create surfaces made from tessellating polygons.
- Lesson 4: Define: From flat tessellated surfaces made of polygons, students investigate how to make curved bowls with polygonal surfaces. Given a budget and prices for each type of polygon, student teams explain choices for combinations of polygons that best meet cost restrictions in their bowl surfaces.
- Lesson 5: Design Challenge — Ideate, Prototype, & Test: The final Design Challenge has students iterate ideating a model, prototyping, testing, redesigning, and retesting the model until all requirements are met; resulting in a soccer ball having polygonal surfaces and made entirely with recycled materials.
STEAM INTEGRATION
In this Inquiry Unit, students investigate various properties and attributes of different polygons by analyzing the surfaces of soccer balls and then recreating soccer balls made from recycled materials. Through the lessons in this unit, student teams find the areas right triangles, other triangles, special quadrilaterals, and polygons by composing them into rectangles or decomposing them into triangles and other shapes (CCSS.Math.Content.6.G.A.1 ). Then they apply these techniques in the context of solving a real-world problem — in this case, finding a way to make a soccer ball out of recycled materials so playing a game of soccer is accessible for anyone anywhere.
In the Empathy phase of Lesson 1, students identify the story of a boys’ dilemma; wanting to play soccer but not having access to a soccer ball. The boy solves the problem by creating a “soccer ball” out of readily available recycled plastic bags and string. In this lesson, students investigate attributes of soccer balls and creative solutions for repurposing recycled materials to solve a variety of problems. In the Define phase of Lesson 2, students examine the types of polygons that appear on actual soccer balls. This leads to exploring and defining polygonal attributes through the process of making a Tangram puzzle; including finding the area of right triangles, other triangles, special quadrilaterals, and polygons by composing them into rectangles and/or decomposing them into triangles and other shapes; CCSS.Math.Content.6.G.A.1. Pentagons and hexagons on soccer balls align together on a curved surface without gaps or overlaps. Prior to investigating polygons on curved surfaces, in the Define phase of Lesson 3 students consider attributes of “regular” polygons that align together without gaps or spaces on flat surfaces. In the Define phase of Lesson 4, student teams contemplate how to “tessellate” a curved surface by creating bowls with combinations of polygons. Student teams must choose combinations of polygons that best meet cost restrictions given a set budget and prices for each type of polygon. In the Design Challenge (Ideate, Prototype, & Test) of Lesson 5, student teams iterate ideating a model, prototyping, testing, redesigning, and retesting the model until all requirements are met; resulting in a soccer ball made entirely out of recycled materials.
Suggestions for pacing and differentiation
For Lesson 3: adjust the amount of discussion in the Sample Teacher/Student Dialog to suit your needs. The lesson is presented in sections to investigate (or omit) at your own discretion. For example:
- Section 1: Types of symmetries for regular polygons
- Section 2: Regular polygon angular measurements
- Section 3: Regular polygons that “self-tessellate”
- Section 4: Regular polygons that tessellate with other regular polygons
Please click on the following links:
- Lesson 1: Maker Journal Page: My Recycle & Repurpose Sheet!
- Lesson 2: Maker Journal Page: Tangram areas
- Lesson 2: Maker Journal Page: Compose polygons & find their areas
- Lesson 2: Maker Journal Page: Decompose polygons & find their areas
- Lesson 3: Finding Vertical Symmetry
- Lesson 3: Comparing Types of Symmetries
- Lesson 3: Central Angles of Regular Polygons
- Lesson 3: Self-Tessellating Regular Polygons
- Lesson 3: Mixture of Tessellating Regular Polygons
- Lesson 4: Making Connections with Polygon Areas!
- Lesson 4: My Team’s Great Polygon Bowl Data Collection Sheet!
- Design Challenge: Criteria & Constraints for Our Soccer Ball
- Design Challenge: Our Soccer Ball Design Process!
- Extra Journal Page
Our design thinking units have five phases based on the Stanford d.school’s* model. Each phase can be repeated to allow students to re-work and iterate while developing deeper understanding of the core concepts. These are the five phases of the design thinking model:
EMPATHIZE: Work to fully understand the experience of the user for whom you are designing. Do this through observation, interaction, and immersing yourself in their experiences.
DEFINE: Process and synthesize the findings from your empathy work in order to form a user point of view that you will address with your design.
IDEATE: Explore a wide variety of possible solutions through generating a large quantity of diverse possible solutions, allowing you to step beyond the obvious and explore a range of ideas.
PROTOTYPE: Transform your ideas into a physical form so that you can experience and interact with them and, in the process, learn and develop more empathy.
TEST: Try out high-resolution products and use observations and feedback to refine prototypes, learn more about the user, and refine your original point of view.
*The Design Thinking Process | ReDesigning Theater. (n.d.). Retrieved April 2, 2016, from http://dschool.stanford.edu/redesigningtheater/the-design-thinking-process/
CCSS.Math.Content.6.G.A.1
Find the area of right triangles, other triangles, special quadrilaterals, and polygons by composing into rectangles or decomposing into triangles and other shapes; apply these techniques in the context of solving real-world and mathematical problems.
NGSS Middle School Engineering Design Performance Expectation MS-ETS1-1
Define the criteria and constraints of a design problem Make a soccer ball from plastic bags and string
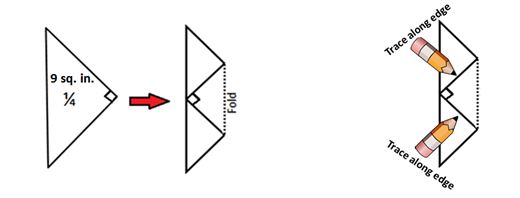
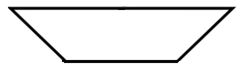
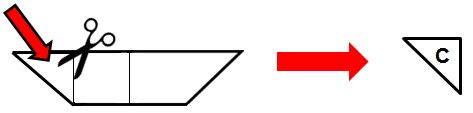
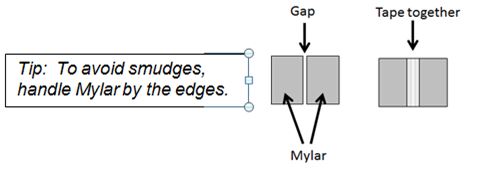
Background Information Please click on the following link: Assessment Forms Please click on the following links: (one per student) Review all student Makerspace Journal pages for formative assessment. Other Examples of actual soccer balls Please click on the following tally sheet link: Lesson 1 Overview Students watch a video about a boy from another country who doesn’t have the means to acquire a real soccer ball but is determined to make his own soccer ball with readily available recycled materials. In this lesson, students examine what it means to empathize with a real-world reason for recycling and for repurposing materials to help solve problems; such as making a soccer ball out of plastic bags and string! Essential Questions: Guiding questions when coaching students: LESSON PROCEDURE Professional Preparation: Lesson Format A Sample Teacher/Student(s) Dialog: The following is a sample dialog between the teacher & the students for this lesson. (Note: T stands for teacher, and S stands for student, with additional advice in parenthesis). T: (Invite students to look around the Makerspace for 5 minutes, and then ask them to prepare for a whole group discussion). T: What does it mean to have empathy for something? S: (answers vary…. to feel something that another person feels, etc.) T: Caring helps us to understand, connect, and to make decisions. When we empathize we have the feeling of “getting” what someone else is going through. What do you notice about the materials in your Makerspace? S: (answers vary…. lots of everyday common stuff, things that once were used for something else, etc.) T: What does it mean to recycle? To repurpose? S: (answers vary….) T: Do you think it is important to recycle and to repurpose? Why? (discuss various answers… ask for examples) T: How does finding new uses for recycled materials help to solve problems? (discuss various answers… ask for examples) (Hand Maker Journal pages to students. Ask students to look around the Makerspace and record their thoughts on the Journal Page: Lesson 1: Maker Journal Page: My Recycle & Repurpose Sheet! . Regroup together after approximately 25 minutes and share results). S: (answers vary….) T: (Have the class watch the video : Make a soccer ball from plastic bags and string ). T: Why did this boy use recycled materials? S: Because he wanted to make a soccer ball since he didn’t have one of his own. T: Why do you think he decided to make a soccer ball out of plastic bags and string? S: Because he had a lot of them to use … (answers vary…) T: What properties of the ball do you think he was looking for? S: (e.g., strength, ability to kick it around and not break, large enough to use, easy to make, inexpensive, available to anyone, etc.) T: What did he do to make the soccer ball? S: (e.g., he kept adding bags within bags, then tightening them up with string so the “ball” was strong enough to kick) T: What other recycled materials could he have made a soccer ball out of? S: (Answers vary… ) T: How was his soccer ball different to a real soccer ball? How was is similar? S: (Answers vary… ) T: How was the way the boy’s homemade recycled soccer ball important/useful to him? S: (Answers vary… it allowed him to play soccer! He was able to enjoy a game of soccer without spending lots of money on a soccer ball….) T: (Have the class watch the video : 2o Awesome Creative Recycling Ideas). T: Did this video help you think differently about recycling and repurposing? How? S: (Answers vary…) Vocabulary Empathy: Repurposing (click on the underlined word for the definition): Recycling (click on the underlined words for their definitions): The three chasing arrows of the international recycling logo. It is sometimes accompanied by the text “reduce, reuse and recycle”. Please click on the following video links: Please click on the following links: Communication is critical in the design process. Students need to be allowed to talk, stand, and move around to acquire materials. Tips for success in an active classroom environment: 1 – Students can access any wall, board, or surface to gather and explore ideas — students personalize the working space to meet their needs. 2 – Students have regular opportunities to make choices, including choices about what they learn and how they learn it. 3 –Encourage students to learn and to demonstrate what they’ve learned in ways that best suit their individual learning styles. 4 – It is not a free-for-all! Amount of prep and planning is evidenced by quality of student work and level of students’ engagement. All is carefully thought out in advance. 5 – A lot of meaningful conversations — between teacher and students and also among students. Lots of questions asked by and of students. Teacher often manages the conversation, but the students and their thoughts, ideas, and questions determine the scope and direction of the conversation. 6 – Instead of teacher or textbook giving answers or info, students discover ideas through inquiry and exploration. They figure out solutions and answers on their own. 7 – Tests and quizzes are sometimes needed, but focus assessment on student-created “learning artifacts” — students complete these products to demonstrate in-depth knowledge and understanding key topics. 8 – The focus is on the ultimate goal of student thinking… Every activity, lesson, and project is geared toward deepening and strengthening students’ critical thinking skills. Students analyze, question, explore, and evaluate on a regular basis. 9 – Help students become successful and care for the success of others by asking them to predict problems that might arise in the active environment and ask them to suggest strategies for their own behavior that will ensure a positive working environment for all students and teachers. 10 – Practice and predict clean-up strategies before beginning the activity. Ask students to offer suggestions for ensuring that they will leave a clean and usable space for the next activity. Students may enjoy creating very specific clean-up roles. Once these are established, the same student-owned strategies can be used every time hands-on learning occurs. Students will be able to: Please click on the following links: (one per student) Review all student Makerspace Journal pages for formative assessment. Building Materials RAFT Makerspace-in-a-box -or- Assorted polygon shapes made from recycled materials (preferably all edges the same length, multiple sets of each polygon type), paper squares (at least 5 x 5 inches; 1 per student), other paper (at least 11 inches by 17 inches; 1 per students), scissors, pens or pencils, calculators, rulers. Connecting Materials Various adhesives and fasteners (staplers, tape, glue) Background Information Please click on the following link: Other Examples of actual soccer balls Lesson Overview In order to create solutions, students need time to investigate various approaches and to hear differing viewpoints from one another. In this lesson students explore and define polygonal attributes; including the area of right triangles, other triangles, special quadrilaterals, and polygons by composing them into rectangles and/or decomposing them into triangles and other shapes; students demonstrate understanding of polygonal attributes in the process of constructing all 7 parts of a Tangram puzzle. Essential Questions: LESSON PROCEDURE: Professional Preparation: Lesson Format A Sample Teacher/Student(s) Dialog: The following is a sample dialog between the teacher & the students for this lesson. Feel free to shorten or lengthen as you see fit. (Note: T stands for teacher, and S stands for student, with additional advice in parenthesis. TPS stands for “think, pair, share”). T: In Lesson 1 we understood a need to create a different soccer ball with recycled materials. Real soccer balls have adjoining shapes, or polygons, on their surfaces. What types of polygons do you see on a real soccer ball? (Display a real soccer ball for students to see) S: Pentagons and Hexagons! T: How many sides does a pentagon have? A hexagon? S: Pentagons have 5 sides and hexagons have 6 sides. T: What do you notice about the pentagons and hexagons on the soccer ball? (they all have the same length sides — so they are “regular” polygons). What do you notice about the number of angles on a pentagon? A hexagon? (review the names of polygons based on their number of sides and angles) (Show the video: Basic polygons ) T: What does “tri” stand for? (answer: “3”). What are the names of some triangles you know of? S: (Answers vary – e.g., Triangles can be called “right” if they have one 90° angle. Isosceles triangles have at least two sides the same length … and equilateral triangles have all 3 sides the same length… another name for an equilateral triangle in terms of its angles is an equiangular triangle because all 3 angles are the same. … etc.) T: The word “polygon” comes from the Greek poly, meaning “many,” and gonia, meaning “angle.” So, let me ask you, why is a triangle a polygon and why isn’t a circle a polygon? S: (Answers vary – e.g., a triangle is a flat, 2- dimensional closed geometric shape bounded by 3 or more straight line segments (called sides), and an equal number of points (called vertices), and a circle is not a polygon because it does not have straight sides! T: What does “quad” stand for? (answer: “4”). What are 4-sided polygons called? S: 4-sided polygons are called quadrilaterals. Squares are special quadrilaterals with all sides the same length and all angles 90°. T: What other types of quadrilaterals can you think of? S: (Answers vary). T: (review attributes of polygons: include vertices, measure and types of angles, convex vs. concave, equilateral vs. equiangular, base, height, regular vs. irregular, the 6 “special” quadrilaterals— rectangles, squares, parallelograms, rhombuses, trapezoids, and kites, etc.,) (Pass to each student: paper squares, scissors, calculators, and a copy of Lesson 2: Maker Journal Page: Tangram areas) T: Look at the top of your journal page. Notice the large square is composed of 7 polygons. Each polygon is called a “tan” and together all 7 pieces form what is called a “tangram” (which is an ancient Chinese puzzle meaning “7 pieces of cleverness”). Notice each tan is a polygon labeled with a letter. T: (Hold up a 6 x 6 inch square piece of paper for all to see). Take your whole square and fold it along a diagonal. Then cut along the fold line. What type of polygons do you obtain? TPS and then share your thoughts … S: (answers vary…. all the following are correct: 2 identical triangles, 2 right triangles, 2 isosceles triangles, 2 isosceles right triangles) T: (Cut your square along the diagonal and hold up the remaining 2 right triangles for all to see) …. A square can be decomposed into two congruent right isosceles triangles! The word “decompose” here means we took a polygon apart to create new polygons! If I told you the square had a side length of 6 inches, how could you find its area? How might you find the area of the two new triangles made from the square? S: (Answers vary –e.g., The area of the square is length times width, but since length = width, it is just 6 x 6 = 36 sq. units (inches). The area of each triangle is 18 sq. inches because each is half the area of the whole square). T: (Hold up the 2 right triangles for all to see)….. Let’s think about this another way ….. could you create a new polygon made out of other polygons? In other words, can you put these two right triangles together somehow to make another polygon? S: (Answers vary – e.g., I could make a parallelogram by putting together two right triangles —- ) T: You composed a parallelogram by putting together right triangles! Putting together polygons to make a new polygon is called composing. Taking apart a polygon to make new polygons is called decomposing! T: Set aside one of the large right triangles. Take the other large right triangle and fold it in half by dividing its right angle in half. Unfold, and then cut along the fold. What do you notice? S: (Answers vary) – I decomposed the right triangle into 2 smaller right triangles! T: Label one small triangle A, and the other B. How can you find the area of A or of B if you know the area of the large right triangle they both came from? S: (Answers vary) — Both A and B composed together have the same area as the original large right triangle = 18 square inches. So A has an area half that size, or (1/2)(18) = 9 square inches, and likewise so does triangle B. Also, each of A and B is one-fourth the area of the whole square, (¼)(36) = 9 square inches! T: Record how you found the area for triangles A and B on your journal page (allow time to write). Set both A and B aside. So far you made 2 of your 7 tans! T: Now return to the other large right triangle that you set aside earlier. Fold from its right angle to the midpoint of its hypotenuse. (Show students if need be…. see illustration below). Use a pencil to trace the edges along the sides of the right angle: S: (Answers vary) – I see 4 smaller right triangles, each equivalent in area and size. T: How can you figure out the area of each small triangle? (expand on why they are right triangles, etc.) S: (Answers vary) – the 4 small triangles compose the large triangle. The large triangle has an area of 18 square inches. Each small triangle is one-fourth the size of the large triangle. So, the area of each small triangle is (¼) (18) = 4.5 square inches, or one-eighth the size of the whole square! (also, 4.5 ÷ 36 = 0.125 = one-eighth!) T: Now cut along the fold line (NOT along the pencil lines!). Label this triangle G and set it aside. Look for figure G on your maker journal page and explain how you found the area for G. G is your third “tan”. What is the name of the remaining shape? S: After cutting off triangle G, I decomposed the large triangle into a trapezoid! T: How can you find the area of this trapezoid? (expand on why it is a trapezoid…) S: (Answers vary) –the area of triangle G is 4.5 square inches, or one-eighth the size of the whole square. Triangle G covers the trapezoid 3 times. So the area of the trapezoid = (3)(4.5) = 13.5 square inches! (or G is one-fourth the size of the large triangle, which means three-fourths of the large triangle is the area of the trapezoid = (¾)(18) = 13.5 sq. in.) T: Arrange your trapezoid so its longest edge is on top: T: Imagine a line going from the middle of the top edge to the middle of the bottom edge. Fold the trapezoid in half along this line! T: Unfold. Look at the top left vertex of the trapezoid. Bring this vertex to the top fold line (middle of the top edge) and then press. T: Unfold and cut out the upper left triangle you made from the fold. Label this triangle C. T: What part of the whole original square is C ? (allow time for students to figure this out — ) S: (Answers vary) – by overlaying C onto the trapezoid, I see it is one-sixth the size of the trapezoid. So the area of C is (1/6)(13.5) = 2.25 sq. in., or one-sixteenth the size of the whole square! S: (Answers vary) – When I compare to triangle G, I also notice the area of C is half the area of triangle G, or (½)(4.5) = 2.25 sq. inches! This also means C is one-sixteenth the size of the whole square (2.25 ÷ 36 = 0.0625 = 1/16)! T: Write in your journal how you found the area for C and then set C aside as another “tan” piece. So far you have 4 tans. What is the remaining shape? S: Another trapezoid! T: Arrange your trapezoid so its longest edge is on the top and 2 right angles are on the left. Notice the small square on the left side from the fold line. Take the upper left vertex and bend it down to the bottom of the fold line (along one diagonal of the small square). Crease along the diagonal, and then unfold. S: (Answers vary) – the area of the small square is the same as the area of 2 triangles that are each the size of triangle C. So the area of the small square is (2)(2.25) = 4.5 sq. in, or one-eighth the size of the original large square we started with. T: Cut along the fold, label square D, and record how you found its area in your journal. T: Look at the remaining polygon. Bring the top left vertex down to the bottom right vertex and press along the fold. T: Unfold and cut along the fold. What new polygons have you created by decomposing this trapezoid? S: One right triangle and one quadrilateral that is a parallelogram! T: Label the right triangle E, and the parallelogram F. How could you find the area of each of these polygons? S: The right triangle is half the area of square D, so the triangle’s area is (½)(4.5) = 2.25 square inches, or one-sixteenth the size of the large square. S: The area of the parallelogram can be found by noticing triangles C and E cover it entirely. Adding together the areas of C and E gives us the area of the parallelogram, which is 4.5 square inches, or one-eighth the size of the large square. T: Explain how you found the areas of all 7 tan pieces on your maker journal pages (allow time for this). —– What do you notice about the areas of parallelogram F, the small square D, and triangle G? (They all have the same area!) — T: How can polygons that look different from one another have the same areas? (TPS) T: We noticed traditional soccer balls have pentagons and hexagons on their surfaces … could you compose a pentagon from some tan pieces? A hexagon? (Allow time to explore….) (Ask students to TPS or to work in small groups to discuss and record findings in their maker journals —- afterwards students share what they have learned about polygonal areas, composing and decomposing polygons): Area of a polygon: Composing Polygons: Decomposing Polygons: Polygonal Review: Click on the following for further information about polygons: A Polygon Review for Teachers A Polygonal Net for a Soccer Ball: Please click on the following video link: Please click on the following links: Adjust the amount of discussion in the Sample Teacher/Student Dialog to suit your needs. Press the link below to reference RAFT idea sheet “Tangram Tactics” for helpful background information/additional ideas: Communication is critical in the design process. Students need to be allowed to talk, stand, and move around to acquire materials. Tips for success in an active classroom environment: 1 – Students can access any wall, board, or surface to gather and explore ideas — students personalize the working space to meet their needs. 2 – Students have regular opportunities to make choices, including choices about what they learn and how they learn it. 3 –Encourage students to learn and to demonstrate what they’ve learned in ways that best suit their individual learning styles. 4 – It is not a free-for-all! Amount of prep and planning is evidenced by quality of student work and level of students’ engagement. All is carefully thought out in advance. 5 – A lot of meaningful conversations — between teacher and students and also among students. Lots of questions asked by and of students. Teacher often manages the conversation, but the students and their thoughts, ideas, and questions determine the scope and direction of the conversation. 6 – Instead of teacher or textbook giving answers or info, students discover ideas through inquiry and exploration. They figure out solutions and answers on their own. 7 – Tests and quizzes are sometimes needed, but focus assessment on student-created “learning artifacts” — students complete these products to demonstrate in-depth knowledge and understanding key topics. 8 – The focus is on the ultimate goal of student thinking… Every activity, lesson, and project is geared toward deepening and strengthening students’ critical thinking skills. Students analyze, question, explore, and evaluate on a regular basis. 9 – Help students become successful and care for the success of others by asking them to predict problems that might arise in the active environment and ask them to suggest strategies for their own behavior that will ensure a positive working environment for all students and teachers. 10 – Practice and predict clean-up strategies before beginning the activity. Ask students to offer suggestions for ensuring that they will leave a clean and usable space for the next activity. Students may enjoy creating very specific clean-up roles. Once these are established, the same student-owned strategies can be used every time hands-on learning occurs. Students will be able to: Please click on the following links: (one per student) Review all student Makerspace Journal pages for formative assessment. Building Materials RAFT Makerspace-in-a-box -or- Assorted regular polygon shapes made from recycled materials (all edges the same length, multiple sets of each polygon type), paper squares (6 x 6 inches; 1 per student), scissors, pens or pencils, calculators, rulers. Examples of real soccer balls. Connecting Materials Various adhesives and fasteners (staplers, tape, glue) Background Information Please click on the following link: Lesson 3 Overview Surfaces of soccer balls have polygons that fit together without gaps and without overlaps. As a precursor to curved polygon surfaces, this lesson invites students to investigate flat surfaces constructed of “regular” polygons that fit together to “tile”, or “tessellate”, a floor. This Define phase explores polygonal placement with the following investigations; symmetry and angular measurement of regular polygons; determining which regular polygons self-tessellate; and finding combinations of different regular polygons that tessellate together. Students will compare floor “tessellations” to the surface of a soccer ball made of hexagons and polygons and identify the importance of this information for the final Design Challenge project. Essential Questions: LESSON PROCEDURE: Professional Preparation: Lesson Format Optional: pass out compasses and/or protractors. A Sample Teacher/Student(s) Dialog: The following is a sample dialog between the teacher & the students for this lesson. Feel free to shorten or lengthen as you see fit. (Note: T stands for teacher, and S stands for student, with additional advice in parenthesis. TPS stands for “think, pair, share”. Adjust the amount of discussion in the Sample Teacher/Student Dialog below to suit your needs. Perhaps break the lesson into sections (suggested below in the dialog) to investigate (or omit). Section One: Types of symmetries for regular polygons T: We are investigating polygons so we can design new soccer balls. What are regular polygons? Can you give me an example of regular polygons? S: (answer vary…) A regular polygon has all its sides and angles the same measure! Examples: squares, equilateral triangles, … T: Think about polygons you might have seen as tiles on a floor (squares, triangles, regular hexagons, etc.)….. What do you notice about the way the tiles are placed in the floor design? S: (answer vary…) They have grout in between them…. T: Think about polygons tiling a floor without grout …. What would be important to know about the arrangement of the tiles in order to create a real floor? S: (answer vary…) The tiles would have to fit snug against each other without gaps and without overlapping on top of each other…. T: A pattern made completely out of polygons that do not overlap each other and that do not have gaps in between them is called a “tessellation”. A soccer ball isn’t flat, but it does have polygons on its surface that appear to “tessellate”. In order to tessellate with polygons, we need to first think about how to arrange them on a flat floor, or surface…. (Arrange student teams. Pass out polygon sets and mirrors, optional compasses/protractors. Also pass out the following Student Maker Journal Page: Lesson 3: Finding Vertical Symmetry ) What do these two pictures have in common? S: (Answers vary…. they can be cut in half by a vertical line, making two identical halves). T: What do you mean by “identical” ? S: (Answers vary…. the halves are actually mirror images of each other….) T: To help us see this, take your mirror and place it upright and vertically along the middle of each picture. Look into the mirror on one side to see the reflection. If the features on one side of each figure have matching features on the other side then the mirror placement on these figures is called a line of reflection, or a mirror line. The type of reflection we are now looking at is called “vertical symmetry”. Record what you observe in the mirror on your Maker Journal page (allow time for them to fill out journals, and to TPS what they discovered with the rest of the class). T: What if you place the mirror on a figure horizontally? What do you think we mean by horizontal symmetry? S: Horizontal symmetry means a figure’s reflection in the mirror looks the same along the horizontal line of reflection! The butterfly has vertical symmetry but it doesn’t have horizontal symmetry! S: That’s because when I hold the mirror along the horizontal part of the butterfly, the top of it doesn’t match the bottom half of it! Same thing about the human face! T: (Pass out journal page: Lesson 3: Comparing Types of Symmetries ). Some figures also have what is called “Rotational” symmetry. A figure has rotational symmetry if it appears the same after being turned less than 360 degrees (a full turn) S: The turn must be less than a full one otherwise all figures would have rotational symmetry! Section Two: Regular polygon angular measurements T: I like how you focused on that point! Notice on your journal page “Comparing Types of Symmetries” there are several different shapes. Some only have vertical symmetry. Some only have horizontal symmetry, some have both vertical and horizontal symmetry, and some have rotational symmetry! How many lines of reflection can you find? Use your mirrors to find and compare these symmetries, TPS with a partner, and then record your observations. (If time allows, review answers: A, B, C, E , F, and H all have vertical (reflectional) symmetry. D, E, F, and H all have horizontal (reflectional) symmetry. This shows that some pictures have both vertical and horizontal (reflectional) symmetry. E, F, and H have rotational (reflectional) symmetry. G does not have any reflectional symmetry). (Pass out (remaining) Mylar, tape, protractors, and/or compasses. Lead students in assembling hinged mirrors, 1 per team of students) T: Place the two 7.5 cm x 5 cm (3” x 2”) Mylar pieces side-by-side lengthwise, highly reflective sides down. Leave a small gap between the strips -the gap should be about twice the thickness of the Mylar. Attach the pieces together with tape lengthwise – the tape will act as a hinge. T: How many degrees are in a circle? (If needed, review how to read and use a protractor and compass with the students). S: 360 degrees! T: (Pass out the handout: Hinged Mirror Kaleidoscope). Arrange your hinged mirror so the bottom edges of it rest along the black lines on the handout. TPSdifferent shapes and images while you move the angle of the mirrors…. What do you notice? S: (Answers vary…. T: The mirror angle (also called the apex angle or central angle of a polygon) is the angle between the mirrors when the regular polygon is formed. What regular polygon has a mirror angle of 120°? S: An equilateral triangle! (The mirror angle of a square is 90°. The mirror angle of a regular hexagon is 60°, and the mirror angle of a regular octagon is 45°) T: Notice the smaller the mirror angle (or central angle), the greater the number of equal sides in the polygon. How do these measures relate to 360°? (Answer: central angles add up to a full circle, or 360°, so the measure of the central angle is 360 divided by the number of sides. the number of degrees surrounding a point is always 360: for example 120° = 360°/3, 90° = 360°/4, 60° = 360°/6, 45° = 360°/8, and so on) T: How can we say this for any regular polygon with n sides? (Answer: the mirror angle of a regular polygon having n sides has a measure of 360°/n). T: How could knowing this help you find the mirror angle of a regular pentagon? (Answer: there are 5 equal sides in a regular pentagon, so the mirror angle = 360°/5 = 72°) (Pass out the Student Maker Journal Page: Lesson 3: Central Angles of Regular Polygons) T: Notice the equilateral triangle on your journal page. If you were to draw a line from any two adjacent vertices to the center, they would make the central angle. The central angle of the equilateral triangle is 120°. (Optional: To double check this lay the hinged mirror on top of the polygon so its angle measurement is at the center of the polygon and the bottom edges of the mirror point to two consecutive vertices — showing the polygon’s reflection in the mirror. Mark the center on the polygon. ) T: Line segments drawn from each vertex to the center of the triangle cause it to form 3 inner triangles. Who can explain why each of the base angles of each inner triangle are 30°? S: The sum of the angles in a triangle is 180°. If you subtract the central angle measure from 180° you get the total measure of both base angles. But both base angles are equal, so half of that amount is the measure of each base angle in the inner triangles. 180° – 120° = 60°. So the base angles of each inner triangle are all have of 60° = 30°. Section Three: Regular polygons that “self-tessellate” T: Angular measurements are useful to know when you tessellate a floor design with regular polygons. (Pass out Student Maker Journal page: Lesson 3: Self-Tessellating Regular Polygons ) T: Teams take one shape from your sets of regular polygon shapes, and trace it onto your journal page to show how it self-tessellates (after time, have teams share findings with class — use backside or other paper if need more room). S: (team answers vary — discuss how angles meet at 360° together and that the only regular polygons that self-tessellate are squares, regular triangles (some turned upside down to fit together) , and regular hexagons) Section Four: Regular polygons that tessellate with other regular polygons T: How does the surface of a soccer ball compare to a flat tessellated floor surface made of regular polygons? S: (Answers vary … both contain regular polygons that tessellate together without gaps and without overlaps. The soccer ball surface is curved and the floor is flat. Only certain shapes fit together to tessellate a surface, …. , etc.) T: (Pass out Student Maker Page: Lesson 3: Mixture of Tessellating Regular Polygons ). T: A regulation 5 soccer ball has 2 different types of regular polygons on the surface — pentagons and hexagons. Now I want you (teams or individuals) to experiment tessellating a pattern with at least 2 different types of regular polygons onto your journal page. (Remind it is ok to turn pieces so they fit together). After journal entries, suggest students (or student teams) trace polygons onto large paper, creating tessellations with at least 2 different regular polygons, and then coloring them. Share designs with the class. Optional: class reviews with the video: What is a Tessellation? Central Angle: The central angle of a regular polygon is formed by two lines from consecutive vertices to the centre point. If n is the number of sides of a polygon: The central angle = 360°/n. The central angle of the regular pentagon = 360°/5 = 72º Polygonal Review: Click on the following for further information about polygons: A Polygon Review for Teachers Regular Polygon: Is a polygon having all angles equal (congruent) and all sides equal (congruent); otherwise it is called an irregular polygon. Tessellate: from Late Latin tessellatus “made of small square stones or tiles,” from tessella “small square stone or tile,” diminutive of tessera “a cube or square of stone or wood,” perhaps from Greek tessera Please click on the following link: Please click on the following links: Please press on the following link to preview: Communication is critical in the design process. Students need to be allowed to talk, stand, and move around to acquire materials. Tips for success in an active classroom environment: 1 – Students can access any wall, board, or surface to gather and explore ideas — students personalize the working space to meet their needs. 2 – Students have regular opportunities to make choices, including choices about what they learn and how they learn it. 3 –Encourage students to learn and to demonstrate what they’ve learned in ways that best suit their individual learning styles. 4 – It is not a free-for-all! Amount of prep and planning is evidenced by quality of student work and level of students’ engagement. All is carefully thought out in advance. 5 – A lot of meaningful conversations — between teacher and students and also among students. Lots of questions asked by and of students. Teacher often manages the conversation, but the students and their thoughts, ideas, and questions determine the scope and direction of the conversation. 6 – Instead of teacher or textbook giving answers or info, students discover ideas through inquiry and exploration. They figure out solutions and answers on their own. 7 – Tests and quizzes are sometimes needed, but focus assessment on student-created “learning artifacts” — students complete these products to demonstrate in-depth knowledge and understanding key topics. 8 – The focus is on the ultimate goal of student thinking… Every activity, lesson, and project is geared toward deepening and strengthening students’ critical thinking skills. Students analyze, question, explore, and evaluate on a regular basis. 9 – Help students become successful and care for the success of others by asking them to predict problems that might arise in the active environment and ask them to suggest strategies for their own behavior that will ensure a positive working environment for all students and teachers. 10 – Practice and predict clean-up strategies before beginning the activity. Ask students to offer suggestions for ensuring that they will leave a clean and usable space for the next activity. Students may enjoy creating very specific clean-up roles. Once these are established, the same student-owned strategies can be used every time hands-on learning occurs. Students will be able to: Please click on the following links: (one per student) Review all student Makerspace Journal pages for formative assessment. Building Materials -or – Regular polygon shapes (per team and all edges the same length: 10 regular triangles, 10 squares, 10 regular pentagons, 10 regular hexagons, and 10 regular octagons) Scissors, pens or pencils, crayons or colored pens Rulers and Protractors Rectangular mirrors, approx 4 in by 6 in, 1 per student team and/or… One set of Two 7.5 cm x 5 cm (3” x 2”) Mylar pieces, 1 set per student team Examples of real soccer balls Large Paper, 11 in by 17 in. per student Connecting Materials Various adhesives and fasteners (staplers, tape, glue) Handout Please click on the following link: Background Information Please click on the following link: Lesson 4 Overview Get ready; get set; it’s time for “The Great Polygon Bowl Contest”! Students know pentagons and hexagons appear on the curved surfaces of real soccer balls — now they enter a contest to discover if other types of polygons might fit together into curved bowl surfaces! This exploration will provide insights useful for the final Design Challenge project. Students incorporate regular, composed and/or decomposed polygons into their bowl designs. In addition, each regular polygon has a fictitious price of 10 cents. The contest requires each team to create a bowl surface made of “tessellating” polygons costing no more than $1.00 (including the price of fractional parts of regular polygons — decomposed into or composed from regular polygons into other polygons — into the final bowl). The team winning the “Great Super Polygon Bowl” is the one with the best bowl costing closest to but not over $1.00 to make. Students will examine how cost restrictions might affect manufacturing choices, and explore other possible uses for bowl-shaped structures in real life. Essential Questions: LESSON PROCEDURE: Professional Preparation: Lesson Format A Sample Teacher/Student(s) Dialog: The following is a sample dialog between the teacher & the students for this lesson. Feel free to shorten or lengthen as you see fit. (Note: T stands for teacher, and S stands for student, with additional advice in parenthesis, TPS stands for “think, pair, share”). T: (arrange teams of students, ask teams to select a team name). How can knowing parts of a whole polygon help you find polygon areas? S: (answer vary…) If I know that half of a parallelogram is a triangle with an area of 4, then I know that two of those triangles make up the whole parallelogram, so the parallelogram has an area of 8! T: I like how your strategy of going back to what you recognize to help you find what you need! (Pass out to each student: Lesson 4: Making Connections with Polygon Areas! ) Work with your teams to think about how this works with the polygons you see on your journal page. (allow time for students to finish journal entries and then discuss as a class answers to the journal page). T: Who recalls what must happen in order for polygons to tessellate together? S: There can’t be any gaps and no overlaps! T: A regular tessellation means a tessellation made up of congruent regular polygons. Which equivalent regular polygons tessellate by themselves? S: (answer vary… but are limited to only 3 answers: triangles, squares, and hexagons). T: I have sets of regular polygons for each team. Choose one person from your team to pick up a set and return it to your team. T: Please take out only the eqivalent regular pentagons for now to look at with your teams. What happens when you try to tessellate 3 equivalent regular pentagons? (allow students time to explore this…) S: (answer vary…) you get gaps between them! T: Why? (might display a larger view of this for all to see …) S: The edges don’t all meet up so there is a gap that makes it impossible for the pentagons to tessellate! T: In other words, the central point (central angle) does not add to 360°! (Suggestion: have them compare this to central points of equivalent tessellating squares, triangles, and hexagons where there are no gaps between the edges). T: What would happen if you bring the edges of the regular pentagons on either side of the gap together? S: The pentagons will raise up creating a bowl-like shape! They wouldn’t lay flat. T: So we just found that some equivalent regular pentagons don’t self- tessellate (tessellate only by themselves) together. But could we tessellate regular pentagons with other equivalent regular polygons? S: You can make a soccer ball with tessellating pentagons and hexagons that all have the same length edges! T: Keep thinking about different polygons that might tessellate together…. Now I want to introduce you to …. “The Great Super Polygon Bowl” competition! (Pass out Student Maker Journal Page: Lesson 4: My Team’s Great Polygon Bowl Data Collection Sheet! ). T: Your team is commissioned to create a “bowl” made entirely out of a combination of different polygons! Here are the rules: S: (student teams TPS, create and record). T: (after a period of time, approximately 20 minutes or more): TOUCHDOWN! (teams finish recording, teacher assesses and announces the winners. Winning team members present how they determined the surface area of their bowl and what they learned about making a polygon bowl). T: (ask class): How does the surface of your bowl compare to the surface of a soccer ball? S: (answer vary…) T: How might cost restrictions affect manufacturing choices? S: (answer vary…) I had to think about sizes and prices and then which polygons fit together to curve into a pattern. T: What might be other uses for a bowl-like surface made of polygons? S: (answer vary… e.g., larger bowls could be made into inexpensive domed housing, which collapse into flat, easy to store/ship compartments when not in use; playground equipment, etc.) Congruent : means that the polygons that you put together are all the same size and shape Interior Angle: An interior angle of a regular polygon is formed by two consecutive sides. Interior angle = 180° − central angle. So the Interior angle of a regular pentagon = 180° − 72º = 108º Polygonal Review: Click on the following for further information about polygons: Regular Polygon: Is a polygon having all angles equal (congruent) and all sides equal (congruent); otherwise it is called an irregular polygon. Regular Tessellation: is a tessellation made up of congruent regular polygons. Tessellate: from Late Latin tessellatus “made of small square stones or tiles,” from tessella “small square stone or tile,” diminutive of tessera“a cube or square of stone or wood,” perhaps from Greek tessera. Please click on the following links: Communication is critical in the design process. Students need to be allowed to talk, stand, and move around to acquire materials. Tips for success in an active classroom environment: 1 – Students can access any wall, board, or surface to gather and explore ideas — students personalize the working space to meet their needs. 2 – Students have regular opportunities to make choices, including choices about what they learn and how they learn it. 3 –Encourage students to learn and to demonstrate what they’ve learned in ways that best suit their individual learning styles. 4 – It is not a free-for-all! Amount of prep and planning is evidenced by quality of student work and level of students’ engagement. All is carefully thought out in advance. 5 – A lot of meaningful conversations — between teacher and students and also among students. Lots of questions asked by and of students. Teacher often manages the conversation, but the students and their thoughts, ideas, and questions determine the scope and direction of the conversation. 6 – Instead of teacher or textbook giving answers or info, students discover ideas through inquiry and exploration. They figure out solutions and answers on their own. 7 – Tests and quizzes are sometimes needed, but focus assessment on student-created “learning artifacts” — students complete these products to demonstrate in-depth knowledge and understanding key topics. 8 – The focus is on the ultimate goal of student thinking… Every activity, lesson, and project is geared toward deepening and strengthening students’ critical thinking skills. Students analyze, question, explore, and evaluate on a regular basis. 9 – Help students become successful and care for the success of others by asking them to predict problems that might arise in the active environment and ask them to suggest strategies for their own behavior that will ensure a positive working environment for all students and teachers. 10 – Practice and predict clean-up strategies before beginning the activity. Ask students to offer suggestions for ensuring that they will leave a clean and usable space for the next activity. Students may enjoy creating very specific clean-up roles. Once these are established, the same student-owned strategies can be used every time hands-on learning occurs. Students will be able to: Please click on the following links: (one per student) Review all student Makerspace Journal pages for formative assessment. Building Materials -or – Connecting Materials Other Please click on the following tally sheet link: Background Information Please click on the following link: Design Challenge Overview In the culminating project, students ideate, prototype, test, reiterate, and finally create a nearly spherical soccer ball out of recycled materials. Student teams decide (and record) their own criteria and constraints for a durable soccer ball. They investigate and report on how their soccer ball compares to real soccer balls. Students demonstrate proficiency at the end of this Design Challenge by presenting their findings to peers, other classes, and/or to a parent audience. Essential Questions: LESSON PROCEDURE Professional Preparation: Lesson Format (Note: T stands for teacher, and S stands for student, with additional advice in parenthesis, TPS stands for “think, pair, share”). T: (Form student teams). Today your team is commissioned to create its own soccer ball made from recycled materials! (Quickly review everything learned from the Define stage lessons; making useful items from recycled materials, attributes of polygons, finding areas based on composing and decomposing polygons, tessellating regular polygons on flat surfaces, and then on curved bowl surfaces. Discuss how bowls surfaced with polygons might be helpful in designing soccer balls). T: Based on all you’ve learned about composing and decomposing polygons, tessellations, and making a bowl out of polygons, how could this information help you if you had to figure out a design for a soccer ball surfaced only with different polygons? S: (answer vary…) I learned certain polygons tessellate together on flat surfaces, and some polygons fit together to form bowl-like surfaces. If I surfaced 2 bowls out of polygons, I might think about making a soccer ball by attaching the 2 bowls together at their “rims.” T: That sounds interesting…… maybe it could work? You might want to consider that now that you have a chance to design your own soccer ball with materials from your makerspace! First off, think about what will be the criteria and constraints for your model designs? ….. TPS for a few minutes: What is meant by “criteria”? By “constraints”? S: (call time, then take answers …) A criteria is design requirement. A constraint is a design limitation. T: (hold up a real soccer ball). Can you give me an example of one criteria that someone must have used in making this “regulation size 5” soccer ball? S: (answer vary… The soccer ball had to be spherical in shape, … , The ball has a surface made of 12 pentagons and 20 hexagons, … etc.) T: (refer to the same soccer ball) That’s true! In fact, one criteria of FIFA (The Fédération Internationale de Football Association, or in English: International Federation of Association Football) regulation size 5 soccer balls is that they are meant for players aged 12 and up. S: What would be a constraint? T: Examples of constraints for regulation size 5 soccer balls is that they must have a circumference of 68 to 70 cm (26 ¾” – 27 ½”), and they must weight between 410 to 450 grams (14 ½ – 16 oz). T: (Pass out Student Maker Page: Design Challenge: Criteria & Constraints for Our Soccer Ball ). Your team will create its own criteria and constraints for soccer balls. For instance: criteria — your soccer ball must be made with recycled materials, and constraint — you can only use recycled materials from your makerspace. Please take a few minutes to think about this, and then record your team’s criteria and constraints on your student maker pages. Your team must list at least 5 different criteria and constraints. Suggestion: must include in its design at least 3 types of regular polygons). Criteria & Constraints Engineers design things using some rules about how the designs must behave or work. These rules are called criteria. Engineers can run out of materials, money, time to build, or space in which to build something. In other words there are limits on how something can be built. These limits are called constraints. (review with students some suggested criteria and constraints for this challenge below). Ideate T: Let’s begin with the ideate phase where you will brainstorm ideas for a soccer ball design! What does it mean to brainstorm? S: Brainstorming means you quickly think of as many ideas as you can with your team! S: Also any idea, no matter how crazy, is acceptable! T: I like how you remind us to keep in mind that everyone’s contribution is important and that everyone is involved! How could we keep track of all these ideas? S: You can draw or write your ideas on sticky notes and attach them to a section of the wall! After brainstorming is over, we can look at each other’s ideas together! (Suggestion: pass out sticky notes or students record ideas on paper) T: Keep in mind your criteria and constraints. Your team has 5 minutes to quickly brainstorm ideas on how to design your soccer ball. Ready, set, go! S: (student teams quickly brainstorm ideas….). T: (Call time and pass each student a copy of the Student Maker Journal page: Design Challenge: Our Soccer Ball Design Process!). T: Take time to look at all your team’s ideas. Record your favorite ideas under the “Ideate” column on your journal page. T: Now, based on the ideas you have, you’re ready to move to the prototype phase where you build a model of your soccer ball! Prototype In the prototype phase teams build a model of their soccer ball based upon ideas generated from the ideate phase. (Keep in mind students may choose to or need to return to this phase as they iterate through the prototype, test, and retest phases) T: Look back in your journal to the ideas your team got from the ideate phase. Take one or combine more than one of those ideas together to design a prototype soccer ball. Remember to record information about your prototype on your journal page under the “prototype” column. You have 20 minutes to design. S: (student teams work together, building their models of a soccer ball). T: (walk around teams and look for examples of communication, collaboration, engaged conversations, involvement, cooperation, etc.). After 20 minutes call time. Test your Design Students test their prototype according to how it holds up to all criteria and constraints. If the test fails, students may choose or need to return to this phase after designing a new prototype, testing it, retesting it, and iterating through these phases again and again until a final soccer ball is agreed upon. T: You need to test your model soccer ball to see if it holds up to all your criteria and constraints. What happens if your ball fails the test? S: (answers vary….) We go back to the “drawing board” and pick another design to build, prototype it, test it, and retest it! T: What if that prototype doesn’t pass the test? Do you give up? S: Keep on trying! You test what didn’t work, try to fix that, test it again and again until finally your model soccer ball works! T: How can you keep track of what happens in each phase as you test your soccer ball designs? S: (answers vary….) we can list or draw an example of our design in the “prototype” column of our journal, and list what we tested in the “test” column, and then explain what we had to redo in the “iterate” column. Once we decide on a final soccer ball design, we can explain it and/or draw a picture of it in the “final design” column of our journal. T: Ok then report all findings on your Student Maker page : Design Challenge: Our Soccer Ball Design Process! T: (After student teams have finalized their designs, call student teams together as a class). T: What was important to you in designing your soccer ball? S: (answers vary…. student teams explain their reasons for their designs to the class). T: What were your criteria and constraints? S: (answers vary…. student teams explain to the class their criteria and constraints). T: In what ways does your soccer ball compare to a real soccer ball? How are they alike and how are they different? S: (answers vary….) T: Explain any limitations to your design and what you would have done differently if given other choices. S: (answers vary…. student teams explain their findings to the class). T: (Optional: show one or both of the following video(s) and discuss how students felt about them/ what they learned afterward): T: In what ways did you find making a soccer ball out of recycled materials helps to solve a problem? S: (answers vary….) (Assessments: Refer to various forms of assessment on the main side bar) (Optional: students demonstrate proficiency at the end of this Design Challenge by sharing their findings with an audience of other classmates, or parents). Please click on the following links: Please click on the following links: Communication is critical in the design process. Students need to be allowed to talk, stand, and move around to acquire materials. Tips for success in an active classroom environment: 1 – Students can access any wall, board, or surface to gather and explore ideas — students personalize the working space to meet their needs. 2 – Students have regular opportunities to make choices, including choices about what they learn and how they learn it. 3 –Encourage students to learn and to demonstrate what they’ve learned in ways that best suit their individual learning styles. 4 – It is not a free-for-all! Amount of prep and planning is evidenced by quality of student work and level of students’ engagement. All is carefully thought out in advance. 5 – A lot of meaningful conversations — between teacher and students and also among students. Lots of questions asked by and of students. Teacher often manages the conversation, but the students and their thoughts, ideas, and questions determine the scope and direction of the conversation. 6 – Instead of teacher or textbook giving answers or info, students discover ideas through inquiry and exploration. They figure out solutions and answers on their own. 7 – Tests and quizzes are sometimes needed, but focus assessment on student-created “learning artifacts” — students complete these products to demonstrate in-depth knowledge and understanding key topics. 8 – The focus is on the ultimate goal of student thinking… Every activity, lesson, and project is geared toward deepening and strengthening students’ critical thinking skills. Students analyze, question, explore, and evaluate on a regular basis. 9 – Help students become successful and care for the success of others by asking them to predict problems that might arise in the active environment and ask them to suggest strategies for their own behavior that will ensure a positive working environment for all students and teachers. 10 – Practice and predict clean-up strategies before beginning the activity. Ask students to offer suggestions for ensuring that they will leave a clean and usable space for the next activity. Students may enjoy creating very specific clean-up roles. Once these are established, the same student-owned strategies can be used every time hands-on learning occurs. Students will be able to: Please click on the following links: (one per student) Review all student Makerspace Journal pages for formative assessment. Building Materials RAFT Makerspace-in-a-box -or- Regular polygon shapes (per team and all edges the same length: 30 equilateral triangles, 30 squares, 30 pentagons, 30 hexagons, and 30 octagons), paper squares (6 x 6 inches; 1 per student), shredded paper clippings, plastic bags, scissors, pens or pencils, calculators, rulers, protractors, compasses. Connecting Materials Various adhesives and fasteners (staplers, tape, glue, binder clips, string, etc.)Lesson 1: Empathy: Recycling materials can help solve problems! (40 min)

Lesson Materials
Lesson 2: Define: Explore Attributes of Polygons (50 min)
 T: Unfold. TPS: What do you notice?
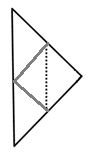


 T: What do you notice about the area of the small square?
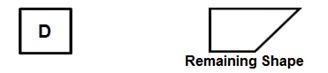


Lesson Materials
Lesson 3: Define: Which Polygons Tessellate? (50 min)

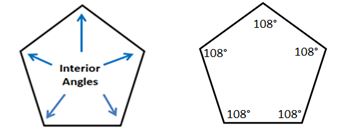
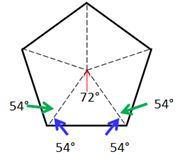 Interior Angle: An interior angle of a regular polygon is formed by two consecutive sides. Interior angle = 180° − central angle. So the Interior angle of a regular pentagon = 180° − 72º = 108º
Lesson Materials
Lesson 4: Define: The Great Super Polygon Bowl! (50 min)

Lesson Materials
Design Challenge: Ideate, Prototype and Test (50 min)
Criteria (design requirements)
Constraints (design limitations)
In the ideate phase, given the criteria and constraints, students brainstorm ideas for soccer ball designs. Any idea is possible. Give students a short amount of time to quickly brainstorm their ideas (suggestion: pass out sticky notes or students record ideas on paper). Keep in mind students may choose to or need to return to this phase as they iterate through the design process.
Design Challenge Materials