This unit was designed in collaboration with teachers from the Campbell Union School District
![]()
Unit Overview:
In this unit students investigate the characteristics and interfaces between the Earth’s four major sphere systems: the geosphere (solid and molten rock, soil, and sediments), the hydrosphere (water and ice), the atmosphere (air), and the biosphere (living things, including humans). Student teams demonstrate understanding of these major systems by designing interactive card games and 3D water cycle models. In the Design Challenge, student teams use various materials to create 3D models of two sphere systems and use the models to describe how the systems interact.
Educational Outcomes:
- Lesson 1: Students define and describe the characteristics of the geosphere, hydrosphere, atmosphere, and biosphere
- Lesson 2: Students explain the interactions between different spheres as they are encountered in a student-created card game
- Lesson 3: Students create a model of the water cycle to describe the interactions between the spheres represented in the model
- Design Challenge: Students design and build detailed models of the interaction between two Earth spheres and describe the interaction in terms of survival
STEAM INTEGRATION
Technology is incorporated throughout this unit in the form of online videos, animations, and short articles. Lesson 1 includes videos that provide students with information on Earth’s spheres. Students use this information in Lesson 2 to develop an interactive card game that incorporates Earth sphere characteristics and interactions as its central theme (CCSS SL.5.4). Lesson 3 focuses heavily on the water cycle for which students build models as an example of all four spheres interacting simultaneously (5-ESS2-1). In the Design Challenge, student teams ideate, prototype, and test models against a set of criteria and constraints as engineers would. They present and explain their models to an audience, which simulates how engineers and researchers defend their claims.
Design Challenge: Ideate Maker Journal
Design Challenge: Prototype Maker Journal
Design Challenge: Test Maker Journal
Our design thinking units have five phases based on the d.school’s model. Each phase can be repeated to allow students to re-work and iterate while developing deeper understanding of the core concepts. These are the five phases of the design thinking model:
EMPATHIZE: Work to fully understand the experience of the user for whom you are designing. Do this through observation, interaction, and immersing yourself in their experiences.
DEFINE: Process and synthesize the findings from your empathy work in order to form a user point of view that you will address with your design.
IDEATE: Explore a wide variety of possible solutions through generating a large quantity of diverse possible solutions, allowing you to step beyond the obvious and explore a range of ideas.
PROTOTYPE: Transform your ideas into a physical form so that you can experience and interact with them and, in the process, learn and develop more empathy.
TEST: Try out high-resolution products and use observations and feedback to refine prototypes, learn more about the user, and refine your original point of view.
The Design Thinking Process | ReDesigning Theater. (n.d.). Retrieved April 2, 2016, from http://dschool.stanford.edu/redesigningtheater/the-design-thinking-process/
- NGSS 5-ESS2-1: Develop a model using an example to describe ways the geosphere, biosphere, hydrosphere, and/or atmosphere interact. (e.g., examples could include the influence of the ocean on ecosystems, landform shape, and climate; the influence of the atmosphere on landforms and ecosystems through weather and climate; and the influence of mountain ranges on winds and clouds in the atmosphere)
- CCSS ELA-Literacy SL.5.4: Report on a topic or text or present an opinion, sequencing ideas logically and using appropriate facts and relevant, descriptive details to support main ideas or themes; speak clearly at an understandable pace.
Unit Materials
Unit Materials:
- RAFT Makerspace-in-a-box
- Various adhesives, connectors, and fasteners
- paperclips
- binder clips
- thread
- yarn
- adhesive foam pads
- wooden stir sticks
- straws
- spoons
- pipettes
- labels & stickers
- rubber bands… etc
- Materials
- laminate samples
- dust covers
- foam pieces
- deli containers
- fishboard
- cardboard tubes
- plascore scraps
- posters
- shower caps
- scrap materials
- cards… etc
- Various adhesives, connectors, and fasteners
- Tape
- glue
- scissors
- timer
- Recording materials: RAFT Makerspace Journal Pages (for each lesson)
- Tech: videos about different “spheres” — their characteristics and interactions
Lesson 1: Empathy: Understanding Earth’s Spheres (45 min)
Lesson Overview
Students investigate the differences between Earth’s major sphere systems, identify examples of how they interact, and discuss the importance of knowing about the systems.
Essential Questions:
- What is the difference between the different sphere systems?
- How do the sphere systems interact?
- Why is it important to understand the interaction between the sphere systems?
LESSON PROCEDURE:
- Students watch videos located in the Extended Resources section (right margin) to gather information on the different sphere systems.
- Students record ideas from the videos in the Maker Journal page. Lead students towards writing down information on differences between the sphere systems, on interactions between them, and of the impact on these interactions on living things, including humans.
- Hold a discussion where students talk about their own experiences with the Earth’s sphere systems. For example, students might share instances where they witnessed two or more spheres interacting during a storm. Call on a few students to share examples.
Sample teacher and student dialog.
T: “If I say the word “hydrosphere”, what comes to mind?”
S: “It makes me think of water because “hydrant” sounds like “hydro” and fire hydrants spew water.” “Sphere is like a ball!”
T: “That’s right. When we say sphere we think of a ball, or the planet. So hydrosphere likely refers to water around the planet. We are going to explore this idea by learning about Earth’s hydrosphere as well as three other “spheres.” We’ll watch some videos, record information from the videos in the Maker Journal page (click button below), and then discuss our own experiences with Earth’s sphere systems.”
S: “This is like trying to see how the spheres all connect or overlap!”
There are many subsystems that make up the natural environment of the Earth. Many of the subsystems are characterized as “spheres”, coinciding with the shape of the planet. The four spheres are the atmosphere, the biosphere, the hydrosphere and the geosphere.
An atmosphere is a layer of gases surrounding a planet or other material body, that is held in place by the gravity of that body. The atmosphere of Earth is mostly composed of nitrogen (about 78%), oxygen (about 21%), argon (about 0.9%) with carbon dioxide and other gases in trace amounts. Oxygen is used by most organisms for respiration, nitrogen is fixed by bacteria and lightning to produce ammonia used in the construction of nucleotides and amino acids and carbon dioxide is used by plants, algae and cyanobacteria for photosynthesis. The atmosphere helps protect living organisms from genetic damage by solar ultraviolet radiation, solar wind and cosmic rays. Its current composition is the product of billions of years of biochemical modification of the paleoatmosphere by living organisms. Geochemists define the biosphere as being the total sum of living organisms. In this sense, the biosphere is but one of four separate components of the geochemical model, the other three being geosphere, hydrosphere, and atmosphere. When these four component spheres are combined into one system, it is known as the ecosphere. This term was coined during the 1960s and encompasses both biological and physical components of the planet. The hydrosphere is the combined mass of water found on, under, and above the surface of the planet. It includes all liquid water in lakes, rivers, and the ocean as well as frozen water such as icebergs, the polar ice caps, and glaciers. The geosphere is any of the almost spherical concentric regions of matter that make up the earth.
Geosphere and Biosphere (4:00)
Hydrosphere and Atmosphere (3:31)
Earth’s Systems and How they Work (12:10)
Earth’s Systems Interact (5:49)
This is a great topic in which to discuss current events involving the spheres. For example, any recent events in the weather such as hurricanes and geologic events like earthquakes often get wide news coverage. Plus, they provide quality examples of the interaction between different spheres (landslides caused by earthquakes, flooding and property damage due to excessive wind and water, etc.)
- Students will be able to describe the four main Earth spheres
- Students will be able to describe example of interactions between the spheres, including those that directly impact living organisms
Student Self Assessment
Student groups review their Maker Journal entries and summarize their learning in a group discussion
Peer Assessment
Student groups discuss and compare their ideas and share different critical areas where we need to understand the interactions between the spheres
Teacher Assessment
Conduct a whole group discussion to allow all students to share, discuss and compare their ideas and examples around a problem related to interactions between 2 or more spheres. For example, how might interactions between the geosphere and hydrosphere impact our ability to obtain clean water?
Lesson Materials
Tech
- Computers or mobile devices
- Internet access
Lesson 2: Define: Earth Sphere Card Game (45 min)
Lesson Overview
Students choose or are assigned a sphere as their theme and create diagrams on cards that describe the attributes of the spheres and possible interactions with other spheres. The cards are used to create a matching game.
Essential Questions:
- How do your card drawings depict interactions with different Earth spheres?
- What methods or strategies did you use to develop the rules of play?
- What new things did you learn about Earth’s spheres through playing the card game?
LESSON PROCEDURE:
- Students choose or are assigned a sphere.
- Students create anthropomorphic (human-like) characters on cards to represent their chosen “sphere” system. They should include characteristics of the sphere that demonstrate interactions with other spheres. For example, they might draw a water sphere character reaching for the sky to imply that water molecules evaporate and enter the atmosphere.
- Students create a card game of matching spherical interactions and play the game in groups.
- Students share their games with other groups and discuss sphere interactions.
- They reflect on the activity in the Maker Journal page.
Sample teacher and student dialog.
T: “Choose a sphere that interests your group. Today you get to create a card game based on that sphere where each card contains a picture. The pictures should show characteristics of the sphere but they will be anthropomorphic.”
S: “What does that word mean?”
T: “It means having human-like features. For example, you might draw a running water droplet to show water “running” downstream. You can be creative and have fun as long as the cards clearly show that you understand your sphere and its interactions with other spheres. First, draw the images in the Maker Journal page (click button below) and then put those drawings on the card material.”
S: “Will we play the game with just our group?”
T: “You will do that first and then play with another group, identifying instances where there is a “match” in the interactions between your spheres. You will also create additional rules of play. For example, you need to decide what happens when matches are made. Do you keep the cards, are they worth points, or do you give them to another member of the group? These are all great ways to add fun to the game. Be creative!”
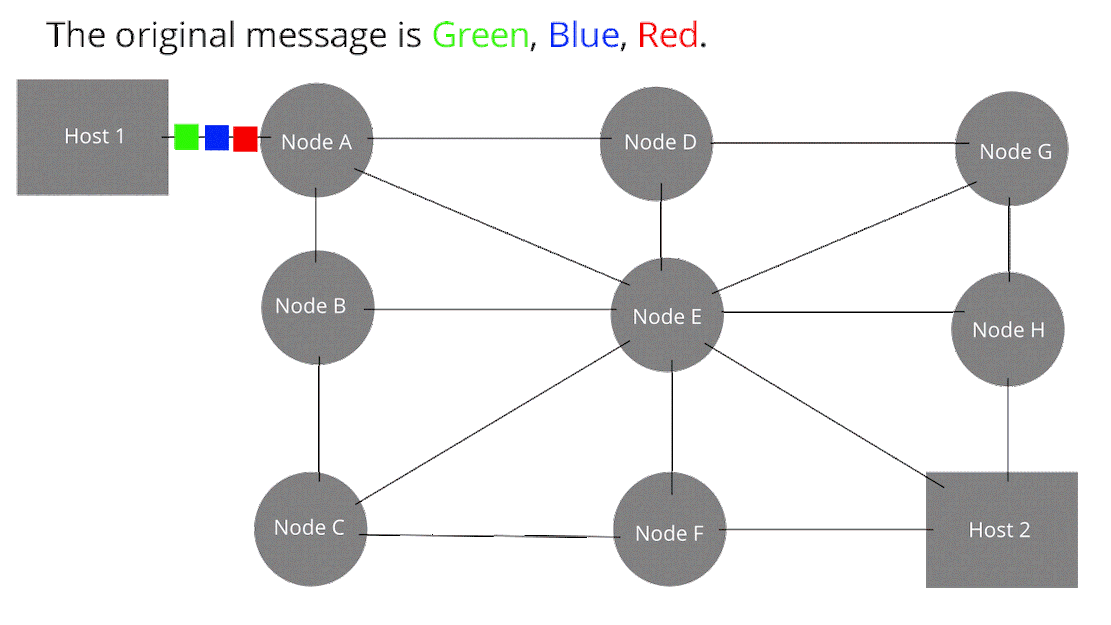
Networked digital environments are also know as digital communication environments (DCE) or simply computer networks. Many digital communication environments contain a central hub, which is connected to everything in some form. This hub can be located inside a networking system, or could be the internet itself. A computer network is a digital network which allows nodes to share resources. The connections between nodes are established using either cable media or wireless media. Computer networks support lots of applications and services such as access to the Internet (best-known computer network), digital video, digital audio, shared use of application and storage servers, printers, fax machines, email, instant messaging, social media, etc.
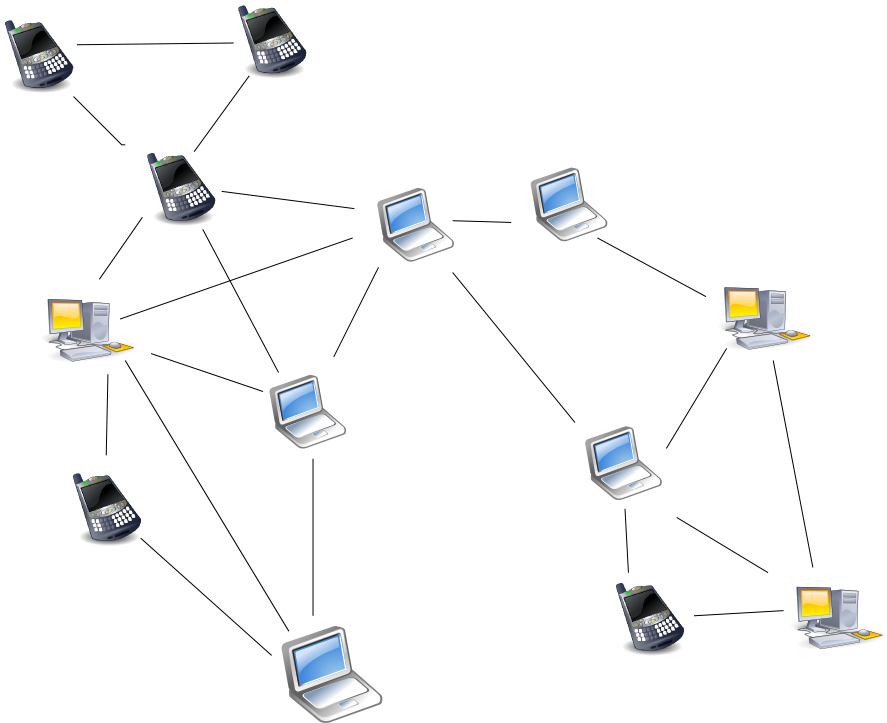
Node: Devices or data points on a larger network such as a personal computer, cell phone, or printer. When defining nodes on the internet, a node is anything that has an IP address. Nodes contain data and also may link to other nodes. Data is sent from node to node as “packets”, which are chunks of information in the form of the familiar bytes, kilobytes, megabytes, and gigabytes. Certain pieces of information from an original message (video, music, text, etc.) can be sent through different pathways to the intended target node (device). The graphic below illustrates this idea (think of each node below as any digital device).
Pre-select examples of anthropomorphic art from online sources to show students. They are often fascinated at the widespread use of these types of depictions and can recognize them in many of the movies and books in which they are familiar.
- Students will be able describe the attributes of the four Earth spheres
- Students will be able to identify and describe sphere interactions using picture models
Student Self Assessment
Student identify strategies that were helpful in playing the card game and recognizing the images
Peer Assessment
Student groups discuss the card images and think of ways to collaboratively make the depictions more clear
Teacher Assessment
Play a round of the card game with various groups and provide suggestions for creating more interactions between the spheres and for improving the images
Lesson Materials
Building Materials
- Cardstock or equivalent
- Colored Markers or crayons
- Scissors
Lesson 3: Define: Water Cycle Models (45-60 min)
Lesson Overview
Students learn about and create a model of the water cycle, making sure to identify key points of interaction between different Earth spheres.
Essential Questions:
- What are the important stages or processes in the water cycle?
- What are the different states of water in the cycle?
- What are the spheres that interact in the water cycle?
- How does the hydrosphere affect ecosystems, organisms, land forms, and climate?
LESSON PROCEDURE:
- Student view the video resources in the External Resources section (right margin).
- Student teams create a model of the water cycle using a variety of recyclable materials.
- Students document specific interactions across different spheres in the Maker Journal page.
- Student teams share their models with an audience determined by facilitator.
Sample teacher and student dialog.
T: “Today we will focus on the hydrosphere, or more specifically, the water cycle. What do you already know about it?”
S: “It involves evaporation, where water becomes a gas.” “Water goes into the air and comes down as rain!”
T: “Yes, that’s right. It includes water in different states, or phases, such as gas (water vapor), liquid water, and ice. What does it include from the geosphere or biosphere?”
S: “I think it erodes dirt and it the dirt goes into the rivers. That means the hydrosphere and geosphere are interacting!”
T: “It does include erosion, which could provide evidence of an interaction between two spheres. The way that we can show this type of evidence today is by building a model of the water cycle out of recyclable materials. The model can help explain the various interactions that we started discussing and more!”
S: “Will we include all interacting spheres? Who will we show these models to?”
T: “You will work in teams to draw and plan out the model. This will go in the Maker Journal page (click button below). Then you build it. Finally we will present these models and describe how the different Earth spheres interact to the class next door.”
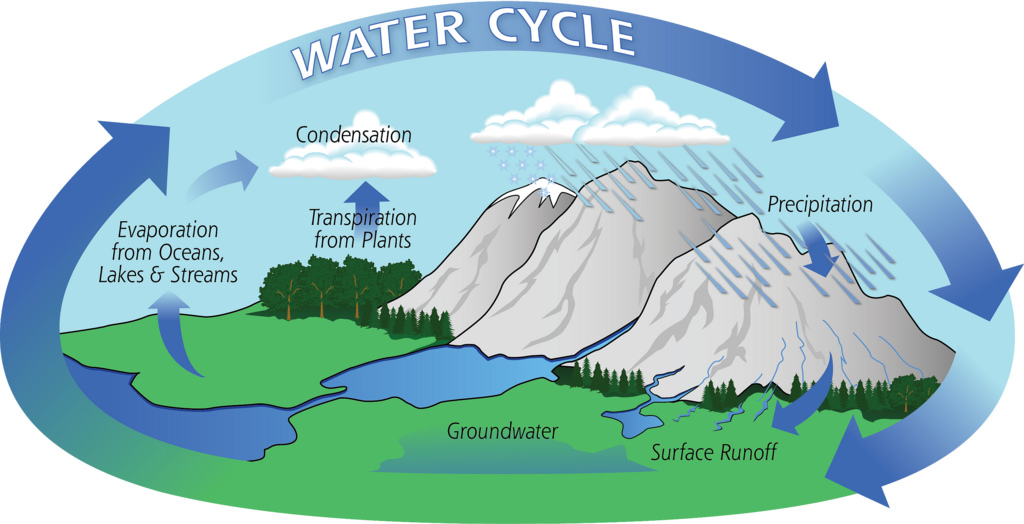
The water cycle, also known as the hydrological cycle or the hydrologic cycle, describes the continuous movement of water on, above and below the surface of the Earth. The mass of water on Earth remains fairly constant over time but the partitioning of the water into the major reservoirs of ice, fresh water, saline water and atmospheric water is variable depending on a wide range of climatic variables. The water moves from one reservoir to another, such as from river to ocean, or from the ocean to the atmosphere, by the physical processes of evaporation, condensation, precipitation, infiltration, surface runoff, and subsurface flow. In doing so, the water goes through different forms: liquid, solid (ice) and vapor.
The water cycle involves the exchange of energy, which leads to temperature changes. For instance, when water evaporates, it takes up energy from its surroundings and cools the environment. When it condenses, it releases energy and warms the environment. These heat exchanges influence climate.
The evaporative phase of the cycle purifies water which then replenishes the land with freshwater. The flow of liquid water and ice transports minerals across the globe. It is also involved in reshaping the geological features of the Earth, through processes including erosion and sedimentation. The water cycle is also essential for the maintenance of most life and ecosystems on the Earth.
Make sure all building materials are positioned such that all students have safe an equitable access to the materials and tools. To avoid bottlenecks, allow only 1-2 people per group to acquire materials for their teams.
Tips for success in an active classroom environment:
Communication is critical in the design process. Students need to be allowed to talk, stand, and move around to acquire materials. Help students become successful and care for the success of others by asking them to predict problems that might arise in the active environment and ask them to suggest strategies for their own behavior that will ensure a positive working environment for all students and teachers.
Practice and predict clean-up strategies before beginning the activity. Ask students to offer suggestions for ensuring that they will leave a clean and useable space for the next activity. Students may enjoy creating very specific clean-up roles. Once these are established, the same student-owned strategies can be used every time hands-on learning occurs.
- Students will be able to build a model depicting each stage of the water cycle
- Students will be able to use the models to describe how the hydrosphere interacts specifically with the three other Earth spheres
Student Self Assessment
Student groups check to ensure the models are not missing any steps in the water cycle and that each step is clearly labeled.
Peer Assessment
Conduct a gallery walk where students can provide constructive feedback on other groups’ models.
Teacher Assessment
Review the models and ask students questions about individual parts of the water cycle, clarifying as needed. Emphasize areas where there are obvious interactions between spheres and have students provide explicit examples
Lesson Materials
Building Materials
- Foam
- Cotton balls or equivalent
- Cardstock
- containers
- Other various materials
Connecting Materials
- Tape or other adhesives
- Fasteners (paper clips, binder clips)
Tech
- Computers or mobile devices
- Internet access
Design Challenge: Ideate, Prototype and Test
Design Challenge Overview
Students engage in the design process to create a 3-dimensional model of two sphere systems that demonstrates a clear interaction between the spheres. Students will present the model to an audience, addressing the essential questions for the challenge.
Essential Questions:
- How can we create a 3D model using recycled materials to describe ways two sphere systems interact?
- How does your model identify and describe interactions within and between those two sphere systems?
- How does your model show the effect of the interaction on the Earth’s surface materials and processes?
LESSON PROCEDURE
Sample student & teacher dialog.
T: “You will build a 3-D model, not a flat, on-the-page model, of two of Earth’s spheres that clearly shows how they interact. There are rules to follow, called criteria and constraints, that will guide us in creating good models.”
S: “How big do the models need to be?”
T: “They can be as big as needed to meet the criteria and constraints but let’s say do not go over 3 feet in any direction. You can use just about anything I provide on the materials table to build the model. You will first brainstorm and record ideas, then build an initial prototype. Afterwards you will test the model to make sure all criteria and constraints are met.”
S: “When the model is finished, what will we do?”
T: “You will have the chance to present your model to an audience, which is probably the class next door to us. You’ll focus on how the essential questions for this design challenge, which will be listed in the Maker Journal pages (click on the buttons in each individual section below to access these).”
Criteria & Constraints
Review the criteria and constraints with students. Engineers design things using some rules about how the designs must behave or work. These rules are called criteria. Engineers can run out of materials, money, time to build, or space in which to build something. In other words there are limits on how something can be built. These limits are called constraints. The criteria and constraints for this challenge are below.
| Criteria (design requirements) | Constraints (design limitations) |
|
|
Ideate
Students will conduct a brainstorm to generate ideas for the Earth sphere model based on the defined criteria and constraints for the challenge. They will likely come back to this step many times as they begin prototyping and making changes to the models.
Sample student & teacher dialog.
T: “Make sure to record all team ideas in the Ideate Maker Journal page (click button below). Each idea has value, so do not judge other peoples’ ideas but instead consider them in the design.”
S: “How do we include them all in the model? That might be too much to consider!”
T: “You will not be able to include all ideas, but think about ways to add to an idea or combine two or more ideas into a single idea. This ensures everyone contributes and that everyone’s point of view is understood.”
S: “This could help us finish on time, too!”
Prototype
Students create an initial prototype or iteration of the model according to the criteria and constraints. They will likely not have a perfect model but encourage them to revisit the ideate phase and think of improvements. These changes may be applied during the test phase as well. Encourage reiteration throughout this process.
Sample student & teacher dialog.
T: “Follow the criteria and constraints and build the model. Do not worry about getting it 100% right. Models are not perfect anyway, but we will be able to test the models to see if they closely represent the intended spheres and meet the other design requirements.”
S: “I want to get it right the first time!”
T: “Improvement is really the key here. As you test them you will think of other ideas along the way (ideate). You can make changes to the materials, remove materials, add more materials, and make any changes the team thinks will make the model better. This is what it means to iterate, or create newer versions of a product or process. This process should be documented, which you will do in the Prototype Maker Journal page (click button below).”
S: “Phew! I thought we would be graded on perfection!”
Test your Design
Students test their models against the defined criteria and constraints to ensure they can be used to demonstrate the interaction between Earth’s sphere systems. As students test, they discover aspects of the model requiring modifications. They fix, remove, and/or add materials to the design to add functionality and realism as necessary to make clear the purpose of the model for its intended audience. Students may revisit the testing step many times until the team agrees the final product is reached.
Sample student & teacher dialog.
T: “When you finish your prototype, begin checking to see if all criteria and constraints are met. Use the checklist in the Test Maker Journal page (click button below). It contains a simple checklist that serves as the test.”
S: “Will you tell us when to begin testing?”
T: “No, you will begin going through the checklist and testing your prototype as soon as your team thinks it is ready. Keep in mind again that you will not be 100% done even after one successful test. You may need to add/remove/change materials or even start certain parts over again. The good news is that you will have lots of ideas you generated and recorded during your brainstorm (ideate phase), so use them as needed. You can repeat multiple steps in the design process as many times as needed to create a successful model.”
S: “I like that we can get up and do the testing on our own! We are free to keep trying and should not quit.”
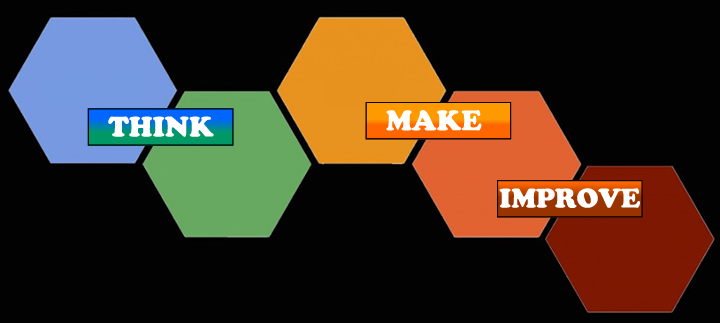
The design process is an effective way for teaching students many different concepts and skills in other content areas. It teaches students to have perseverance, be creative, and learn from other people. Going through the process to understand earth and space science is crucial because many of the processes occur either too slowly, covering geologic time, or at distances unattainable for students (hard to directly observe stars because not every student has access to telescopes). Modeling provides an avenue through which students can explore processes and demonstrate understanding. This combined with the iterative nature of engineering develops one of the key skills young people need today, the ability to improve when things are not going 100% right and persevere! Use the graphic shown here as a simple way to represent the steps in the design process.
Place all materials and tools on an accessible cart or table, making sure all students can safely access needed supplies
Tips for success in an active classroom environment:
Communication is critical in the design process. Students need to be allowed to talk, stand, and move around to acquire materials. Help students become successful and care for the success of others by asking them to predict problems that might arise in the active environment and ask them to suggest strategies for their own behavior that will ensure a positive working environment for all students and teachers.
Practice and predict clean-up strategies before beginning the activity. Ask students to offer suggestions for ensuring that they will leave a clean and useable space for the next activity. Students may enjoy creating very specific clean-up roles. Once these are established, the same student-owned strategies can be used every time hands-on learning occurs.
Students will be able to develop a model using an example to describe ways the geosphere, biosphere, hydrosphere, and/or atmosphere interact.
Student Self Assessment
Student groups review their models and think of improvements that can make the model better represent the intended spheres
Peer Assessment
Student groups present their models in a classroom “gallery walk” and receive constructive feedback for improving them. Students put post-it notes on the models for specific pieces of feedback.
Teacher Assessment
Pose thought questions about ways to make the models more realistic. Identify missing elements and allow students to modify them as needed. Provide time for students to clarify and implement feedback received from peers.
Design Challenge Materials
Building Materials
- RAFT Makerspace-in-a-box
- Various adhesives, connectors, and fasteners
- paperclips
- binder clip
- thread
- yarn
- adhesive foam pads
- wooden stir sticks
- straws
- spoons
- pipettes
- labels & stickers
- rubber bands…etc
- Materials
- laminate samples
- dust covers
- foam pieces
- deli containers
- fishboard
- cardboard tubes
- plascore scraps
- posters
- shower caps
- scrap materials
- cards…etc
- Various adhesives, connectors, and fasteners
- Tape
- glue
- scissors
- timer
- Recording materials: RAFT Maker Journal Pages (for each lesson)