A digital citizen is a person utilizing information technology (IT) in order to engage in society, politics, and government. Digital citizenship is focused on nine themes grouped into three main categories: 1) Respecting yourself and others (digital access, etiquette, and law), 2) Educating yourself and connecting with others (digital literacy, communication, and commerce), and 3) Protecting yourself and others (rights and responsibilities, safety/security, and health & welfare). In this unit, students will learn and apply several concepts in a series of lessons where they create resources to promote digital citizenship at their school sites. The unit culminates in a design challenge where students demonstrate their understanding of digital citizenship.
Educational outcomes
- Lesson 1: Students define digital citizenship and learn of its importance in today’s world, presenting their findings in a poster presentation
- Lesson 2: Students research the networked digital environment of their school site and develop a slide presentation on the potential risks associated with this environment at specific user locations
- Lesson 3: Students brainstorm ideas for informing their school community on best practices for data safety
- Lesson 4: Students identify tools and methods used by hackers to gain unauthorized access to data and then create a comparison chart differentiating between cyber crimes and real-world crimes
- Lesson 5: Students create a user-friendly resource for identifying and addressing cyberbullying at their school site
- Lesson 6: Students plan, develop, and publish a PSA in the form of a video skit that demonstrates online ethical behavior
- Design Challenge: Students design, build, and test a model of their classroom or school’s networked digital environment and describe best practices for digital citizenship at key points within the environment
STEAM INTEGRATION
Lesson 1 provides students with the opportunity to research digital citizenship using technology to gather the information in order to present a logically-sequenced, descriptive report on the topic (CCSS SL.5.4, ISTE 4.b). Students build on this experience in Lesson 2 by analyzing the networked environment of their school, identifying potential risks, and presenting their ideas using multimedia (CCSS SL.5.5). Lesson 3 familiarizes students with data security and using web-based tools for facilitating team brainstorms (ISTE 2.b, 4.b). Lessons 4 teaches students about the criminal nature of unauthorized access to data through hacking (ISTE 2.b, 4.b). Lesson 5 allows students to use technology to in order to create a resource that could help prevent cyberbullying at their school site. Lesson 6 builds on these skills and concepts by incorporating artistic expression and technology to promote ethical online behavior (CCSS SL.5.4, ISTE 2.b). The Design Challenge gives students the chance to engage in the design process as engineers and apply their learning to create a model of a networked environment in which to practice learn and practice digital citizenship skills.
Click here for ideas on getting started with digital citizenship in your school or district
Design Challenge: Ideate Maker Journal
Design Challenge: Prototype Maker Journal
Design Challenge: Test Maker Journal
Our design thinking units have five phases based on the d.school’s model. Each phase can be repeated to allow students to re-work and iterate while developing deeper understanding of the core concepts. These are the five phases of the design thinking model:
EMPATHIZE: Work to fully understand the experience of the user for whom you are designing. Do this through observation, interaction, and immersing yourself in their experiences.
DEFINE: Process and synthesize the findings from your empathy work in order to form a user point of view that you will address with your design.
IDEATE: Explore a wide variety of possible solutions through generating a large quantity of diverse possible solutions, allowing you to step beyond the obvious and explore a range of ideas.
PROTOTYPE: Transform your ideas into a physical form so that you can experience and interact with them and, in the process, learn and develop more empathy.
TEST: Try out high-resolution products and use observations and feedback to refine prototypes, learn more about the user, and refine your original point of view.
The Design Thinking Process | ReDesigning Theater. (n.d.). Retrieved April 2, 2016, from http://dschool.stanford.edu/redesigningtheater/the-design-thinking-process/
CCSS SL.5.4: Report on a topic or text or present an opinion, sequencing ideas logically and using appropriate facts and relevant, descriptive details to support main ideas or themes; speak clearly at an understandable pace
CCSS SL.5.5: Include multimedia components (e.g., graphics, sound) and visual displays in presentations when appropriate to enhance the development of main ideas or themes
ISTE 2.b: Students engage in positive, safe, legal and ethical behavior when using technology, including social interactions online or when using networked devices
ISTE 4.b: Students select and use digital tools to plan and manage a design process that considers design constraints and calculated risks
Suggestions for pacing and differentiation
Each of these lessons except the design challenge can be taught as stand-alone lessons highlighting different aspects of digital citizenship. One suggested path through the lessons is to start with Lesson 1 and then move on to Lessons 5 and 6 so students immediately learn about ethical behaviors in online environments.
Unit Materials
- Various adhesives, connectors, and fasteners (e.g., paperclips, binder clips, thread, yarn, adhesive foam pads, wooden stir sticks, straws, spoons, pipettes, labels & stickers, rubber bands, etc.)
- Materials (e.g., laminate samples, dust covers, foam pieces, deli containers, fishboard, cardboard tubes, plascore scraps, posters, shower caps, scrap materials, cards, etc.)
- Tape, glue, scissors
- Recording materials: RAFT Makerspace Journal Pages (for each lesson)
- Tech: Computers or mobile devices
Lesson 1: Empathy: Digital Citizenship Basics (60-90 min)
Lesson Overview
Students conduct web research to learn basic information on digital citizenship, including specific behaviors, and then summarize their learning in a poster presentation (CCSS SL.5.4, ISTE 4.b).
Essential Questions:
- What does it mean to be a “digital citizen?”
- Why is digital citizenship an important topic in today’s world?
Lesson Procedure:
- Put the term “digital citizen” on a whiteboard or flip chart. Ask students to share ideas on what they think the term means and to whom it applies. List their ideas on the board.
- Students explore the web resources in the External Resources section to the right. They record ideas, terms, and thoughts in the Maker Journal page, asking clarifying questions as needed.
- Students work in teams to create a poster presentation that summarizes their learning on digital citizenship. They should include a general definition of digital citizenship, behaviors associated with responsible technology users, and reasons why digital citizenship is important.
Sample teacher and student dialog.
T: “What does the term “digital citizen” mean to you? to whom do you think the word applies (who would be called a digital citizen)?”
S: “I think it is someone who uses lots of technology like computers and stuff.” “May it’s government employees!”
T: “You’re right, but there is a bit more to it. Today you will learn more about this term and the characteristics of people who can be called digital citizens. You will work in teams as you gather information through videos and web links and record the information in the Maker Journal page for this lesson (click button below).”
S: “What will we do with the information after we record it? Are we going to make something cool?!”
T: “Yes! Your team will develop a poster presentation that summarizes the main ideas you learn through doing research. Be sure to focus on defining what digital citizenship is and the kinds of behaviors you would see in someone who is a responsible digital citizen. This will help frame our learning in the upcoming lessons. I’ll circulate and provide help where needed. Let’s go to work!”
Digital Citizenship: The norms of appropriate, responsible behavior with regard to technology use. Digital citizens are people that exhibit a degree of digital literacy.
Digital Literacy: The ability to use information and communication technologies to find, evaluate, create, and communicate information, requiring both cognitive and technical skills.
This terms are very important and relevant today due to several reasons. The first and most critical is the fact that students embrace and use technology every day but do not consider the consequence of the information they view and share in cyberspace. This makes it crucial to teach digital citizenship lessons, especially as technology is quickly becoming a classroom norm. Another reason digital literacy is important in becoming a responsible digital citizen is the influence that digitalization has on adult life in the future. For example, employers often pass judgement on prospective students or employees for their social media profiles. This makes it important to teach students how to create online personas that project a positive and constructive image. Cyber-bullying is another reason for teaching digital citizenship. We can only prevent cyber-bullying by educating students about digital citizenship. Information searches and critical analysis is an important aspect of Digital Citizenship. There are many resources available over the internet that is a mixture of authentic work and facts with some that are much less credible and even harmful. Digital citizenship teaches students how to be critical and evaluate information they receive through technology.
Below are some examples of practices used by responsible digital citizen:
- Understanding how to use web browsers, search engines, email, text, wikis, and blogs
- Evaluating online resources for accuracy/trustworthiness
- Using online resources to enhance learning in the classroom (like this lesson!)
- Choosing appropriate media to showcase learning – understand what platforms will best illustrate the message and learning to peers and educators
- Using the web ( web sites video, music) to enhance the learning of your students
- Students and teachers creating online content to be utilized both in and out of the classroom
Below is a useful graphic that can be posted in a classroom to increase awareness on digital citizenship.
Youth and Media – Digital Dossier
Digital Citizenship – Addressing Appropriate Technology Behavior
Review school policies with students regarding acceptable uses of technology, if available. Ask students to think about their own behaviors in terms of these policies.
- Students will be able to use technology to gather information on digital citizenship
- Students will be able to present their findings on digital citizenship in a descriptive, logically-sequenced poster presentation
Student Self Assessment
In their own words, individual students write their own definition for the term “digital citizen.”
Peer Assessment
Student groups ask and answer questions about the information presented by other groups, comparing and contrasting ideas
Teacher Assessment
Provide student groups with different scenarios describing the behaviors of people using technology. Have students decide whether or not the people in the scenarios are conducting themselves as responsible digital citizens and provide a rationale for their decisions. Student groups can share ideas out loud when called upon.
Lesson Materials
Tech
- Computers or mobile devices
- Internet access
Other
- Poster board or equivalent
- Markers, various colors
Lesson 2: Define: Networked Digital Environments (45-60 min)
Lesson Overview
Students learn about networked digital environments using digital tools (ISTE 4.b). They map out the of the networked digital environment of their classroom or another part of the school site and develop a slide presentation on the potential risks associated with this environment at specific user locations (CCSS SL.5.4, 5.5).
Essential Questions:
- What is a “networked digital environment?”
- What are the risks associated with such an environment?
Lesson Procedure:
- Allow students to look up the term “networked digital environment” online. Have students share their findings out loud and record their ideas on the board. Ask students to circle key ideas written on the board.
- Local networked digital environment: Direct students’ attention to cables, connections, devices, computers, and other features related to the network in the classroom or area of interest on the school site. Have students work in teams to discuss and identify how the network is connected and how people are able to access local and online data over the network.
- Students explore the resources listed in External Resources and find additional information on networked digital environments.
- Students draw and map out the local networked digital environment in the Maker Journal page for this lesson. They should consider all access points (nodes), connections (LAN lines and wireless), and also identify on the map areas that are likely to be potential data risks.
- Students reflect on this experience and identify ways of applying these ideas in their own lives.
Sample teacher and student dialog.
T: “Today we’ll learn about networked digital environments. Briefly discuss what that means with your team. Then use a computer or mobile device to look up the term. I’ll call on a few of you to share your findings.”
S: “It means all of the ways that computers are connected.” “It includes all of the places people access data on the network.”
T: “Yes. To understand our networked digital environment we’ll need to first locate all of the connections, cables, devices, computers, basically any access points where people can get on our network and retrieve or send data. Then you will work in teams to map out and draw our local networked digital environment. It does not need to be perfect but should include lots of detail, especially locations where their are likely to be security risks.”
S: “Do we draw places where viruses can happen?” “When you say security risks, does that include places where people may leave browser windows open, not logged out?”
T: “Yep! Consider all of those ideas as they are all important digital citizenship behaviors. Keep in mind you do not need to create a schematic for the networked environment like the ones you may see images of online. There are parts of our network we may not know about, but let’s focus on what we can see, what we’ve experienced, and things we are aware of.”
Networked digital environments are also know as digital communication environments (DCE) or simply computer networks. Many digital communication environments contain a central hub, which is connected to everything in some form. This hub can be located inside a networking system, or could be the internet itself. A computer network is a digital network which allows nodes to share resources. The connections between nodes are established using either cable media or wireless media. Computer networks support lots of applications and services such as access to the Internet (best-known computer network), digital video, digital audio, shared use of application and storage servers, printers, fax machines, email, instant messaging, social media, etc.
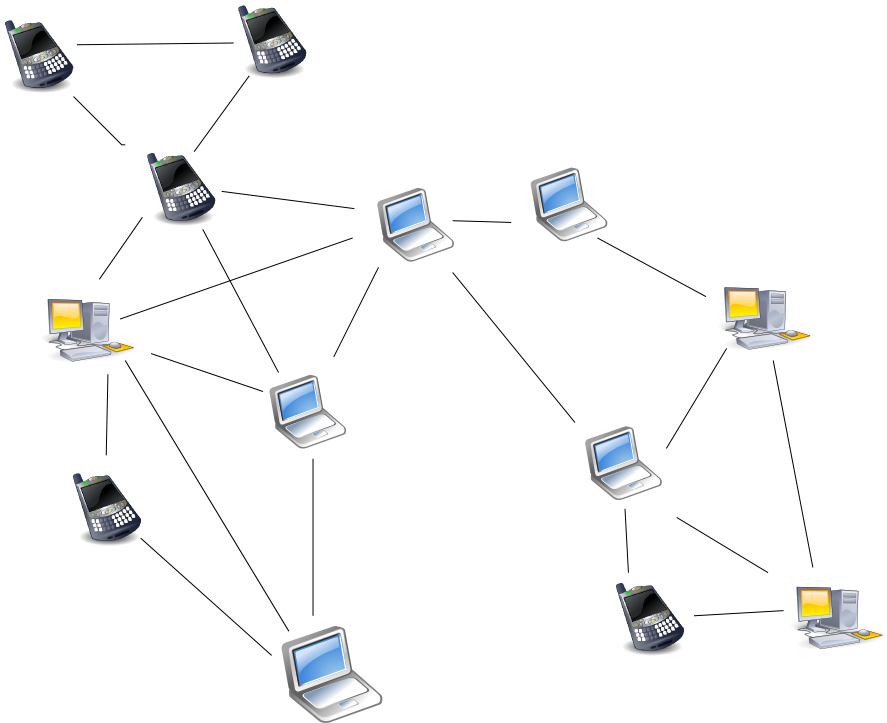
Node: Devices or data points on a larger network such as a personal computer, cell phone, or printer. When defining nodes on the internet, a node is anything that has an IP address. Nodes contain data and also may link to other nodes. Data is sent from node to node as “packets”, which are chunks of information in the form of the familiar bytes, kilobytes, megabytes, and gigabytes. Certain pieces of information from an original message (video, music, text, etc.) can be sent through different pathways to the intended target node (device). The graphic below illustrates this idea (think of each node below as any digital device).
How Computer Networks Connect and Work
Computer Networks (LANs and WANs)
This lesson is intended to teach students basic information on networked environments without diving deeply into detailed technical aspects of computer networking such as communication protocols, routers, switches, etc. Challenge students who are familiar with or interested in these topics to explore and report out on their findings.
- Students will be able to use digital tools to gather information on networked digital environments
- Students will be able to present a logically-sequenced report on the potential risks associated with their local networked environment
- Students will be able to include multimedia components in the presentation of their report
Student Self Assessment
Students individually list risks at certain points in the local networked environment
Peer Assessment
Student teams share and discuss their network drawings recorded in the Maker Journal pages
Teacher Assessment
Students circle key access points in the graphic provided in the Maker Journal page where security risks are likely to occur and explain their reasoning
Lesson Materials
Tech
- Computers or mobile devices
- Internet access
Lesson 3: Define: Data Safety (45 min)
Lesson Overview
Student teams research the topic of data security and then brainstorm ways to inform their school community on strategies for keeping their personal data safe (ISTE 2.b). They facilitate the brainstorm using a web-based brainstorming tool (ISTE 4.b).
Essential Questions:
- What is data security?
- How can users keep personal data safe?
- How do institutions or agencies keep data safe?
Lesson Procedure:
- Students conduct web research to find information on data security, strategies used by individual users to keep data safe, and technologies employed by institutions and agencies to secure data. The links in the External Resources section provide a starting point. Students use the Maker Journal page to record their findings on data security.
- Set up a Padlet wall for each student team (see Teacher Notes). As the header for each wall, use the following brainstorming prompt: “How can we share strategies with our school community for keeping data secure?” Provide them with the appropriate wall URL. Students use computers or mobile devices to insert ideas into their team’s wall. Students may add photos, video, text, or web links in their wall entries.
- Monitor the entries made on each team wall. Ask students to elaborate on their ideas in a whole class discussion.
Sample teacher and student dialog.
T: “Just as we conducted web research in previous lessons, we will gather information on data security to understand how it plays a role in digital citizenship. What does it mean to keep data secure?”
S: “It means to keep it hidden from people who might want to take it.” “It means encrypted!”
T: “That’s correct. Keeping sensitive data secure hides it from the view of unauthorized people, perhaps by using encryption. The ways that most people keep their data safe might be somewhat different than how schools, hospitals, and banks keep data secure. Why might there be differences in how individuals and institutions or agencies keep data safe?”
S: “They have lots more data to protect than most people!” “They store data that belongs to many more people.”
T: “Correct! It’s important to understand that fact, which is why we’ll be brainstorming ways to share strategies with our school community to keep our data secure. The school already has safeguards in place for doing this, but there are still ways sensitive data can be accessed despite these safeguards, as we learned in the previous lesson.”
Students use the Maker Journal page to record ideas (click button below)
Data security means protecting digital data, such as those in a database, from destructive forces and from the unwanted actions of unauthorized users, such as a cyber attack or a data breach. There are many strategies available to users for keeping data protected, some more technical than others but most are effective and easy to implement. Organizations, companies, hospitals, and financial and educational institutions store massive amounts of data belonging to students, patients, and customers that is very sensitive and therefore they must use several measures to ensure data security.
Some effective strategies for protecting data at a school site include but are not limited to:
- Secure every device – Failing to secure every device that connects to the school’s network provides hackers and other unauthorized users easy access to data.
- Encrypt everything – Schools use sophisticated exterior protection such as firewalls, but very few take steps to protect data at rest (the data sitting on a hard drive of a server or desktop computer).
- Data Loss Prevention (DLP) – Districts must monitor the flow of outbound data and stop it when necessary. This helps prevent data owned by the school from being downloaded onto an unauthorized storage device.
- Web filtering – School networks often use technologies that protect students from obscene web content. These technologies can also ensure students safely utilize collaborative tools and leverage dynamic content that can enhance their educational experience.
- Educate the school staff – People make mistakes and hackers exploit those human mistakes to access data. This makes regular training and communication on data policies important considering many of the most data retrieving and sending functions are handles using mobile devices.
- Educate students – Sometimes children don’t understand the potential ramifications of being on unsecured Wi-Fi networks, trying to reconfigure secured school devices, or bullying others online

Top Tips for Kids and Teens Online
Create a free Padlet account. Become familiar with this online tool here. Review with students how to add entries onto a Padlet wall and the types of media that can be added onto the wall. Students might think of and share other useful ways of using tools like Padlet in the class.
- Students will be able to apply digital tools to gather information of data safety
- Students will be able to apply an online digital tool to generate, gather, and share ideas obtained during a student-driven brainstorm session
Student Self Assessment
Students identify and reflect on methods they currently use to keep their own digital data safe and then identify personal next steps
Peer Assessment
Student teams share and discuss ideas around data safety and update their Padlet walls with new ideas generated from the share out
Teacher Assessment
Have individual students create a personal data safety plan that listed and describes action items they will take to ensure their personal data is safe. They should include proposed completion dates. Provide guidance where needed.
Lesson Materials
Tech
- Computers or mobile devices
- Internet access
Lesson 4: Define: Hacking and Cyber Crimes (45-60 min)
Lesson Overview
Students learn about the criminal nature of hacking, identify tools and methods used by hackers to gain unauthorized access to data, and then create a comparison chart differentiating between cyber crimes and real-world crimes (CCSS SL.5.5, ISTE 2.b). The chart is a useful resource for promoting digital citizenship in the classroom and for reminding students that hacking is a criminal offense and carries consequences just like real-world crimes.
Essential Questions:
- What is hacking?
- What is the difference between “white hat” and “black hat” hackers?
- How is hacking similar or different than real-world crimes (e.g. hacking into a bank account vs. breaking into the actual bank)? How are the consequences for hacking similar or different than for real-world crimes?
Lesson Procedure:
- Students gather information from the resources listed in the External Resources section of this lesson and 1-2 additional sources, recording their findings in the Maker Journal page (see Student Directions below).
- Students create a comparison chart (e.g., T-chart, box chart, flow chart, concept map, etc.) with details illustrating differences and similarities between cyber crimes and real-world crimes. They can creatively include ideas regarding the different “hats” associated with hacking in the chart.
- Quick Write – Have students think and write individually on the following sample prompts or develop different ones: “How can a hacker’s skills be used to make data more secure in our data-dependent world? How does learning about hackers and cyber crimes change the way you feel about data security? How might this information change your own behaviors when using technology?”
- Facilitate a whole class discussion where students share and discuss their responses.
Sample teacher and student dialog.
T: “What is a hacker? What do hackers do?”
S: “They break into computers or corrupt programs.” “Hackers are people who use computers to cause trouble for people!”
T: “You are both correct! Hackers are people who know how to use technology to gain unauthorized access to data. But there are different types of hackers and each type has certain motives, or reasons for doing what they do. Some of them are even helpful and paid by companies and governments to stop other hackers!”
S: “I thought hacking is illegal. How can you be paid as a hacker?!”
T: “It is illegal, but sometimes it is sanctioned by the government for certain purposes. That means some hackers are given permission to hack into systems. An example is a hacker who helps the government find the location of someone who has created a damaging computer virus. In this case, the hacker would not be committing a cybercrime, which you will learn about in this lesson.”
Students record their findings in the Maker journal page (click the button below)
Computer hacking have been around for decades and the tools used by hackers have been steadily getting more and more sophisticated. To add to this concern, cybercriminals are casting wider nets to acquire unauthorized access to data to make a huge profit. Recent cybercrimes include the WannaCry cyberattack and a later ransomware attack on many governments and businesses around the globe. Ransomware is a tool used by hackers to lock people out of their computer files and demand payment in order to regain access to them. Ransomware is basically a virus spread by appearing as an email with a link and/or attachment containing malicious code. People click on these because they appear to come from credible sources. For example, one such virus appeared to users as an unclaimed parcel from FedEx. Users were to click on the link to recall a driver to the address. Instead, the code encrypted and locked people out of their hard drives and a screen appeared demanding hundreds of dollars for access to the file, hence the term “ransomware.” Users who pay the ransoms never regain access to their files! This is one of several types of hacks that can disrupt the lives of business, government, and personal users.
White hat: Hacker who breaks security for non-malicious reasons, such as testing their own security systems or performing vulnerability assessments for clients. The term is generally synonymous with ethical hacker. There are certifications and online training covering ethical hacking.
Black hat: Hacker who “violates computer security for little reason beyond maliciousness or for personal gain” (Moore, 2005). The term was coined by Richard Stallman, to contrast the maliciousness of a criminal hacker versus the spirit of playfulness and exploration in hacker culture, or the ethos of the white hat hacker who performs hacking duties to identify places to repair or as a means of legitimate employment. Black hat hackers form the stereotypical, illegal hacking groups often portrayed in popular culture, and are “the epitome of all that the public fears in a computer criminal.”
Grey hat: Hacker who lies between a black hat and a white hat hacker. For example, they may surf the Internet and hack into a computer system for the sole purpose of notifying the administrator that their system has a security defect and may then offer to correct the defect for a fee. Grey hat hackers may not necessarily perform hacking for their personal gain, but unauthorized access to a system can still be considered illegal and unethical.
Elite hacker: “Elite” is used to describe the most skilled hackers.
Script kiddie: An unskilled hacker who breaks into computer systems by using automated tools written by others (usually by other black hat hackers), hence the term script.
Neophyte: Also known as a “newbie”, or just “noob”, is someone who is new to hacking and has almost no knowledge or experience of the workings of technology and hacking.
Blue hat: A hacker who is someone outside computer security consulting firms who is used to bug-test a system prior to its launch, looking for exploits so they can be closed.
Hacktivist: A hacker who utilizes technology to publicize a social, ideological, religious or political message. Hacktivism can be divided into two main groups: (1) cyberterrorism, which usually involves website defacement or denial-of-service attacks; and (2) freedom of information, which aims at making information that is not public, or is public in non-machine-readable formats, accessible to the public.

Source: Wikipedia
Cyber Crimes vs Real-World Crimes
U.S. Department of Justice – Cyber Crime
Hacking the Hackers: The Human Side of Cyber Crime
Students may want to draw their comparison charts on paper prior to creating a digital version. Before starting the lesson, gauge student experience in creating charts and tables using software such as MS Word, Paint, Excel, or Google Docs. These tools provide simple methods of creating charts digitally.
- Students will be able to describe the types of hackers and their associated activities
- Students will be able to be able to visually display a comparison of real-world crimes vs cyber crimes
- Students will be able to demonstrate their understanding of human and/or societal issues with technology
Student Self Assessment
Students think about and discuss their next steps for protecting their data from hackers. They share their ideas with an elbow partner (someone sitting nearby).
Peer Assessment
Student teams share examples with another team of how the skills of some hackers could be used to protect data.
Teacher Assessment
Review student responses to the Quick Write prompts, providing guidance as needed.
Lesson Materials
Building Materials
- list
Connecting Materials
- list
Tech
- list
Lesson 5: Define: Overcoming Cyberbullying (60-75 min)
Lesson Overview
Students create and present information in a digital resource (slideshow, video, podcast, etc.) for identifying and addressing cyberbullying (CCSS SL.5.5, ISTE 2.b). The information is presented in a logical and well-sequenced way and synthesizes information gathered from digital sources (CCSS SL.5.4).
Essential Questions:
- What is cyberbullying and how can it be identified?
- What can a person do if he or she is bullied online?
Lesson Procedure:
- Students research the web resources in the External Resources section (videos and articles). They should focus on ways of identifying and defining next steps for dealing with cyberbullies.
- Students plan the specific digital resource they will design and think of the specific information they will share from their research.
- Students develop the digital resource (slideshow, video, podcast, webpage, or other).
- Students present their resource to the class or another audience.
Sample teacher and student dialog.
T: “How would you know if you were being bullied by someone? What does that mean? Does the word “bully” mean the same thing if it occurs online?”
S: “It means to bother, pick, or harass someone, making them feel sad or depressed.” “When you text or email someone or post lies about a person on social media.”
T: “These are all correct. Bullying is a negative and hurtful thing to do to someone even if it is online and not in person. Sometimes it happens and people are not sure what to do about it.”
S: “They should tell someone. Some people get so hurt they become suicidal!”
T: “That’s true. Today you will explore some online resources that contain information on cyberbullying, the kind that happens online or through technology. We can help people by creating a digital resource such as a podcast, video, webpage, or slideshow that summarizes the information on how to identify cyberbullies and explains what a person can do to address and protect themselves from cyberbullies.”
Students record ideas for the digital resource in the Maker Journal page (click the button below)
Cyberbullying is a form of bullying or harassment using electronic forms of contact. Cyberbullying has become increasingly common among teenagers and can include posting rumors about a person, threats, sexual remarks, disclose victims’ personal information, or pejorative labels (i.e., hate speech). Cyberbullying can be identified by repeated behavior and an intent to harm. Victims often develop low self-esteem, suicidal thoughts, and a variety of emotional responses such as retaliating, being scared, frustrated, angry, and depressed. Awareness in the United States has risen in recent years due in part to high-profile cases in the media. Several states in the US and in other countries have laws designed to regulate cyberbullying; some are specific to teen bullying while others extend to physical harassment. For adults, these reports are usually filed beginning with local police.
Cyberbullies may disclose victims’ personal data on websites/social media and/or may use impersonation, posing as their target for the purpose of publishing material in their name that defames, discredits or ridicules them (denigration). This can make it difficult for the offender to be caught or punished for their behavior, although not all cyberbullies maintain their anonymity. Text or instant messages and emails between friends can also constitute cyberbullying if what is said or displayed is hurtful to the participants. The recent use of mobile applications and rise in smartphone use have made students more accessible to cyberbullies than on stationary computers. It is likely that those bullied via mobile devices will experience a wider range of cyberbullying types than those exclusively bullied elsewhere.
Internet trolling is a common form of bullying over the Internet in an online community (such as in online gaming or social media) in order to elicit a reaction, disruption, or for personal amusement. Cyberstalking is another form of bullying or harassment that uses electronic communications to stalk a victim. It may pose a credible threat to the safety of the victim.

CallerSmart: Cyberbullying – What is it and how do we stop it?
As students explore the resources on cyberbullying they may recognize examples and instances from their own lives where they have been bullied on or offline. This may or may not lead to them feeling emotional during the lesson, especially in instances where the bullying involves another student in the class or school. Be ready to provide an appropriate level of support if needed.
- Students will be able to present information on cyberbullying gathered from digital sources in a logically-sequenced manner
- Students will be able to create a digital resource with multimedia components for identifying and addressing cyberbullying
- Students will be able to demonstrate an understanding of legal and ethical behavior with technology
Student Self Assessment
Students record their ideas for the digital resource in the Maker Journal page and review them with teammates
Peer Assessment
Student teams present their digital resources on cyberbullying to peers (or different audience) and engage in a Q & A session
Teacher Assessment
Present students with a scenario and have them identify next steps to deal with the cyberbullies in the scenario. Example: “Gene receives several text messages from three students at school calling him names and saying several hurtful and embarrassing things about him that are untrue. Based on what you learned in this lesson, what should Gene do?”
Lesson Materials
Tech
- Computers or mobile devices
- Internet access
Lesson 6: Define: Cyberethics (60 min)
Lesson Overview
Students explore resources on cyberethics and leverage their learning in previous lessons to plan, develop, and publish a public service announcement (PSA) in the form of a video skit (CCSS SL.5.5) that demonstrates ethical behaviors while online (ISTE 2.b).
Essential Questions:
- What is cyberethics? Why is it important?
- How is ethical behavior online different or similar to real-world ethical behavior?
Lesson Procedure:
- Student teams conduct online research to find information on cyberethics. Use the links in External Resources as a starting point.
- Student teams develop their video skit plan in the Maker Journal page. They should include such details as the roles each person will play, dialogue, and any required props.
- Student teams publish their video skits on YouTube or another online video platform (facilitator’s discretion).
- Student teams show their videos to peers in the class and receive feedback for improvement.
- Student teams share the video skit with an external audience (share URL, link to another website or blog, etc.).
Sample teacher and student dialog.
T: “In the previous lesson we learned about cyberbullying and we developed a resource that provided suggestions for identifying and addressing cyberbullies. This time we will address something called cyberethics. What do you think this term means?”
S: “It means to do the right thing while online, like don’t create viruses or steal someone else’s stuff online.”
T: “Correct! Given these ideas, how is cyberethics related to cyberbullying?”
S: “Oh! Cyberbullying can be harassing or saying mean things to people on the internet.” “It’s not ethical to bully people online or offline.”
T: “Yes, and sometimes what seems like ethical behavior might actually be unethical. You might post something on social media about someone that you think is positive but is perceived as a negative by the person for which the message applies. This leads us to our task. Work in teams to research cyberethics. Plan and develop a video skit (short informational performance) that summarizes and demonstrates key points on cyberethics.”
S: “What will we do after we create and capture the skit on video?”
T: “You will publish it on YouTube or another video platform and then have classmates view and provide feedback on it. Then, you share it with friends, family, or another external audience.”
Cyberethics: The philosophic study of ethics pertaining to computers, encompassing user behavior and what computers are programmed to do, and how this affects individuals and society. For years, various governments have enacted regulations while organizations have defined policies about cyberethics.
In terms of what constitutes ethical behaviors and practices online, there are many areas of debate among organizations that focus on cyberethics. Some example of these areas are intellectual property rights, accessibility of information, censorship and filtering, gambling, sexuality/pornography, cyberbullying, etc. The debates around these and other related areas have spawned several different codes of conduct among IT professionals that can apply to personal computer users.
Two areas of debate in terms of cyberethics related to property rights include peer-to-peer file sharing, a technology that allowed users to anonymously transfer files to each other, and software ownership. In regards to the former, the question is whether it is ethical to transfer copyrighted media to another user, especially for digitally-formatted music. Proponents of unrestricted file sharing point out how file sharing has given people broader and faster access to media, has increased exposure to new artists, and has reduced the costs of transferring media (including less environmental damage). This argument is often met by supporters of restrictions on file sharing who argue that we must protect the income of artists and other people who work to create digital media. For software ownership there is a similar debate between those who support closed source software rights distributed under restrictive licenses and those who want to promote open source software. The following organizations are of notable interest in cyberethics debates:
International Federation for Information Processing (IFIP)
Association for Computing Machinery, Special Interest Group: Computers and Society (SIGCAS)
Electronic Privacy Information Center (EPIC)
Electronic Frontier Foundation (EFF)
International Center for Information Ethics (ICIE)
Directions and Implications in Advanced Computing (DIAC)
The Centre for Computing and Social Responsibility (CCSR)
Cyber-Rights and Cyber-liberties
International Journal of Cyber Ethics in Education (IJCEE)
The ethical values as defined in 1992 by the Computer Ethics Institute; a nonprofit organization whose mission is to advance technology by ethical means, lists these rules as a guide to computer ethics:
Thou shalt not use a computer to harm other people.
Thou shalt not interfere with other people’s computer work.
Thou shalt not snoop around in other people’s computer files.
Thou shalt not use a computer to steal.
Thou shalt not use a computer to bear false witness.
Thou shalt not copy or use proprietary software for which you have not paid.
Thou shalt not use other people’s computer resources without authorization or proper compensation.
Thou shalt not appropriate other people’s intellectual output.
Thou shalt think about the social consequences of the program you are writing or the system you are designing.
Thou shalt always use a computer in ways that ensure consideration and respect for your fellow humans.
10 Commandments of Cyberethics
Stop.Think.Connect – Family Presentation
During the skit planning, circulate and offer suggestions and strategies that might help students plan more efficiently. For example, students may benefit from viewing existing video skits, sample storyboards (for filming purposes), or other tips to facilitate the planning, filming, or video publishing processes.
- Students will be able to define and describe the purpose for cyberethics
- Students will be able to create a video skit on cyberethics to demonstrate their understanding of human, cultural, and societal issues with technology
Student Self Assessment
Individual students reflect on their own technology usage in terms of cyberethics, e.g. moments where they were unsure if specific activities were ethical based on what they learned in this lesson
Peer Assessment
Student teams provide, receive, and apply feedback in order to improve their video skits
Teacher Assessment
Review Maker Journal pages for evidence of video skit planning. For example, look for evidence of dialogue, defined roles, sequence (timeline), planned use of props, etc.
Lesson Materials
Building Materials
- OPTIONAL: Materials for props (foam, plastics, fabric, wood, etc.)
Tech
- Computers or mobile devices
- Internet access
Design Challenge: Ideate, Prototype and Test (60-90 min)
Design Challenge Overview
In this culminating project, student teams ideate, prototype, test, reiterate, and finally create a model of the networked digital environment in their classroom or school. Students use various materials and locally-installed or web-based modeling tools to create the model, mapping out the network and key access points connected by wires and Wi-Fi. Finally, students identify potential risks and other considerations at each access point represented in the model and prescribe strategies for addressing these issues, presenting their findings to an audience.
Essential Question:
- What are the concerns, risks, and associated strategies that apply to our networked digital environment in terms of digital citizenship?
Lesson Procedure:
Sample student & teacher Dialog.
T: “Recall that in Lesson 1 you developed empathy, that is, you developed an understanding of what digital citizenship is and why it is important in our world. It is relatively easy to determine what you can do to become an effective digital citizen, but it is more difficult to consistently and strategically put those ideas into practice. Now that we have learned so much about digital citizenship, we will construct a model of our networked environment to use for analyzing how to apply the digital citizenship learning we gained throughout the unit.”
S: “Will we be able to use what we did already?” “Where should we put the information we learned in the model?”
T: “These are good questions. Yes, you can use all of the resources you created throughout the unit. You get to practice them again as you go about designing the network model but you also get to be creative in it looks. Ask yourself, “What would I want to see in this classroom to remind me of the skills and strategies I learned so far?” The answer to this question should guide your thinking, and there are no wrong ways to design it.”
S: “Do we have any rules for building the model, like how big must it be?”
T: “There are rules that we will call criteria and constraints (described below). These will tell you how big the model should be, how many materials to include, and other design specifications and limits.”
Criteria & Constraints
Review the criteria and constraints with students. Engineers design things using some rules about how the designs must behave or work. These rules are called criteria. Engineers can run out of materials, money, time to build, or space in which to build something. In other words there are limits on how something can be built. These limits are called constraints. The criteria and constraints for this challenge are below.
| Criteria (design requirements) | Constraints (design limitations) |
|
|
Ideate
In this phase students generate ideas for developing the model and capture the brainstorm using a web-based platform such as Padlet, Google Docs, or other digital tool built to encourage real-time collaboration. Students may come back to this phase as many times as needed during their various iterations of the classroom model.
T: “No matter which digital tool your team decides to use to record your brainstorming efforts, call me over if you need help.”
S: “Can you please review the rules of brainstorming?”
T: “Sure. Let’s keep them simple: 1) Don’t judge ideas until later, 2) Consider all ideas contributed to the group, 3) Ask for clarification on ideas as needed, 4) Build on others’ ideas wherever possible, and 5) go for quantity!”
S: “How will we choose a few ideas to start with if we have so many?”
T: “Find ones that are the easiest to implement. For example, if an idea is to start the model with a rectangular base without adding doors to the model, this might be easier than say, worrying about the doors and other minute details immediately. Start simple and then get fancy later. In other words, choose starting ideas that lead to a quick prototype!”
S: “Okay, then we can build on those ideas or select new ones. Got it!”
(Click button below to access Ideate Maker Journal page)
Prototype
Students select ideas from the ideate phase and begin building an initial version, or prototype. Remind students that it should meet most, if not all of the criteria and constraints but does not need to be perfect. They will test and reiterate as they proceed with building the model. It’s likely students will come back to this phase very often. Encourage the iteration! This often will lead to more ideas being generated and explored.
T: “When your team feels it has a good idea of how to begin the model, you may start collecting materials and begin to build. Please send only 1-2 people from your team to gather materials. This will ensure everyone can access the materials.”
S: “How many of each materials can we take? Is there a limit?”
T: “Please do not take all of any one material. Make sure you take only what you need to start building. You can come back to get more materials. The key is that each team can be as creative as possible but also must be courteous to others.”
S: “Can we share ideas with other groups? I want to collaborate!”
T: “Work on the model with your team first. In a while you will be able to share and discuss your completed models with other teams and receive useful feedback to apply to the model. That is very collaborative and positive!”
(Click button below to access Prototype Maker Journal page)
Test your Design
Student teams evaluate their models using the checklist provided on the Test Maker Journal page. This checklist will help ensure the models meet the defined criteria and constraints for the design challenge. Students do not need to wait for a specified time block in order to start testing. They should test as soon as the team believes the prototype is ready. This will allow them to determine areas where the models need to be modified and refined. They will likely engage in testing several times and the tests can lead to more ideation and prototyping.
T: “When your team is ready to test, use the checklist in the Test Maker Journal page and identify criteria and constraints that have not been met. Also, for the ones met, think of ways to make those attributes (characteristics) of the model better.”
S: “What will we do then?”
T: “You will have learned areas that need improvement. This means you can modify, refine, takeaway or add more materials, etc. Do whatever it takes to ensure all criteria and constraints are met, and that the model looks well-designed, doesn’t fall apart, is labeled, etc. It is okay and encouraged that you revisit your brainstorm ideas and continue to prototype. After you reach a final iteration, work on identifying the risks, strategies, and other digital citizenship concerns with which to develop your recommendations to present to an audience.”
(Click button below to access Test Maker Journal page)
The design process always involves creating a model, whether it is a 2D drawing or a 3D device. The design challenge allows students to combine the content knowledge and skills pertaining to digital citizenship with a 5-phase design process (empathy, define, ideate, prototype, test). This unit was designed such that students engage in empathy building around the basic ideas and definitions of digital citizenship in Lesson 1 and then learn specific skills and concepts for digital citizenship in Lessons 2-6 (define phase). This sequence prepares students to engage in the ideate, prototype, and test phases of the design challenge. The networked environment the students design and build serves as a means for students to think about an ideal learning space where they can incorporate what they have learned in previous lessons. They also get an opportunity to demonstrate mastery of the concepts through a public presentation of their model and prescribed strategies for addressing various concerns related to digital citizenship.
Design Challenge – Ideate Maker Journal
Design Challenge – Prototype Maker Journal
Design Challenge – Test Maker Journal
Just as in a previous lesson, students will use digital tools to brainstorm, plan, and develop ideas for the classroom models. Check to ensure students are clear on how to use these tools and provide support as needed. Make sure the technology is fully functional prior to engaging in this design challenge.
Communication is critical in the design process. Students need to be allowed to talk, stand, and move around to acquire materials. Help students become successful and care for the success of others by asking them to predict problems that might arise in the active environment and ask them to suggest strategies for their own behavior that will ensure a positive working environment for all students and teachers.
Practice and predict clean-up strategies before beginning the activity. Ask students to offer suggestions for ensuring that they will leave a clean and useable space for the next activity. Students may enjoy creating very specific clean-up roles. Once these are established, the same student-owned strategies can be used every time hands-on learning occurs.
- Students will be able to design and build a model of a classroom intended to teach digital citizenship skills
- Students will be able to engage in positive, safe, and legal and ethical behavior when using technology
- Students will be able to select and use digital tools to plan and manage a design process that considers design constraints and calculated risks
Student Self Assessment
Ask individual students to explain the reasoning behind including specific design elements in the model in terms of digital citizenship
Peer Assessment
Student groups discuss and compare their models and provide each other with constructive feedback
Teacher Assessment
Provide student teams with scenarios that depict instances of poor applications of digital citizenship skills and have them work to develop suggestions for changing the situation in favor of best practices in digital citizenship
Design Challenge Materials
- Various adhesives, connectors, and fasteners (e.g., paperclips, binder clips, thread, yarn, adhesive foam pads, wooden stir sticks, straws, spoons, pipettes, labels & stickers, rubber bands, etc.)
- Materials (e.g., laminate samples, dust covers, foam pieces, deli containers, fishboard, cardboard tubes, plascore scraps, posters, shower caps, scrap materials, cards, etc.)
- Tape, glue, scissors
- Recording materials: RAFT Makerspace Journal Pages (for each lesson)
- Tech: Computers, mobile devices, internet access