In this unit, students learn about different aspects of cyber security. Students build empathy around the concept of cyber security by learning about different types of data categories and by conducting research into how cyber security is addressed globally. The next set of lessons allow students to learn and apply concepts for creating effective account passwords, converting decimal data strings to binary strings, creating simple programs, and basic encryption. The unit culminates in a design challenge where students design, build, and test a model of a device that can safely transmit data through the application of multiple layers of encryption and patterns.
Educational outcomes
- Lesson 1: Students will conduct research to find and integrate information on different types of data that must be protected
- Lesson 2: Students learn to create strong passwords to protect user accounts from unauthorized access
- Lesson 3: Students learn to convert decimal numbers into binary numbers to understand the nature of digital data transfer
- Lesson 4: Students learn how to create simple directional programs and then convert the directions into binary code
- Lesson 5: Students learn how to create, use, and compare messages encrypted using a simple substitution pattern
- Design Challenge: Students develop a solution for transmitting information that is protected by multiple layers of encryption
NOTE: Cyber security is an important aspect of digital citizenship. Access RAFT lessons on DIGITAL CITIZENSHIP (coming soon!)
STEAM INTEGRATION
In Lesson 1, students find and integrate information on types of data requiring protection and how cyber security is addressed globally and then write a mini case study (RI.4.9). They learn how to create and test the strength of effective passwords in Lesson 2 (4-PS4-3). Lesson 3 teaches students convert decimal numbers into binary data strings, adding and subtracting multi-digit numbers in the process, and then applying this technique to simple programs (4.NBT.B.4). The culminating design challenge requires students to apply all of the above described skills.
Our design thinking units have five phases based on the d.school’s model. Each phase can be repeated to allow students to re-work and iterate while developing deeper understanding of the core concepts. These are the five phases of the design thinking model:
EMPATHIZE: Work to fully understand the experience of the user for whom you are designing. Do this through observation, interaction, and immersing yourself in their experiences.
DEFINE: Process and synthesize the findings from your empathy work in order to form a user point of view that you will address with your design.
IDEATE: Explore a wide variety of possible solutions through generating a large quantity of diverse possible solutions, allowing you to step beyond the obvious and explore a range of ideas.
PROTOTYPE: Transform your ideas into a physical form so that you can experience and interact with them and, in the process, learn and develop more empathy.
TEST: Try out high-resolution products and use observations and feedback to refine prototypes, learn more about the user, and refine your original point of view.
The Design Thinking Process | ReDesigning Theater. (n.d.). Retrieved April 2, 2016, from http://dschool.stanford.edu/redesigningtheater/the-design-thinking-process/
NGSS Physical Science 4-PS4-3:
Generate and compare multiple solutions that use patterns to transfer information.
Common Core Reading: Informational Text RI.4.9:
Integrate information from two texts on the same topic in order to write or speak about the subject knowledgeably.
Fluently add and subtract multi-digit whole numbers using the standard algorithm.
Suggestions for pacing and differentiation
Lessons 1-5 can be taught as stand-alone lessons as each provides experiences for application of concepts of cyber security.
Unit Materials
- Corrugated plastic or equivalent
- Green file folders or equivalent cardstock
- Adhesive foam or other thick tape
- Stickers, letters and numbers
- Paper tubes or equivalent
- CD container spindles (short or tall) or equivalent
- Plastic or paper cups, any style
- Deli containers, any style
- Corks
- Various plastic items that can be cut with scissors
- Fabric scraps
- Pipe cleaners or other items for tying
- Craft sticks
- CDs
- Rubber bands
- Foil
- CD media trays
- Beverage lids
- Checkerboard-like grid or equivalent grid for placing objects
- Various types of foam
- Binder clips and/or paper clips
- Scissors
- Stapler
- Single or multiple-hole punches
- Scotch tape
- Rulers
- Internet access
- Computers or mobile devices
- ASCII Table (see Binary Talk lesson)
- Activity Grid (see Binary Talk lesson)
- Basic Direction Cards (see Puppy Programming lesson)
- Advanced Direction Cards (see Puppy Programming lesson)
- Caesar Cipher Blackline Master
Lesson 1: Empathy: The Importance of Cyber Security (90-120 min)
Lesson Overview
Students will learn the definition of cyber security and then identify different types of data in a variety of categories that require protection. Students engage in research and integrate information describing how another country handles cyber security issues on a particular kind of data (RI.4.9). Then they write a mini case study (informational text) comparing cyber security methods used by the U.S. and the other country.
Essential Questions:
- What is cyber security and why is it important?
- What kind of data is collected and stored in each category (below in Lesson Procedure)?
- What is a data breach?
- How does the U.S. address the issue of cyber security? How do other countries address the issue?
LESSON PROCEDURE:
Write the following categories on the board: Finance, Medical, Education, Government /Military, Travel, Communications, Real Estate/Land Management, Utilities, Transportation, Retail
- Student teams visit several websites (see Media toggle in right margin) with content on global cyber security.
- Students should also look up and compare 2-3 sources of information on the same topic to check for consistency.
- Students record sources and information in the Maker Journal page.
- Students use the information to write a mini case study comparing cyber security efforts between U.S. and another country.
Sample teacher and student dialog.
T: Share the following example with students. “Suppose Bob Mulligan has a huge bank account and he frequently checks his account balance online. His online account has the password BMULLIGAN. Do you think this password is secure? What could happen if it is not secure? Discuss your ideas with a partner and then be ready to share.”
S: “It’s not secure because it’s mostly his last name.” “We think he should have lower case letters and numbers in the password.” “It should not have all capital letters!”
T: Check for prior knowledge. “Who can tell me what they think cyber security means?” “Where have you heard that term before?” Call on a few students.
S: “Cyber security is with computers.” “Protecting online accounts.” “Cyber security means not letting hackers get your stuff!”
T: “Today you will be learning about cyber security and about the types of information, called data, that must be protected. You will also do web research and learn how cyber security is addressed in other countries. Finally, you will use the information to write a mini case study describing how another country addresses the issue of cyber security and how those efforts compare to those practiced in the U.S.”
Cyber security refers to a set of processes and practices designed to protect networks, computers, programs and data from attack, damage or unauthorized access. This has become increasingly problematic because of the ever-evolving nature of the types of security threats. Computer viruses and other malware used by hackers are more sophisticated and difficult to stop today than in the past, making it necessary to frequently create updated processes and procedures for dealing with them.
Data refers to the quantities, characters, or symbols on which operations are performed by a computer, being stored and transmitted in the form of electrical signals and recorded on magnetic, optical, or mechanical recording media. It can also refer to facts and statistics collected together for reference or analysis; things known or assumed as facts, making the basis of reasoning or calculation. A data breach is an incident in which sensitive, protected or confidential data has potentially been viewed, stolen or used by an individual unauthorized to do so. Data breaches may involve personal health information (PHI), personally identifiable information (PII), trade secrets or intellectual property.
Students conduct research on the topic of cyber security and then write a mini case study. A case study is a particular instance of something used or analyzed in order to illustrate a thesis or principle. Students analyze the cyber security methods used in another country in regards to a particular type of data and then compare those methods with those applied in the U.S. The study is mini in that it is shorter than most case studies.
- Computer Security
- Trans-European Research and Education Networking Association (TERENA)
- Canadian Cyber Incident Response Centre
- U.S. Computer Emergency Readiness Team
- World’s Biggest Data Breaches
- Model good techniques for safe quality internet searches
- Consider pre-selecting additional websites that yield quality information on cyber security methods.
Communication is critical for collaboration. Students need to be allowed to talk in order to agree on sources of information on cybersecurity for their particular country of interest.
- Students will integrate information on cyber security from multiple websites (texts) in order to write and speak knowledgeably about the topic.
Student Self Assessment
Student groups review and complete the case study checklist in the Maker Journal page and make necessary changes to their writing and/or find more information.
Peer Assessment
Student groups present their case studies to the class and then receive peer feedback and answer any peer questions on the study.
Teacher Assessment
Make sure the case study has the items listed in the checklist with sufficient details and examples.
Lesson Materials
Tech
- Internet access
- Computers or mobile devices
Lesson 2: Define: You Shall not Pass(Word)! (30 min)
Lesson Overview
Creating a strong and unbreakable password has become crucial in our data-driven world. Student accounts, business transactions, personal email accounts, and smartphone applications are just a few examples of things that must be password protected. It is difficult to come up with good passwords when people usually have many online accounts to manage, and most people know that using the same password for multiple accounts is a bad idea. This is especially true since computer hackers use various techniques for cracking passwords and stealing data, and they are getting much better at it! The question is how does a person create a strong and unbreakable password and remember it? This lesson will teach students about strategies and tools for generating strong passwords and to develop mnemonic devices to remember them. Mnemonic devices for remembering passwords represent an applied pattern for gaining access to information, making it possible for the information to be transferred (4-PS4-3).
Essential Questions:
- What is the purpose of a password?
- What are current best practices for creating strong passwords?
- What tools are available to help generate strong passwords?
- Why must users create mnemonic devices to remember passwords?
LESSON PROCEDURE:
- Allow students to work individually for this lesson in order to model the concept of keeping passwords private.
- Students review current best practices for creating strong passwords (see Concept Quick Reference section).
- Students learn the attributes of strong passwords using the resources in the Media section, including a free password generator
- Students create examples of strong passwords using the generator and create their own version of the mnemonic device suggested by the generator.
- Remind students that their password examples should not be current passwords they actually use, or intend to use, to access their own personal or school accounts!
Sample teacher and student dialog.
T: Show students the following passwords: BMULLIGAN and BMULLIGAN12345. “Which one of these passwords do you think would be harder to guess? Why?”
S: “The second one because it is longer.” “The second one because it has letters and numbers.” “They are both hard to just guess!”
T: Ask, “What then makes a password strong? How will we know when to call a password strong or weak? What are the characteristics, or attributes, of a strong password?”
S: “Strong passwords are longer, like 12 letters.” “Passwords that spell your name or have your birthday are weak.” “Always use combinations in a password.”
T: “Today you will be learning the best ways, or practices, to create strong passwords. First you need to learn the characteristics of strong passwords. Then you will use a special tool called a generator to create passwords for you. You get to control the length, symbols, numbers, letters, and special characters that can be added to the passwords to make them very strong (secure)! Then you will learn how to remember them using something called a mnemonic device, like silly sentence that help you remember them.”
S: “Can we use the passwords we create in class today for accounts we already have at home or at school?”
T: “No! When you are at home and with your parents around, you may use this tool to generate passwords that you can use for your own accounts. Please do not use passwords generated here in class because other people may see your passwords without you knowing it. What might happen if other people see your passwords?”
We live in a data-driven world. Nearly all aspects of human life are dependent on the collection of information in one form or another, and that information is stored by various systems in order to provide a reference to events and facts of interest. It also helps us understand certain trends, form predictions about behaviors, and make logical decisions. Such vast amounts of data (personal, financial, medical, etc.) must be protected so they are only accessed by authorized individuals or agencies. Today there are many methods for keeping data safe, including various encryption techniques. The most common method for the average person is by using passwords. A password is a secret word or phrase that must be used to gain admission to something. Today they are most familiar to people as a string of characters that allows access to a computer, interface, or system. Simply put, the purpose of a password is to keep information secure! Therefore, it makes sense that passwords should be kept secret, or shared with only those who have a need to know or access the information. Passwords are particularly useful for keeping out viruses and worms. A computer virus is a piece of code that is capable of copying itself and typically has detrimental effects, such as corrupting the system or destroying data. A computer worm is a standalone malware computer program that replicates itself in order to spread to other computers. Often, it uses a computer network to spread itself, relying on security failures on the target computer to access it. Unlike a computer virus, it does not need to attach itself to an existing program. Most of the time, these threats are avoided by creating strong passwords. But how do you create a strong password?
To be considered strong, a password should:
- Be at least 8 characters long
- Consist of a mixture of upper and lower case letters
- Contain numbers
- Contain non-numeric, non-alpha special characters such as !@#$%^*()
Some examples of weak passwords include:
- Any word that can be found in a dictionary, in any language (e.g., airplane or aeroplano).
- A dictionary word with some letters simply replaced by numbers (e.g., a1rplan3 or aer0plan0).
- A repeated character or a series of characters (e.g., AAAAA or 12345).
- A keyboard series of characters (e.g., qwerty or poiuy).
- Personal information (e.g., birthdays, names of pets or friends, Social Security number, addresses).
- Anything that’s written down and stored somewhere near your computer
Remembering a strong password, or several of them, can be difficult but can be made simpler by using mnemonic devices. Mnemonic devices are techniques a person can use to help improve his or her ability to remember something. In other words, it is a memory technique to help your brain better encode and recall important information. For example, to remember the password 8ButdBns!, a possible mnemonic could be “8 Buttered Beans!” Certain agencies recommend changing passwords every 1-2 months but there is debate as to whether it actually reduces the risk of unauthorized access. In any case, it’s still considered a best practice in terms of cyber security. Just remember that when changing a password, you should also create a new mnemonic to remember it. This is much safer than putting a sticky note on your monitor!
How to Choose Strong Passwords
How to Memorize Difficult Passwords
Make sure all computers and/or mobile devices are working properly. Also make sure the videos in the Media section play on the computers/devices.
- Students will generate and compare multiple (password) solutions
- Students will use patterns (as mnemonic devices) to transfer information (reveal passwords)
Student Self Assessment
Students list attributes of strong passwords they need to put into practice for themselves.
Peer Assessment
Student groups share 1-2 passwords created using the generator and evaluate them for strength according to best practices learned in the lesson.
Teacher Assessment
Review the recommendations students write in the Maker Journal for improving the sample passwords provided.
Lesson Materials
Tech
- Computer or mobile devices
- Internet access
Lesson 3: Define: Binary Talk (45 min)
Lesson Overview
Cyber security threats have shifted from networks to software applications in recent years. Individuals and organizations must test software and/or fix any flaws that may expose them to threats. Binary code analysis is a new approach for testing the security of software and helps reduce the risk of malicious or erroneous code from damaging applications and systems. In this lesson students learn to convert decimal (base ten) numbers into binary code by applying a simple pattern that represents a 6-bit piece of information (4-PS4-3). The process of converting numbers into binary code will involve subtracting multi-digit numbers (4.NBT.B.4). This uncomplicated activity provides an understanding of digital data transfer and familiarizes students with the American Standard Code for Information Interchange (ASCII). In other words, students understand the nature of data transfer by speaking computer!
Essential Questions:
- What are bits? What are bytes?
- How can the ASCII language be used to explain data transfer between digital devices/computers?
LESSON PROCEDURE:
- Distribute the activity grid, ASCII table, and 8 corks to each student team.
- Model how to convert decimal numbers into binary numbers. Use the example illustrated in the Concept Quick Review section below or create other examples.
- Students practice converting several multi-digit numbers and record their results in the student Maker Journal page.
- Student teams refer to the ASCII table to create short sentences (2-4 words) and then convert them into binary code letter by letter, using spaces, hyphens, and/or commas where necessary. For example, the phrase “I like cats” consists of three words and a total of 9 letters. The reader needs to know where the letter codes start and stop, so one suggestion might be: “(I)code, (l)code-(i)code-(k)code-(e)code, (c)code-(a)code-(t)code-(s)code”. The hyphens can represent the separation between letters and the commas can represent separations between words.
- Student teams share and compare their messages with each other.
Sample teacher and student dialog.
T: Write the following on the board or mention them verbally: 8-bit, 32-bit, 64-bit. “Who here has heard of these terms before? What do they mean?”
S: “They tell you about computers.” “The higher the bits, the more you can do with your device.” “Sixty four bit systems can do more!”
T: “Today we are going to learn about these terms by understanding what bits and bytes are and how they represent information sent, received, and stored by technology. You will also learn to speak computer-ese!”
S: “That sounds like a language. We are going to speak like computers?”
T: “Basically, but we will use clever tools that will help us translate between our language and computer talk, a language called binary code!”
S: “How will we do that?”
T: “We will learn how data is transferred between devices using regular counting numbers, called decimal numbers, and change those into a bunch of ones and zeros, computer-style!”
Data is sent around the world every second of every day using technology. Communication between computers and other digital devices have become a necessity for nearly every aspect of our daily lives. It is a good thing the devices all speak the same language! Every character typed into a text message or email gets converted into binary code, a series of ones and zeros. Each one or zero is called a “bit.” Since bits by themselves represent small amounts of information, they are commonly stored together in groups of 8, called “bytes”. In terms of computer storage, ones and zeros are not explicitly written on the hard drive of a computer. In reality, they are represented by the orientation of magnetic particles on the disk. When one device sends information either through cables or wireless networks, the receiving device converts the bytes (binary code) back into the original form and renders it on a screen for the user. The “original form” is the typed information in a text message or email, or it can be pictures or video. See the graphic below for an example of converting decimal numbers to binary code using the grid in this activity.
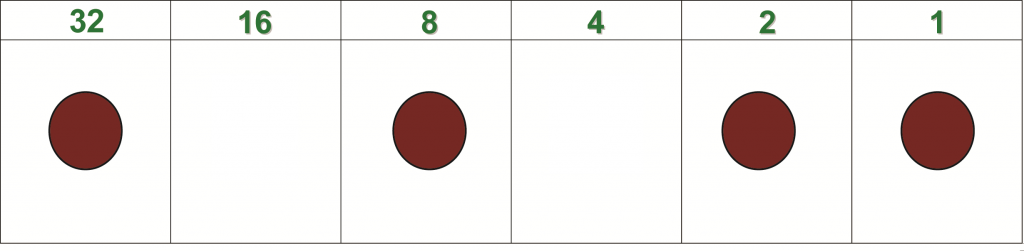
Example – Converting 43 into Binary Code: Start with the largest value on the grid that “fits” into 43 (it’s 32). Place a cork in the box under 32. The 32 is now said to be turned “on.” Now subtract 32 from 43 (43 – 32 = 11). The next box in the grid is 16. Does 16 fit into 11? No, it is too big, so 16 does not get a cork. The 16 is “off.” The next box of the grid is 8, which happens to fit nicely into 11 so it gets a cork. Subtract 8 from 11 (11 – 8 = 3). Since 4 does not fit into 3, it is left empty. This process continues until all values have been checked. Any number on the grid with a cork (“on”) is assigned a one. The “offs” are assigned zeros. The resulting binary code for 43 is 101011. Ta dah!
Technical note: Each column in the grid represents a bit so this is a 6-bit example rather than 8-bit, not a full byte but hey, its an example! The process is the same for any number of bits in the data string.
The American Standard Code for Information Interchange, or ASCII, is a standard system for converting data from familiar base ten numbers into binary numbers. Base ten numbers are the familiar counting numbers having digits 0-9 in each position. They are also called decimal numbers because each place value is a multiple of ten. For example, the decimal number 36 is equal to three 10’s plus six 1’s (3 x 10 + 6 x 1 = 36). ASCII assigns a decimal number to each recognized character used for communication (alpha-numeric, punctuation, hashtags, etc.). For example, each letter in the common acronym “LOL” is assigned a number. The L’s are each assigned 76 as values while the O is assigned 79, so LOL becomes 76, 79, 76. Each character is assigned a unique value, so capitalization of characters doesmatter (see this ASCII table). Each of these decimal values gets converted into binary code when sent from a device. The receiving device understands and interprets the binary code as LOL. In case you are wondering, the binary code for LOL is:
L = 00101100, O = 00101111, L = 00101100.
Allow students to draw their own versions of the activity grid with additional columns. Students should first identify the pattern represented in the numbers for each column heading (n, … , 32, 16, 8, 4, 2, 1). The pattern increases by a multiple of two moving from left to right on the grid (previous column x 2 = next column).
Communication is important in this lesson because students must work together to practice the conversion process. They also must mutually agree on a message with which to apply the ASCII values and later convert to binary.
- Students will generate multiple solutions using binary code as a pattern to transfer information.
- Students will compare multiple solutions using binary code as a pattern to transfer information.
- Students will fluently subtract multi-digit whole numbers using the standard algorithm.
Student Self Assessment
Students reteach how to use the corks and activity grid to convert from decimal to binary numbers to a partner.
Peer Assessment
Students share binary sentences from the Maker Journal with another team who uses ASCII to decode and verify the accuracy of the sentences.
Teacher Assessment
Have students use their corks and activity grid and demonstrate for you how to convert a number into binary.
Lesson Materials
Building Materials
- Corks
Tech
- Computer
- Internet access
Other
Lesson 4: Define: Puppy Programming (45 min)
Lesson Overview
A computer program is a collection of instructions that performs a specific task when executed by a computer. A computer requires programs to function and typically executes the program’s instructions in a central processing unit. In this lesson, students lead a puppy to a tennis ball by giving exact directions, programming the puppy’s path. This fun and easy activity reinforces programming techniques such as planning, sequencing, testing, debugging, and creating procedures and loops. By creating and testing out these simple programs students are both generating and comparing multiple solutions for transferring data (the puppy) using a patterns (sequence of instructions) (4-PS4-3). Students will discuss their learning and relate programming knowledge to the issue of cyber security.
Essential Questions:
- What is a computer program?
- What are procedures and loops?
- How does knowing about programs help cyber security efforts?
LESSON PROCEDURE:
- Distribute a sheet of basic and advanced direction cards to each team.
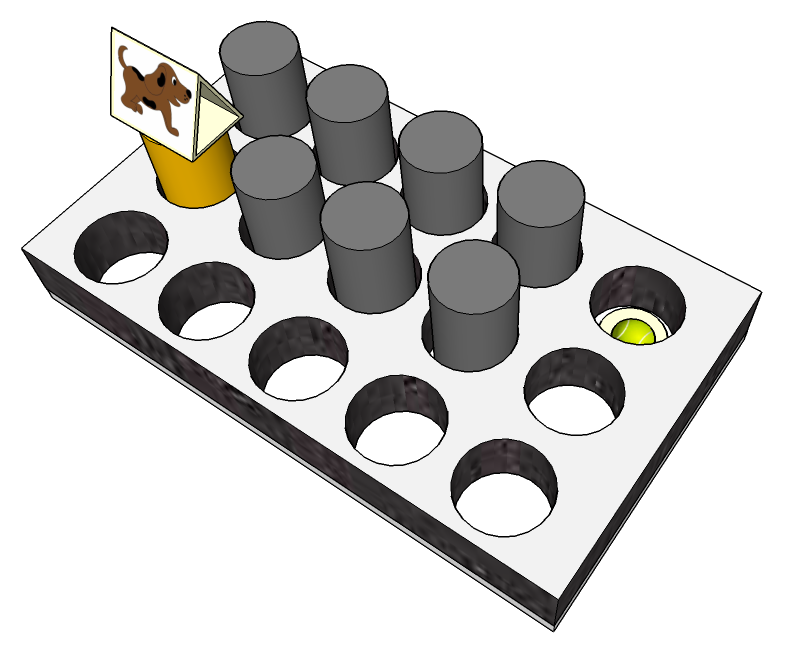
- Student teams assemble the Puppy Programming models.
- Students use the Maker Journal page to guide them in creating a program with the basic cards, successfully sequencing the steps for getting the puppy to the tennis ball.
- Student teams exchange models and program cards with another team and then run the programs. If errors are found (puppy hits a cork), students work together to correct (debug) the program.
- Student teams create another program using the advanced direction cards and continue to collaboratively run and debug programs.
- Students reflect on the essential questions for the lesson, linking programming to cyber security.
VIDEO: Assembling and using the Puppy Programming grid
Sample teacher and student dialog.
T: Show students a picture of the set-up they will assemble. “The puppy shown here wants to get to the tennis ball. How many steps, or instructions, are needed for it to get the ball, assuming it cannot go through or over the corks?”
S: “I think it is three. One move down, then all the way to the right, then up.” “It’s seven moves.” “I’m not sure if it is one step per space or if a step is one whole direction.”
T: “You will do an activity where you get to create a set of instructions for the puppy. This is a model of a computer program, meaning you will be creating programs!”
S: “How is this activity like a real program?”
T: “Programming involves techniques such as planning, sequencing, testing, debugging, and creating procedures. When you assemble and use the models you will engage in programming by doing all of these actions, making the model like a real program, just not on a screen.”
(Click button below to access Maker Journal page)
The set-up used in this lesson provides an effective physical model of a computer program that allows students to practice programming techniques such as sequencing testing, and debugging (correcting errors). The programs are easily created and provide excellent opportunity for team collaboration and peer assessment because the models can be tried by other teams, allowing for immediate peer feedback.
A program is a set of exact instructions that a programmer writes to tell a computer on how to do a task. A procedure is a list of step-by-step instructions within the program that the computer executes. A loop is a set of instructions that are repeated.
In Puppy Programming, using the basic cards reinforces the importance of order. Using the advanced cards adds in the element of direction, along with a repeat function. The repeat card introduces the student to loops, which repeat a set of instructions a given number of times or until a certain condition is reached.
Writing a good program requires planning and foresight to anticipate how the computer will react to a command or set of instructions. Occasionally, though the program follows the instructions, it does not get the desired result. It is up to the programmer to debug the program by going over the instructions and correcting errors.
- Students will generate multiple solutions for transferring data (the puppy) using patterns (programs)
- Students will compare multiple solutions for transferring data (the puppy) using patterns (programs)
Student Self Assessment
Students share and demonstrate a program to a partner.
Peer Assessment
Student teams exchange, run, test, and debug programs. The debugging teams make suggestions to the team that creates the program being tested.
Teacher Assessment
Conduct a whole group discussion to allow all students to share, discuss and compare their reflections on the relationship between programming and cyber security.
Lesson Materials
Building Materials
- Corks
- Foam, 3×5 grid of holes or checkerboard-like grid
Connecting Materials
- Tape
Other
Lesson 5: Define: Encryption the Roman Way! (30 min)
Lesson Overview
Cyber security involves many strategies for protecting information from unauthorized access. One such strategy involves hiding data using different types of cryptography, the effective practice of concealing information. Cryptography was important more than 4,000 years ago as a way to protect the interests of kings, military leaders, and other dignitaries. It is important today because vast amounts of personal, financial, and medical data stored in computer systems worldwide are at risk and need to be protected. In this lesson students will learn about cryptography by encoding and decoding messages using a technique similar to that used by the Roman general Julius Caesar! The technique uses substitution to conceal information, based on a special key that determines the pattern necessary for decoding the original message (4-PS4-3).
Essential Questions:
- What is cryptography?
- How does cryptography play a role in cyber security?
LESSON PROCEDURE:
- Distribute blackline masters to students.
- Students build the devices according to the instructions in the Maker Journal page.
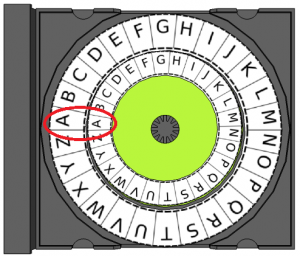
- Model how to encode the message HELLO with a secret key = 3. Turn the inner plain text ring 3 positions to the right (clockwise). The first plain text letter in HELLO is H. The cipher text letter on the outer ring is K. Continue encoding the rest of the word HELLO. When finished, the plain text word HELLO becomes the cipher text word KHOOR. Explain that decoding works the same way except the message is read from the outer ring inward (KHOOR becomes HELLO).
- Students practice decoding the messages provided in the Maker Journal page.
- Student teams create their own secret message and encode it. Then they share the message with another group who must then try to decode the message.
VIDEO: How to build and use the device
Sample teacher and student dialog.
T: “Today we will learn about cryptography, which is a set techniques used to conceal information. You will work in teams to assemble and use a cryptographic device once used by Julius Caesar, a Roman emperor from long ago!”
S: “That sounds like it’s difficult. Is it going to be hard to use?”
T: “It’s simple. All you need to be able to do is know the positions of letters in the alphabet and be able to add and subtract.”
S: “Will we have to figure it all out on our own?”
T: “After you assemble the device, called a Caesar Cipher, we will work together and practice using it. Then you and your team will get a chance to practice and create your own secret messages. You will also learn how this relates to the use of passwords. Follow the instructions and record your work in the Maker Journal page (click button below).”
Cryptography is the securing of information through concealment. It is intended to protect digital communication and requires data integrity, authentication, and confidentiality. Julius Caesar, a famous general of the Roman Republic who later became its first emperor, protected important messages using the encryptionscheme, or cipher, learned in this lesson, which takes an original message and converts it to an encoded message using substitution. The cipher encodes messages by substituting letters with other letters further away in the alphabet. For example, the message “SURPRISE” might become “VXUSULVH”. The substitution is basically a shift in the alphabet determined by a secret key that defines the amount of shift. Digital information represents “secrets” requiring protection using the Caesar Cipher while the secret key is analogous to a password. The password is required in order to access, decode, and then transfer the information to another person or agency.
The device is quite simple to use. The small ring contains the plain text letters to be encoded. The large ring contains the cipher text (encoded plain text letters). As long as the device is initially set so that the alphabets on the rings align, shifting the inner ring according to the secret key is straightforward (see below). If the key is a positive number the inner ring is shifted clockwise. If the key is negative the inner ring is shifted counter-clockwise. If the key is greater than 26, the ring is shifted all the way around to where it started and then shifted an additional amount to equal the value of the key. For example, for a key of 32, the ring shifts clockwise 26 letters and then an additional 6 letters (“A” becomes “G”). This new letter position could also be calculated as 32 – 26 = 6. For negative keys the same rules apply, so for -32 the new letter position would be 26 – 32 = -6, or six letters counter-clockwise. In this case, “A” becomes “U”.
- Students will generate multiple solutions that use patterns for encoding information (secure transfer).
- Students will compare multiple solutions that use patterns for encoding information (secure transfer).
Student Self Assessment
Students rewrite one of the quotes in the Maker Journal by encoding it with the key prescribed by you. Provide guidance as necessary.
Peer Assessment
Student teams try to decode messages provided by other teams along with the secret key. The decoding teams provide feedback on how to increase the difficulty for “cracking” the code.
Teacher Assessment
Conduct a whole group discussion to allow all students to share, discuss and compare their learning on cryptography and the role it plays in cyber security.
Lesson Materials
Building Materials
- 3-inch circle cut from cardstock
- CD media tray
- Blackline master
Connecting Materials
- Tape
Other
- Scissors
Design Challenge: Ideate, Prototype and Test: Multi-Layer Encryption (60min)
Design Challenge Overview
In this culminating project, students apply the skills and concepts learned through the empathy and define phase activities. They will ideate, prototype, test, reiterate, and finally create a successful device that can securely transmit data through the application of multiple layers of encryption and patterns. Students learn the design process is a non-linear series of steps that can require multiple applications. This helps develop perseverance and creativity as well as facilitate collaboration.
Essential Question:
- How can we build a device that can safely transmit data using patterns and has multiple layers of encryption?
LESSON PROCEDURE
- Students facilitate a brainstorm in their groups to generate approaches to answer the essential question.
- Student groups agree on an idea from the brainstorm and then select materials with which to build their first prototype.
- Students build a prototype according to the criteria and constraints defined in the design challenge introduction (see section below).
- Students test their first prototype using the checklist provided in the Maker Journal page, noting any changes or modifications that must be made.
- Students reiterate, repeating the process until the group agrees that the device successfully meets the criteria and constraints.
- Student groups demonstrate how their devices transmit data using patterns and encryption and why the devices are appropriate for the countries researched in Lesson One (empathy phase).
Sample student & Teacher Dialog.
T: “So far in this unit you have learned about the importance of cyber security and how to create and remember strong passwords. You also learned how to convert decimal data to binary data to “talk like a computer.” You can model simple programs by using materials creatively and can encode and decode data. Now, it is time to put all of that knowledge and skill into practice with a design challenge!”
S: “What will we do?”
T: Introduce the design problem: “Your team must build a device that can protect and transmit data by applying multiple layers of encryption and then demonstrate how the device uses patterns to securely transmit data. You will need to explain how your device can benefit the country you researched in Lesson One.”
S: “That sounds hard!” “How are we supposed to do that?”
T: “You will apply everything you learned about creating strong passwords, converting data into binary, creating simple programs, and using basic encryption. There are many ways to approach the design problem, which you will brainstorm with your team. I cannot tell you how to do it. You can be as creative as possible and explore different solutions. Remember, engineering involves failure in order to develop the best solution, so you will likely redesign as you go!”
Criteria & Constraints
Review the criteria and constraints with students. Engineers design things using some rules about how the designs must behave or work. These rules are called criteria. Engineers can run out of materials, money, time to build, or space in which to build something. In other words there are limits on how something can be built. These limits are called constraints. The criteria and constraints for this challenge are below.
| Criteria (design requirements) | Constraints (design limitations) |
|
|
Ideate
Students brainstorm different solutions to build a device that can securely transmit encoded data. The data will be a program in binary code that is protected by at least two layers of encryption. They will record their ideas in the Maker Journal pages for this challenge (see Prototype and Test sections below). Because engineering is an iterative process, students may choose to or need to return to this phase as they iterate.
T: “Remember that engineers iterate, or come up with multiple versions of a product after conducting tests on it. The first prototype is the most important because it’s a real model of an idea.”
S: “Does the first prototype need to meet all of the criteria and constraints?” “I want it to be perfect!”
T: “Do not worry about perfection on the first try. Believe it or not, engineers learn more when they fail. Fail stands for First Attempt In Learning. When you fail at something, it gives you the opportunity to do better. That’s why engineers build and test many versions of a product to see if it works as intended. Iteration is a good thing!”
S: “I like that idea!” “That makes sense.”
Prototype
Students gather materials and begin building the first iteration of their design solution. They go into the build knowing that it will likely not be the final product, especially since they must test the device against the criteria and constraints. Keep in mind students may choose to or need to return to this phase as the iterate.
T: Students conduct tests on their designs to see if they meet all of the criteria and constraints defined for the device. “Testing is very important to the engineering process. You need to know if all criteria and constraints are met by the prototype, and which parts of your solution need to be fixed or changed in order to improve them.”
S: “How do you conduct a test?” “What are we supposed to do?”
T: “Review each criterion and constraint and simply look for them in the device. For example, does the device make use of a simple program? Yes or know? If the answer is no, then the next question might be where a program could be applied. A simple formula for you to use can be a simple “yes/no” evaluation and then a “where can we …” or “what can we change …” mini brainstorm. Testing can be done repeatedly, so you do not need me to tell you when to test your solution.”
S: “So we can build and then just go test, and then repeat until we think we’re done?”
T: “Yes, but keep in mind you only have a defined amount of time to work and test. Engineers always work with deadlines! Don’t spend too much time planning a build or doing testing. You need to be constantly building, thinking, and testing and refining your design, keeping the time in mind.”
Test your Design
Students will conduct tests on their devices to ensure they meet all criteria and constraints. They can conduct tests while others are still building. In other words, students do not need to wait for “test time” but can engage in testing at any point during the challenge. This models real-world engineering and encourages students to keep developing improved iterations of their designs. The Maker Journal page contains a checklist that students can repeatedly use to evaluate their designs during each test. This can also serve as a quick formative assessment tool.
T: “You will brainstorm, build, test, and refine your designs using the Maker Journal page as a guide.”
S: “When will we start testing?”
T: “I will not tell you when to test. You will test your design when your team agrees that the first prototype meets the criteria and constraints. You might need to test and refine/rebuild several times until it meets them all. Just keep the time limit in mind!”
This design challenge allows students to engage in the engineering design process. This process can be represented in many ways. People may engage in the steps in any order. This unit is built around a model with five design phases: empathy, define, ideate, prototype, and test. Engineering is an iterative discipline with many design steps being taken several times. This is why there are so many versions of televisions, toothbrushes, and many other common items. Each product is intended to serve a particular purpose and meet the needs of specific users.
This specific design challenge is intended to provide an opportunity for students to combine the concepts of strong password creation with binary numbers and programming in order to create “data” that must be protected. Students then use the concept of basic encryption via substitution to encode the data multiple times to provide extra layers of protection, similar to entering a password and then verifying additional pieces of information in order to gain access to an online account. This is the real-world connection that circles back to the empathy lesson where students conducted research on cyber security methods applied in another country.
[/et_pb_accordion_item][et_pb_accordion_item title=”Maker Journal Pages” _builder_version=”3.17.6″ open=”off”]
Materials Center
Organize all materials neatly on 1-2 tables or carts. This will allow students to easily access the materials. One suggestion is to keep stationary items like paper clips and tape separate from the main array of materials. Depending on space, it might be best to allow only 1-2 members from each team to gather items for their team. This can help prevent crowding.
Communication is critical in the design process. Students need to be allowed to talk, stand, and move around to acquire materials. Help students become successful and care for the success of others by asking them to predict problems that might arise in the active environment and ask them to suggest strategies for their own behavior that will ensure a positive working environment for all students and teachers.
Practice and predict clean-up strategies before beginning the activity. Ask students to offer suggestions for ensuring that they will leave a clean and useable space for the next activity. Students may enjoy creating very specific clean-up roles. Once these are established, the same student-owned strategies can be used every time hands-on learning occurs.
- Students will integrate information from multiple sources in order to write and speak knowledgeably about the topic.
- Students will generate and compare multiple solutions to a design problem
- Students will use patterns to transfer information
- Students will fluently subtract multi-digit whole numbers using the standard algorithm
Student Self Assessment
Student groups repeatedly use the checklist in the Maker Journal to improve their designs.
Peer Assessment
Student groups conduct short demonstrations on how to use their devices and explaining their choices of materials.
Teacher Assessment
Review Maker Journal entries for evidence of brainstorming and testing using the checklist.
Design Challenge Materials
Building Materials
- Corrugated plastic or equivalent
- Green file folders or equivalent cardstock
- Adhesive foam or other thick tape
- Stickers, letters and numbers
- Paper tubes or equivalent
- CD container spindles (short or tall) or equivalent
- Plastic or paper cups, any style
- Deli containers, any style
- Corks
- Various plastic items that can be cut with scissors
- Fabric scraps
- Pipe cleaners or other items for tying
- Craft sticks
- CDs
- Rubber bands
- Foil
- CD media trays
- Beverage lids
- Checkerboard-like grid or equivalent grid for placing objects
- Various types of foam
- Binder clips and/or paper clips
- Scissors
- Stapler
- Single or multiple-hole punches
- Scotch tape
- Rulers
- Internet access
- Computers or mobile devices