Unit Overview: Exploring the Relationship Between Magnetism and Electricity
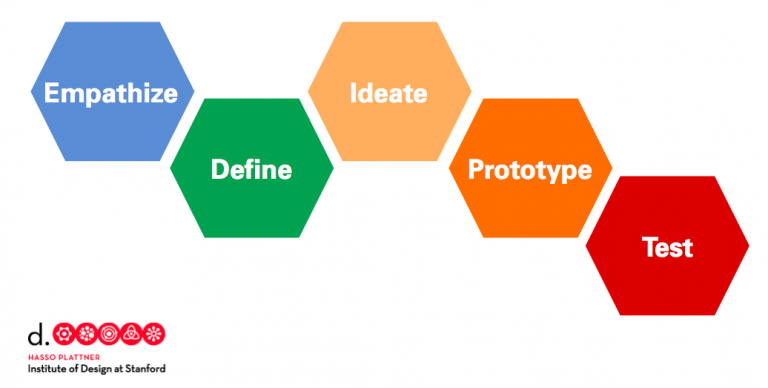
This inquiry unit takes students through a sequence of lessons where they make observations and conduct investigations to provide evidence that energy can be transformed and moved from place to place by electric currents to power circuits and create magnetic fields. This kit shares many connections with the RAFT Electrical Engineering kit designed for middle school students. The unit begins with an empathy lesson that connects the importance of magnets to our modern lives. The define lessons dive into core concepts of magnetism and demonstrate the relationship between electricity and magnetism. The ideate, prototype, and test phases of the design thinking model are combined in a final design challenge where students apply their learning of electromagnetism concepts to build a unique device that powers an LED.
Educational Outcomes
- Students will create a presentation demonstrating how magnetism affects their lives
- Students will identify magnetic and non-magnetic items and investigate the magnetic force strength of ring magnets
- Students will build a floating compass and use it to investigate the relationship between electricity and magnetism
- Students will build a simple generator and spinning motor, demonstrating how magnetism causes electrons to flow
- Students will collaboratively design, test, and refine their own unique generator or motor that will power an LED
STEAM INTEGRATION
Students learn and apply scientific concepts on electricity and magnetism throughout the unit. The first lesson allows students to leverage technology in conducting research and developing a digital or poster presentation to define problems that can be solved by applying scientific ideas about magnets (NGSS 3-PS2-4). Lessons 2-4 provide opportunities for students to apply mathematical reasoning and measurement as well as investigation and observation skills while they use build generators and motors to provide evidence that energy can be transferred from place to place by electric currents (NGSS 4-PS3-2). The culminating design challenge brings students through the engineering design process as they apply scientific ideas to design, test, and refine a generator or motor that will power an LED (NGSS 4-PS3-4). This also gives students the freedom to iterate, think mathematically, and artistically express themselves through the use of various materials.
Design Thinking Overview
Analyze data from tests of two objects designed to solve the same problem to compare the strengths and weaknesses of how each performs.
Directly compare two objects with a measurable attribute in common, to see which object has “more of”/”less of” the attribute, and describe the difference.
Suggestions for pacing and differentiation
Lesson 2: If your students have already gained experience measuring with non-standard units, you may choose to skip this lesson. Alternatively, if you have limited time, consider eliminating the activity where students categorize classroom furniture as movable, or not.
Lesson 3: This lesson allows for students to explore more/less as described in CCSS K.MD.A.2. If you have limited time, or will cover this at another time, consider skipping this lesson.
Design Challenge: The design challenge portion of this unit can be extended through many student iterations. If time allows, you may choose to have student diagram different classroom arrangements, actually move the furniture, then compare the reality with the diagram specifically looking to see if the measurements were accurate. Rearranging multiple times, building new measuring tools, and reflection upon those iterations will give students more of an opportunity to understand the concepts of this unit.
STEAM Integrated Standards
NGSS 4-PS3-2 Make observations to provide evidence that energy can be transferred from place to place by sound, light, heat, and electric currents.
NGSS 3-PS2-4 Define a simple design problem that can be solved by applying scientific ideas about magnets.
NGSS 4-PS3-4 Apply scientific ideas to design, test, and refine a device that converts energy from one form to another.
Unit Materials
RAFT Electromagnetism Kit:
- Ring magnets
- Mini bar magnets
- RPM motor, large
- Cardboard tubes, colored
- Cardboard rings
- Pony beads
- Corrugated plastic strips, white
- Silicone tubing
- Wire connectors
- Foam (size and/or shape may vary)
- Deli containers
- Craft sticks
- Rubber bands
- Wooden dowels
- LEDs, red
- Magnet wire
- Plastic caps (color and/or type may vary)
- Binder clips
- Straws (size and/or color may vary)
- Cable tie, releasable
- Pencils
Other:
- Paper, poster boards, or equivalent
- Staplers w/ staples
- Single-hole punches
- Computers or mobile devices
- Internet access
Maker Journal Pages
Lesson 3 Maker Journal (coming soon!)
Lesson 4 Maker Journal (coming soon!)
Design Challenge Maker Journal (coming soon!)
Lesson 1: Magnetism in Our World
Lesson Overview
Students experience magnetic phenomena through an exploration of various materials and magnets of different types, shapes, and sizes. The exploration is guided by prompts that encourage students to explore different aspects of magnetism and provides examples of where and how magnetism exists in the world. Students document their learning and ideas in a maker journal.
Essential Questions
- Where do you see or use magnets in your life?
- What are the properties of magnets and magnetic materials?
Lesson Procedure
Opening (10 minutes)
- Form student groups or allow student to form their own groups. Give students a few minutes to think about how often they encounter magnets, or the effects of magnetism, in their daily lives.
- Guide the discussion to an understanding that magnetism exists in almost all aspect of modern life, and often in connection with electricity.
- Show YouTube video Everyday Uses of Magnets.
Activity: Magnetic vs Non-Magnetic Materials (20-25 minutes)
- Students explore the interactions between a variety of magnets and a variety of magnetic and non-magnetic items. They are not told which items are magnetic or provided specific information. The purpose is for them to discover magnetic properties through observing magnetic phenomena.
- Provide each group with a set of magnets and 8-10 different materials, some of which must be magnetic. Alternatively, you can have a station where the magnets and materials can be gathered by students when prompted. Suggestions for magnets include ceramic ring magnets, bar magnets, pill magnets, cow magnets, and/or small neodymium magnets. Material suggestions include foam, wood, plastics, clay, paper, paper clips, foil, washers, soda cans, screws, springs, etc.
- Students list observable attributes for each magnet they explore as well as each material they try to interact with the magnet. Although students work together in groups, each student should record his or her observations and interactions in the Maker Journal.
- Encourage students to consider these ideas (and more) while exploring the materials:
- Do the magnets repel or push away anything?
- Do the magnets attract or seem to pull objects closer? How do you know? Which object(s)?
- What do you notice about the pushing and pulling (forces) for each size, shape, or type of magnet? Describe how they are the same or different.
- Which material(s) seem to be attracted to magnets? What do you notice about each material (similarities and/or differences)?
- What do the similarities and differences tell you about materials that are attracted or repelled by magnets?
- Based on this, how would you define magnetic materials vs non-magnetic materials?
Reflection (5-10 minutes)
Students should be given time to think about what they learned and how it may have changed their thinking. The following are examples of questions that may be useful:
- What is your main takeaway from this lesson on magnets and magnetic materials?
- What did you learn about magnets in this lesson that you did not already know?
- What affirmed what you already know about magnets?
- How comfortable are you in being able to explain your learning about magnets and magnetic materials to another person? Explain.
Sample teacher and student dialog.
T: “We’re going to start a unit on electromagnetism. Believe it or not, magnets play an essential role in both science and our daily lives. We’ll learn how magnets work, a little bit about electricity, and how electricity and magnetism are connected, hence the term “electromagnetism”. This is a big term, so we’ll need to take it a step at a time even if you already know something about it. Our focus today is on magnets and magnetic objects. What do you know about them? Where do you find them?
S: “They stick to each other. They can push and pull.”
T: “Some can stick, or attract, each other while others push, or repel, each other. You may have experienced this phenomenon but why magnets push and pull? Don’t worry, we’ll find out together. Let’s take a moment now and do a thinking exercise. I want you to think about your daily lives, from the moment you get up to the moment you go to bed. During those hours, how often do you encounter magnets, or the force of magnetism? I want you all to talk to your group members, and lists those moments.”
S: “We came up with a list, and we encounter magnets when we open up our fridge, when go into our cars, when we use our computers, at school there are magnets on the whiteboard, there are probably magnets in our tv as well.”
T: “Magnets and the force of magnetism are in almost everything we do. When we listen to the radio, that’s due to magnetism. When we get an MRI, that also involves magnetism. When we store and retrieve data on our computers, magnetism is often involved. But almost each and every one of you today encountered magnetism when you used electricity.”
S: “How can electricity be related to magnets?”
T: “That’s a great question, and we are going to figure that out together. But first we are going to work in groups to explore the interactions between different magnets and materials.”
Uses of Magnets in Our Daily Lives
“You come into contact with magnets many times in the course of your daily life. They play an important role in a wide range of devices including simple toys, computers, credit cards, MRI machines and business equipment. Magnets range in size from barely-visible specks to industrial monsters weighing tons. Though some are plainly visible, others are often tucked inside the inner workings of appliances and other household, medical and commercial items, doing their job silently and unseen.” – Faith Chandler, Uses of Magnets in Our Daily Life.
Lesson Materials
- Common non-magnetic items: Foam, fabrics, wood, plastics, clay, paper, rubber, corks
- Common magnetic items: Paper clips, foil, washers, screws, nails, staples, springs
- Magnets of different shapes, sizes, and types (ring, horseshoe, bar, pill, cow, neodymium, ceramic, or other types)
- Internet access
- Lesson Maker Journal (one per student)
External Resources
YouTube Video: Everyday Uses of Magnets
Maker Journal Pages
Teacher Notes
Setting up a materials station or cart helps eliminate the need to distribute individual materials to each student or group and it encourages students to make choices about which materials they would like to explore. If creating a materials station, arrange materials so that each type of material is clearly visible (foam separate from wood, fasteners and connectors grouped together, etc.). Magnets should be separated by type, size, or shape.
Learning Targets
Students will conduct an investigation to provide evidence that fields exist between objects exerting forces on each other even though the objects are not in contact.
Assessments
Student Self Assessment
Students identify the objects affected most strongly for each type of magnet
Peer Assessment
Students discuss their maker journal entries with peers and search for patterns in their observations
Teacher Assessment
Have students conduct mini demonstrations of 1-2 observations recorded in the maker journal
Lesson 2: How Do Magnets Work?
Lesson Overview
Students learn about magnetism at the subatomic level by watching a brief video and engaging in a kinesthetic activity where they play the role of electrons in different materials. Then they use a simple tool to discover where the poles are on a magnet and describe their observations in terms of the alignment of particles in a magnetic material when exposed to a magnetic field.
Essential Questions
- What causes materials to be magnetic?
- What happens inside a magnetic material when it is exposed to a magnetic field?
Lesson Procedure
Opening (10-15 minutes)
- Review the student observations recorded in the previous lesson. Ask students to share their findings regarding the various materials and magnets they explored. Guide students to think about the types of materials used and the observed effects of the magnets used.
- Ask students to share their thoughts about what might be happening inside a magnetic material when a magnet is close by. This can reveal students’ prior knowledge, if any, on subatomic particles, magnetic fields, and field lines.
- Remind students that all of the materials explored so far are solid objects that are made of molecules containing atoms that contain yet smaller subatomic particles called protons, neutrons, and electrons (the video linked below illustrates the key points and relevant aspects of these particles for understanding magnetism).
- Show YouTube video MAGNETS: How Do They Work?. Stop the video as necessary to address key points, student questions, or points of confusion.
Kinesthetic Activity: Magnet, Magnetic, Non-Magnetic (15-20 minutes)
- Students work in groups of 3-4 and each student refers to the lesson Maker Journal.
- Students play the role of electrons in different materials.
- You call out a material listed in the facilitator instructions (provided HERE and in Teacher Notes section) and give students 1-2 minutes to discuss and identify the material as a magnet, magnetic, or non-magnetic.
- Students align themselves according to how electrons would behave in that material with and without a magnetic field being present.
Investigation: Where is the Strongest Part of a Magnet? (10-15 minutes)
- Give each group of students a 6-inch piece of thread, a magnet, and a paperclip.
- Students assemble a paperclip “leash” by looping and tying the thread around the end of the paperclip.
- Encourage students to move the magnet around to see if the behavior of the paperclip “leash” changes. For example, one side of the magnet might attract the paperclip more strongly than an adjacent side.
- They can also dangle the paperclip over the moving magnet to observe its behavior. Common observations include the paperclip being strongly attracted to opposite sides of a bar magnet, or the magnet drawing the paperclip closer from a distance in multiple orientations. This exercise usually leads students to identifying the poles of a magnet, explored in the next lesson.
- Students record their observations in the Maker Journal.
- Ask, “What do your observations tell you about the particles in the paperclip before and after it is near the magnet?” Provide time for students to discuss the question with peers and provide clarification where necessary.
Reflection (5-10 minutes)
Students should be given time to think about what they learned and how it may have changed their thinking. The following are examples of questions that may be useful:
- What is your main takeaway from this lesson on magnets and magnetic materials?
- What did you learn about magnets in this lesson that you did not already know?
- What affirmed what you already know about magnets?
- How comfortable are you in being able to explain your learning about magnets and magnetic materials to another person? Explain.
Sample teacher and student dialog.
T: “What did we learn in the previous lesson regarding magnetic and non-magnetic materials? What were your findings?”
S: “Magnets are metals that stick to metal things.” “Magnets have iron in them!”
T: “That’s right. What do you feel when magnets are close to each other? Do they interact in some way?”
S: “Magnets have poles (sign of prior knowledge), like, the north pole of a magnet is attracted to the south pole of other magnets.” “Some magnets are pulled together but other ones push each other away. Opposites attract!”
T: “So we’re somewhat familiar with what magnets are and have some experience with them. Today we will explore magnets and magnetic objects further and at a much deeper level so that we understand the science behind magnetic phenomena. First, we’ll see a video to give us some detailed background knowledge on magnetism. Then we will do a short activity where we get to move around to check our understanding of what causes magnets to behave as they do. Finally, we’ll use a paper clip “leash” to find the strongest parts of a magnet and explain our observations in terms of what we learn in this lesson.
The following background material should be presented in an appropriate way for the understanding level of the students. Older students could be presented with statements and/or common misconceptions about magnetism to research and report back to the class. It should be noted that there is always more to learn. Even ferromagnetism, the most commonly experienced type, is only one of several different types of magnetism in nature.
Magnets are items that can contain Nickel, Cobalt, and/or Iron. Subatomically, their unpaired electrons can be made to point in the same direction. While these materials are magnetic they will become a magnet only after being placed in a strong magnet field. The unpaired electrons will become aligned and will stay aligned even after the magnet field is removed for these elements. The aggregated strength of each electron’s magnetic field gives the overall material the strong N and S polarization we experience and label as “north pole” and “south pole”. Magnets always have a pair of north and south poles. Some exceptionally strong magnets contain elements from the rare earth part of the periodic table of elements such as neodymium and are referred to as “rare earth magnets”.
Magnetic materials are those that are mutually attracted to a magnet. They could contain nickel, cobalt, and/or iron in pure or mixed form. Steel is a mixture of iron and other elements. Items made from steel are the ones most commonly found to be attracted to a magnet. Subatomically, all their unpaired electrons have magnetic fields pointing in random directions; however, when a magnet’s magnetic field is brought near enough to one of these materials, the unpaired electrons of nickel, cobalt, and/or iron will rearrange their direction of spin to create a temporary (usually) magnetic field opposite orientation to the magnet’s magnetic field. The oppositely oriented magnetic fields will mutually attract each other. Note that a US “nickel” contains too little nickel for the attraction to overcome the force of gravity. Certain Canadian coins, a country with large nickel mines, do have a high enough percent of nickel content to be attracted to a magnet. Also certain coins from England have a copper coating over a steel core and so are also attracted to a magnet. Stainless steel is an alloy of iron and other elements that resists rust (“stainless”) but is also much less attracted to a magnet than say a steel can of soup or other food.
Non-magnetic items are materials that do not contain elements of nickel, cobalt, and/or iron embedded inside and will not turn magnetic even when a magnetic field is brought near it.
Lesson Materials
- Thread
- Paperclips
- Magnets (bar, ring, or other types)
- Lesson Maker Journal (one per student)
- Internet access
External Resources
Maker Journal Pages
Teacher Notes
The kinesthetic activity entitled “Magnet, Magnetic, Non-Magnetic” provides students the opportunity to check their own understanding of magnetic vs. non-magnetic materials and the related effect on the materials due to a magnetic field. It also serves as a formative assessment tool for the teacher/facilitator. Click HERE for facilitator instructions.
Learning Targets
- Students will conduct an investigation to provide evidence that fields exist between objects exerting forces on each other even though the objects are not in contact
Assessments
Student Self-Assessment
Students draw pictures of the paper clip leash near a magnet placed in different orientations
Peer Assessment
Students correct their positions in the kinesthetic activity based on peer and teacher feedback
Teacher Assessment
Review maker journal entries and ask students clarifying questions in a whole class discussion
Lesson 3: Magnetic Force Investigation
Lesson Overview
Students learn about the relative strengths of magnetic forces by observing the attraction and repulsion forces between magnetic objects. Students build a device to measure and graph the distance between ring magnets orientated to repel each other by pressing them together using weighted objects, providing an indirect measure of the repulsion force between the magnets.
Essential Questions
- What are magnetic forces?
- How can we use simple materials to observe and measure the strength of magnetic forces?
Lesson Procedure
Opening (10-15 minutes)
- Review the learning from the previous lesson with students. The lesson covered magnetic alignment of electrons in materials using video and a kinesthetic activity where students play the role of electrons in a material.
- Now that students understand what causes some materials to be magnetic, explain that now they will explore magnetic pushes and pulls and their relative strengths (magnitudes).
- Ask students to share examples of their experiences with weak and strong magnets. Guide them towards describing their examples in terms of pushes and pulls (forces)
Activity: Relative Strengths of Magnetic Forces (15 minutes)
- Students work in groups.
- Number a variety of magnetic objects by labelling them as #1 through #4. For example, a paper clip might be #1, a metal cap as #2, and so on. Make multiple sets using the labels consistently.
- Number an assortment of magnets as #1 – #4 in similar fashion, remembering to be consistent.
- Provide a set of labeled magnetic objects and magnets.
- Students place a magnet and a magnetic object on a flat surface and far enough apart from each other to prevent interaction, and then measure and record the distance in the Maker Journal
- Students slowly move the object closer to the magnet in 1-2 centimeter (cm) increments until they notice an interaction..
- They note their observations in the Maker Journal.
- Students repeat this procedure for the remaining objects.
- They must discuss and analyze their data to identify patterns in the relative strength of magnetic forces between the objects.
Investigation: Levitating Ring Magnets (30 minutes)
Building the Device
- Show students the video Magnetic Pole. Ask them what they notice about the design of the pole, the position of the magnets, the scale, and the apparent levitation of the magnets.
- Give each group of students 5-6-ring (donut) magnets and a copy of the paper scale.
- Students will use a variety of materials to build a levitating ring magnet device similar to the one shown in the video (see lesson materials list for suggested items). They should start by finding a pole-like object such as a dowel, straw, or pencil that can fit inside the hole in the ring magnets.
- Students should wrap the paper scale template around the pole-like item so that the graduated scale can be read after being inserted into the material serving as the base of the device (round foam is used in the video). They secure the paper scale with tape.
- Check each device to ensure students can move magnets up and down the pole without damaging the paper scale. Have students adjust the paper scale as needed.
- Students build their own container for holding objects that will serve as weights. The container must be able to smoothly slide up and down the pole. This implies students must either use an item with a center hole, or they must cut or punch a hole into the center of the item. Some suggestions include dome-shaped beverage lids, small paper cups, or other cup or bowl-like items.
Measuring Magnetic Force
- Student groups slide two ring magnets onto the device, orienting them so they repel each other. Make sure one magnet is resting on top of the device base.
- Students measure and record the distance between the top of the lower magnet and the bottom of the upper magnet using the paper scale (in mm). If the upper magnet tilts to one side, they measure the distance to the lowest point of the upper magnet.
- Students identify objects to serve as weights and hypothesize the numbers of each object it would take to press the magnets together.
- Students count out one type of object (e.g. 5 pennies) and put them into the scale container.
- They measure and record the distance between the magnets again, as described.
- Students add more weight in standard increments (i.e. If they used 5 pennies before, they add 5 more pennies to the container) and again measure the distance between the magnets.
- Students continue adding objects to the scale container until they can no longer measure the distance between the magnets.
- Students compare their measurements to their hypothesis for that object type.
- Encourage students to try the procedure with different objects to put into the container. For example, if they used pennies before, they might switch to marbles for the next round of measurements.
- Students graph their distance data for each weighted object type with number of objects along the x-axis and distance (mm) along the y-axis.
- Encourage students to add more magnets oriented to repel, repeat the procedure, and compare these results with previous results.
- Have student groups compare their data and discuss the following questions:
- How many groups used the same weighted objects as yours?
- For those same objects, what were the distance measurements?
- How does your group’s data compare to the other group(s)? Which group had the smallest distance between magnets for those same objects?
- For that measurement, how many objects were pressing down on the upper magnet? How do these results compare to your hypotheses?
- What does this tell you about the strength of the repelling force of magnets?
Reflection (5-10 minutes)
Students should be given time to think about what they learned and how it may have changed their thinking. The following are examples of questions that may be useful:
- What is your main takeaway from this lesson on the strength of magnetic forces?
- What did you learn about magnets in this lesson that you did not already know?
- What affirmed what you already know about magnets?
- How comfortable are you in being able to explain your learning about magnets and magnetic forces to another person? Explain.
Sample teacher and student dialog.
T: “In previous lessons we learned the difference between magnetic and non-magnetic materials and we learned about magnetic alignment of particles in materials that cause them to become magnetic (magnetized). Today we will learn about the relative strength of magnets.”
S: “What do you mean by magnet strength? That does not make sense to me because magnets do not have muscles!”
T: “By magnetic strength we mean how strongly magnets attract or repel other magnetic materials. The attraction or repulsion is caused by a force, which is a push or pull, similar to shaking someone’s hand and either pulling him or her closer or pushing his or her hand away. Some magnets are stronger than other magnets meaning they push and pull other magnets more noticeably. Please share an example of your experience with weak or strong magnets.”
S: “How can we measure how strong magnet is?”
T: “That is a question we will investigate working in groups. First, we’ll investigate the relative strength, or magnitude, of some magnets by observing their pushes and pulls on different objects. Then we’ll build a device in which magnets will levitate, or float, and then push them together with different weighted objects. You will measure, record, and graph your data to describe the relative strengths of the magnets.
The device is positioned vertically and rests on a flat surface. The lower magnet is constantly repelling the upper magnet but gravity pulls downward on the upper magnet(s) and when the repelling force and gravity force are balanced, the upper magnet appears to levitate above the lower magnet. When additional weight is added to the system, the force of gravity on the upper magnet and the added weights are combined, thus causing a larger downward push on the upper magnet towards the lower magnet. The two magnets do not touch because the repulsive forces between the magnets do not turn off or go away. Instead, as the upper magnet is pushed more strongly towards the lower magnet the repulsive force emanating from the lower magnet increases to an equal amount in accordance with Newton’s 3rd Law of Motion.
Lesson Materials
- Ring Magnets
- Variety of small magnetic objects
- Foam, various types able to be cut with scissors
- Post-like objects such as straws, wooden dowels or skewers (sharp point removed), pencils, or similar items (NOTE: Items must be as close as possible to the diameter of the ring magnets)
- Paper scale (mm), able to be wrapped around post
- Metric ruler
- Bowl or cup-like beverage lids or equivalent, with center hole or thin enough for students to cut a hole
- Objects to serve as weights (marbles, pennies, paper clips, rocks, etc.) (NOTE: Objects should be large enough to avoid falling through center hole)
- Lesson Maker Journal (one per student)
- Internet access
External Resources
YouTube Video: Magnetic Pole
Maker Journal Pages
Floating Compass Idea Sheet
Teacher Notes
Make sure students measure the distance between the upper and lower ring magnets on their magnetic devices before adding weights. This gives them a baseline data point from which to make comparisons as more weights are added to the system. It also serves as a best practice for collecting data and drawing conclusions from the data set to explain phenomena.
Learning Targets
- Students will conduct an investigation to provide evidence that fields exist between objects exerting forces on each other even though the objects are not in contact.
Assessments
Student Assessment
Each student checks his or her hypothesis for each weighted object to measurements obtained experimentally, noting patterns in the graphed data set.
Peer Assessment
Students discuss their group results with 1-2 other groups and attempt to explain variations in the results despite following a similar investigation procedure, being sure to use terms and concepts learned in the lesson.
Teacher Assessment
Instruct groups, or subset of groups, to deliver a presentation highlighting the results and demonstrating an understanding of relative magnetic field strength, as well as answering the essential questions for the lesson.
Lesson 4: Foil Wire Circuit & Compass Exploration
Lesson Overview
Students assemble and use simple circuits made with foil, paperclips, and AA batteries to explore the effects of an electric current on the direction a magnetic compass points. As the wire and compass(es) are repositioned, students can observe how an electric current in a wire creates a magnetic field with field lines that can be analyzed and described, highlighting the relationship between electricity and magnetism.
Essential Questions
- What effect is produced when an electric current running through a wire is brought near a magnetic compass?
- How does the effect change when the direction of the electric current is changed?
Lesson Procedure
Opening (10-15 minutes)
- Briefly review the learning from the previous lesson with students. The previous lessons covered magnetic alignment, magnetic poles, and relative strengths of magnetic forces.
- Tell students they will explore the relationship between electricity and magnetism by creating simple circuits and observe the direction a magnetic compass points.
- Show first 3:50 of the YouTube: “What is Electric Current?” to highlight how electrons flow in a closed circuit. Remind students that electricity is energy resulting from the existence of charged particles (such as electrons or protons), either statically as an accumulation of charge (battery) or dynamically as a current through a wire in a circuit.
Activity: Assembling Foil Wires (10 minutes)
Folded strips of aluminum foil can be easily formed into wires, switches, bulb contacts, and tabs for batteries. The foil wires make it possible to form right angle turns that will lay flat, making it easier to follow the path of an electrical current.
- Cut thin, stiff cardstock or pressboard strips ⅜” x 12½”, one for each student or team.
- Follow the visual instructions below for one method to prepare 3” x 12” foil sections and wires that utilizes the cardstock strip as a cutter as well as a rolling form.
- Lay the cardstock strip along the long rougher edge of a 3” x 12” section of foil and fold the foil around the strip forming a flat ribbon.
- Pull out the cardstock strip, and repeat with the other pieces of foil.
- The 12” long Folded Foil Wires can be cut or torn to any desired length. Shorter pieces can be used to make battery tabs, switches, etc.
Activity: Building Simple Circuits (15 minutes)
Students may work in teams or individually. Use the instructions and pictures below to assist students in building the circuits.
- Cut a rectangle 4” x 1.5” from cardboard or equivalent fluted material (see below).
- Insert the narrow loop of a paperclip into a flute near the short side of the rectangle as shown. Repeat for the opposite end, making sure the wider paperclip loops are on the same side of the rectangle.
- Insert a foil wire under both of the wide paperclip loops and form right angle bends near the ends as shown below.
- Attach another foil wire to the end of the first foil wire by folding and pinching the two end together. This provides more length of wire that can be used to complete a circuit.
Exploration: Effects of Electric Current on Magnetic Compass (20-30 minutes)
Students will close the circuit with a AA battery to create an electric current. By placing a magnetic compass in different locations near the circuit, and by adjusting the length of foil wire around the compass, students can observe that a magnetic field exists around the foil wire when current flows through it and that its field lines can be analyzed and described.
- Place a magnetic compass on top of the cardboard and foil wire (see below).
- Note the direction of the compass needle and record it in the Maker Journal.
- Close the circuit with the AA battery, touching the ends of the foil wire to the battery terminals.
- Note any changes in the direction the needle is pointing in the Maker Journal.
- Disconnect the foil wires and battery terminals. Note what happens, draw sketches, and record observations in the Maker Journal.
- Move the foil out from under one or both paperclips, loosen some slack in the foil, and refasten the foil wire under the paperclips. Shape the slack into an arch and position the compass underneath the arch.
- Repeat steps 2-4, remembering to accurately record your observations.
- Continue exploring the effects caused by moving the compass and foil wires. Considerations might include: A) Position of the compass, B) Position/configuration of the wires, C) The +/- orientation of the battery (does this produce different results than before?), D) Rotating the compass around the wire in all directions, E) Using multiple compasses around different points along the circuit
- Use your recorded observations and continue exploring to answer the essential questions: A) What effect is produced when an electric current running through a wire is brought near a magnetic compass? B) How does the effect change when the direction of the electric current is changed?
Reflection (5-10 minutes)
Students should be given time to think about what they learned and how it may have changed their thinking. The following are examples of questions that may be useful:
- What is your main takeaway from this lesson on electric currents and magnetic fields?
- What did you learn about electricity or magnetism that you did not already know?
- What affirmed what you already know about electricity and magnetism?
- How comfortable are you in being able to explain your learning about electricity and magnetism to another person? Explain.
Sample teacher and student dialog
T: “In previous lessons we learned about magnetic poles, magnetic forces and their relative strengths, and the reasons why materials are magnetic. We have been exploring magnetic phenomena in isolation, meaning that so far we did not consider how magnetism relates to other phenomena. Today we’re going to begin introducing electricity into our discussions and activities on magnetism and as we proceed from this point, we’ll appreciate and explore the relationship between these two scientific phenomena.”
S: “I saw a video of a nail turned into a magnet online. It had a battery hooked up to it.”
T: “That’s an example of a simple electromagnet. We’ll be doing activities that do something similar but first we need to observe the effects of electricity on magnetism, which we’ll do using a magnetic compass. What are these used for?”
S: “They are used to help us find our way on a map!” “They point to the North Pole.”
T: “Those responses are both correct. The question is will they work and do those things when electricity is nearby. Today we’ll explore this question and more by making a simple circuit with a battery and foil wires and observing what happens when a magnetic compass is brought near the circuit.”
Electricity is defined as a form of energy resulting from the existence of charged particles such as electrons or protons, either statically as an accumulation of charge or dynamically as a current flowing through a wire or through the air (lightning bolt). A battery is a container consisting of one or more cells in which chemical energy is stored and then later converted into electricity and used as a source of power. Batteries have electrical contacts called terminals that are labeled as positive (+) and negative (-). The negative terminal has an accumulation of electrons making it relatively more negative than the positive terminal.
Basic circuits consist of a power source, wires, and various components such as resistors, capacitors, transistors. The circuit in this activity uses a AA battery as the power supply, foil wires, and paperclips, which can be used to hold or connect the foil wires to another material or to the battery. When the foil wires are connected to the battery terminals it is said to be a closed circuit; when disconnected it is an open circuit. When closed, the negative charge held by the electrons in the (-) part of the battery pass their energy to the electrons inside the material in the wires, which then moves through the wires from the (-) battery terminal to the (+) terminal. This is an electric current. Note that in this activity there are no intermediary components, such as a light bulb, meaning the electric current is free to flow from one terminal to the other with little to no resistance. This is technically a short circuit, which in electronics is usually not a desired result. The foil wires used in this lesson provide just enough resistance to prevent the short circuit from becoming dangerous for students.
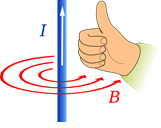
The word electromagnetism in physics is used to describe one of the fundamental forces of nature, which is the force between subatomic particles such as protons and electrons. It helps to hold matter together. When an electric current flows through a wire, it generates a magnetic field. When current is flowing through a wire, the magnetic field rotates around the wire. The direction of the current determines the direction of the magnetic field. You can figure out the direction of the magnetic field using the “right-hand rule” (see below). Your thumb points in the direction of the current (I). If you pretend to wrap your fingers around the wire, they will point in the direction of the rotation of the magnetic field (B).
In this lesson students explore the effects of an electric current on a magnetic compass by bring the compass near the foil wire so that the field generated by the current interacts with the field emanating from the magnetized compass needle. The observed interaction will manifest as the compass needle moving away from its original direction. The intensity and direction of the compass needle movement depends on the strength of the force generated by the current, the position of the compass around the wire, and the direction of the current through the wire. By repeatedly moving the compass (or multiple compasses) around the wire, students may be able to investigate and learn more about the properties of the magnetic field lines generated around the wire.
Lesson Materials
- Magnetic compasses, one per group
- Aluminum foil, pop-up style is ideal
- Cardboard or equivalent
- Stiff cardstock, press board, or equivalent material
- AA batteries
- Ruler
- Paper clips
- Lesson Maker Journal (one per student)
- Internet access
External Resources
YouTube Video: What is Electric Current?
Maker Journal Pages
Flow of Electrons
Teacher Notes
This lesson is intended to provide students with basic knowledge on electricity so that they can appreciate the relationship between electric and magnetic phenomena. The lesson intentionally avoids the degree of thoroughness often included in physics texts on these topics in order for the activity in the lesson to be useful to teachers interested in teaching these topics, presumably without extensive scientific knowledge. This approach is beneficial from a teacher perspective because it provides a simple, logical, and equitable path to understanding the fundamentals of electromagnetism for all students. It is also easily implemented and can be modified to meet diverse learning needs.
Learning Targets
- Students will conduct an investigation to provide evidence that fields exist between objects exerting forces on each other even though the objects are not in contact
- Students will describe the cause and effect relationship between an electric current flowing through a wire and the magnetic field generated by the current, and the field emanating from a magnetic compass
Assessments
Student Self Assessment
Individual students can draw a diagram of their wire circuit and compass set-up with arrows showing the magnetic force generated by the electric current and then demonstrate how it works to a peer
Peer Assessment
Student groups compare their findings and make a t-chart listing similarities and differences in their data
Teacher Assessment
- Students make a video demonstration to post online, touching on key concepts such as electric current flowing in a specific direction, the right-hand rule, and magnetic field lines and changes due to electric currents
- Students develop an animation, Scratch program, or other digital representation of their circuit-magnet set-up
Lesson 5: Coiled Wire Around a Compass
Lesson Overview
Students wrap a conductive wire around a magnetic compass, put electric current through the wire, and observe the direction of the compass needle caused by the induced magnetic field emanating from the wire. Students vary the number of wraps (turns) around the compass and investigate how this changes the observed results. Through the activity and the videos linked in this plan, students will learn that the greater the number of turns in the wire, the greater the magnetic field strength around the coiled wire. This provides a simple demonstration of Faraday’s Law.
Essential Question
- What is the cause and effect relationship between the number of turns in a coiled wire wrapped around a magnetic compass and the behavior of the compass needle?
Lesson Procedure
Opening (10-15 minutes)
- Briefly review the learning from the previous lesson with students. The previous lessons covered magnetic alignment, magnetic poles, magnetic forces, and the effects of an electric current running through a wire on a magnetic compass.
- Tell students they will explore another aspect of electromagnetism involving a coil made by wrapping a wire around a compass. It is similar to the last lesson, which focused on the effects of a magnetic field generated by a current running through a length of foil wire. This lesson, however, will focus on the effects of the number of turns in the wire that wraps around a compass. See “Sample teacher and student dialog” below.
- Alternatively, you may have students read the information on this website (http://bit.ly/2IRdOJv) as another engagement strategy.
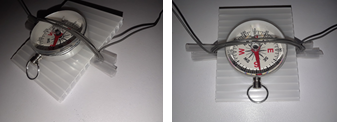
Assembly (5 minutes)
Students assemble a simple platform that will hold the compass and grip the conductive wire as it is wrapped into a coil.
- Insert one 3” slit straw piece into one fluted space in the cardboard material. You may need to pinch the end of the straw so that it fits into the flute.
- Repeat this process for another straw piece, inserting into an adjacent flute (see below).
- Make sure the straws are not inserted evenly. Having them offset creates a catch that can grip the wire later.
- Put a magnetic compass onto the cardboard.
- Wrap a piece of conductive wire a few times around the compass, leaving extra slack on both ends. Trap the ends of the wire between the straw ends. This can hold the compass in place as well as keep the wire from uncoiling.
- Lay the assembly on a flat surface. The compass is designed to point to magnetic north. Turn the assembly until the N on the compass aligns with magnetic north.
- Draw a picture of the assembly in the lesson Maker Journal, noting the position of the compass needle.
- Connect the ends of the wire to the terminal of a AA battery. Record the new direction of the compass needle. Disconnect the battery and see if the needle returns to its previous direction. Repeat this procedure again to ensure the results are consistent.
- Increase the number of turns in the coil by wrapping the wire around the compass (2-4 times). Whatever number you choose should be used for each subsequent observation in the investigation in order to be consistent.
- Repeat step 3 above, recording the results in the lesson Maker Journal for the chosen turn number.
- Keep adding more turns and recording the effects in the Maker Journal as the remaining length of wire permits or until the teacher indicates you must stop.
Analysis and Conclusion (10-15 minutes)
Students identify patterns in their data that could possibly explain the relationship between the number of turns in the wire coil and the resulting behavior of the compass needle. Suggest the following questions for students to consider:
- Were there any observations where the needle moved relatively slow or only a little bit?
- Were there any observations where the needle moved fast and far away from north?
- What was the number of turns when you observed each of these cases?
- Did the needle behavior increase or decrease with the number of turns?
- How do your results compare to data collected by other students?
Reflection (5-10 minutes)
Students should be given time to think about what they learned and how it may have changed their thinking. The following are examples of questions that may be useful:
- What is your main takeaway from this lesson on induced magnetic fields?
- What did you learn about induced magnetic fields and copper coils that you did not already know?
- What affirmed what you already know about them?
- How comfortable are you in being able to explain your learning about induced magnetism to another person? Explain.
Sample teacher and student dialog
T: “We learned in a previous lesson that circuit wires with electric current passing through them generate a magnetic field. We also learned how to determine the direction of the magnetic field around the wire using the right-hand rule. We built a circuit and observed the effects of the current on a magnetic compass. Today we’ll see what happens when we wrap a wire around the compass.”
S: “Isn’t this the same thing? What might we observe that is different than before?”
T: “Before we made circuits having only one wire near or touching the compass. Today we are going to wrap a wire, not made of foil this time, around the compass. You will observe the effects of running a current through the wire on the compass. Then you will change the number of wire wraps, or turns, around the compass and then record your observations.”
S: “If the wire is wrapped around the compass and the wraps are touching, I think that’s like making a thicker wire. Is that right?”
T: “You could say that. What might that affect the behavior of the compass? That’s what we’ll explore today. Hopefully the data you collect will help you identify a pattern and maybe predict the compass’s behavior with different numbers of turns in the wire.”
The word electromagnetism in physics is used to describe one of the fundamental forces of nature, which is the force between subatomic particles such as protons and electrons. It helps to hold matter together. When an electric current flows through a wire, it generates a magnetic field. When current is flowing through a wire, the magnetic field rotates around the wire. The direction of the current determines the direction of the magnetic field. You can figure out the direction of the magnetic field using the “right-hand rule” (see below). Your thumb points in the direction of the current (I). If you pretend to wrap your fingers around the wire, they will point in the direction of the rotation of the magnetic field (B).
In this lesson students explore the effects of an electric current on a magnetic compass by bring the compass near the foil wire so that the field generated by the current interacts with the field emanating from the magnetized compass needle. The observed interaction will manifest as the compass needle moving away from its original direction. The intensity and direction of the compass needle movement depends on the strength of the force generated by the current, the position of the compass around the wire, and the direction of the current through the wire. By repeatedly re-positioning the compass (or multiple compasses) around the wire, students may be able to investigate and learn more about the properties of the magnetic field lines generated around the wire.
Conductive wire that is coiled creates an increased area through which current can flow. The magnetic force generated is directly proportional to the amount of current, hence the more turns in the wire coil, the stronger the magnetic force around the coiled wire. This is a simplified view of Faraday’s Law (http://bit.ly/2IRdOJv). For a more detailed description, visit http://bit.ly/FLInduction.
Lesson Materials
- Magnetic compasses
- Cardboard or equivalent, cut into 2” x 2 ½” pieces
- Insulated copper wire or equivalent, flexible, cut into 2 ft. lengths
- AA batteries
- Regular beverage straws, slit lengthwise on one side and cut into 3” pieces
- (Optional): Paperclips
- Lesson Maker Journal (one per student)
- Internet access
External Resources
http://bit.ly/2IRdOJv (Faraday’s Law – For kids)
Maker Journal Pages
Flow of Electrons
Teacher Notes
The straws can be easily slit using a flat, plastic letter opener as long as the straw can be slid towards the blade along the long protruding part of the opener. Scissors are an alternative. The fluted spaces in the cardboard accommodate the slit straw pieces. The straws, when inserted into the flutes, provide a natural catch in which to hold the wire as it is wrapped around the compass.
Learning Targets
- Students will conduct an investigation to provide evidence that fields exist between objects exerting forces on each other even though the objects are not in contact
- Students will describe the cause and effect relationship between the number of turns in an electrified wire wrapping around a compass and the behavior of the compass needle
Assessments
Student Self Assessment
Students demonstrate to another person the effect of doubling vs. tripling the number of turns in the wire on the compass needle’s behavior
Peer Assessment
Groups compare and discuss their findings and try to explain any differences and/or similarities
Teacher Assessment
Create a matching game where students have to match up a number of turns in the wire with various degrees of movement in the compass needle
Design Challenge: Generating Electricity to Power an LED
Design Challenge Overview
In the culminating project, students are challenged to work as a team and create a way to spin a generator to power a LED light for 10 seconds. Using the prior knowledge obtained in the empathy and define stages of the engineering design process, students will generate ideas and themes, build prototypes, test and reflect on whether their design meets and exceeds the criteria and constraints.
Essential Questions:
- Challenge: Can your group create a device to spin the generator and power up the LED light bulb?
- What were you able to learn by testing your design? How can you use that knowledge to iterate your design?
- Your device converted what type of energy into electrical energy?
LESSON PROCEDURE
- Remind students that electricity is an integral part of how our society works. A large majority of the world still creates energy by creating a way to spin a magnet around a coil of wires, converting mechanical energy into electricity. Ask students what are some current methods we use to spin turbines and produce electricity?
- Have students follow RAFT’s ElectroMagnet Generator Youtube Video with instructions to build their first generator.
- Present to students that their challenge: is to create a system to spin the magnets and keep the LED lit for 10 seconds.
- Introduce students to suggested criteria and constraints of their Design Challenge.
Criteria (design requirements) Constraints (design limitations) - The device must light up the LED light bulb for 10 seconds.
- The devices must use materials approved by teachers.
- MakerJournal must include sketch of design, any results from testing, and ideas for improvement.
- The device can not use batteries to spin the generator.
- The device can not be human powered. You can not just spin it for 10 seconds.
- Allow students time to brainstorm, and sketch ideas in MakerJournal (Define and ideate stage).
- Allow students to build an initial design (prototype stage).
- Allow students to test and reflect (test stage).
- Allow students to iterate on their design (iteration cycle).
- Ask students to recap by sharing their reflection and curiosity about the core concepts and their learning experience so far.
Criteria & Constraints
Remember, all engineers deal with criteria and constraints when engineering. Engineers design things using some rules about how the designs must behave or work. These rules are called criteria. Engineers can run out of materials, money, time to build, or space in which to build something. In other words there are limits on how something can be built. These limits are called constraints. The criteria and constraints for this challenge are below.
Ideate
Have students work in groups, and brainstorm then sketch out their game board and circuitry on paper. Ask students to label key components of their game and of the circuitry of their game. Explain to students their sketches will be a part of their journal, and will be used to mark down where the device needs improvement.
T: Now that we had practice creating a generator, here is your challenge. We will work in teams, and your challenge will be to create a system to light the LED light for 10 seconds. Here are some of the criteria and constraints.
Prototype
If a makerspace is available at your site, the prototyping phase is most conducive in this environment. Alternatively, supplies from RAFT’s Electrical Engineering module can be presorted on a table so that students can easily see, take, and return materials. Have students select a materials manager to bring supplies and avoid any potential traffic jams in the classroom.
Display criteria and constraints rules somewhere visible to all students. Allow students 10-15 minutes of build time, and then 10 minutes of testing in front of the class. This structure works for classrooms with less space, limited the testing area. This encourages group presentation during the testing phase where everyone gets to see each group test and present their design.
Alternatively, allow for 20-25 minutes of combined build and testing time. This structure works for larger classroom with more available testing areas, and students who work better through self-organizing. In this model, students get to test freely as they build, and can go through more iterations.
T: Let’s take our sketches and start creating our prototypes. Remember, only the supply coordinator should make it up to get supplies. We’ll have 15 minutes to try create our first prototype. Don’t worry about if you can’t finish on time, remember it’s our first prototype but we’ll have a second iteration.
S: We can make anything we want.
T: Yes, but remember it has to fit into the criteria and the constraints.
S: What happens if we need help?
T: First ask your team members, then if your whole team still need a bit of help, let an adult know.
Test and Reflect on your Design
Testing can be done in groups with each group taking turns to present in class, this helps to build public speaking and is a fun way of learning that failure points in your device are completely a natural part of engineering. Testing can also be done during build time to reduce pressure and induce more participation. Have students come up to testing area, and demonstrate their completed system.
Guiding Question:
How can you harness energy to spin the magnets?
In what ways can we get objects to move without using human or battery power?
Were some reasons why your device might not have worked as you planned?
How can you improve on your design?
Engineering Design Process
The engineering design process is an iterative process. Through testing, and data collecting (or lessons learned) engineers recreate through several iterations the design changes progresses incrementally until a final solution is created. There are many examples of the engineering design process, but all will follow the same principles of understanding a problem, brainstorming ideas, prototyping a solution, testing the solution, and reiterating the process.
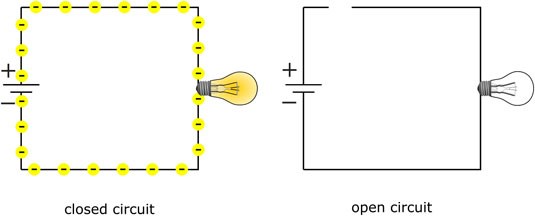
Open and Closed Circuits
A closed circuit board has a pathway for electrons to flow without interruptions. With all wires attached properly, and connected to an energy source like batteries, a closed circuit should allow for electrons to flow to lights, speakers, and all components of the board.
An open circuit board might have the pathway for election to flow, but there is a gap somewhere that stops the cyclical flow, and the components of the board will not operate. A switch allows us to turn on and off a device by either breaking the pathway of electrons in the off position or be reconnecting the pathway of electrons.

Design Challenge Materials
Building Materials
- all materials supplied in RAFT’s Electromagnetism Unit
- any additional material around classroom.
External Resources
“The Loathsome, Lethal Mosquitoes” by TED-Ed
Maker Journal Pages
Teacher Notes
Normalize that failing is a way of learning that is common for all people, even professionals such as engineers, scientists, doctors, lawyers, and athletes. Have signage around the class that supports growth mindsets. Use acronyms such as First Attempt In Learning (F.A.I.L).
Allow students to work through challenges, even if it seems they are having a tough time. Reference criteria and constraints to students as guidelines, rules, and instructions for their design, and refrain from giving too much clarification. Students will get it.
Active Classroom
Tips for success in an active classroom environment:
Communication is critical in the design process. Students need to be allowed to talk, stand, and move around to acquire materials. Help students become successful and care for the success of others by asking them to predict problems that might arise in the active environment and ask them to suggest strategies for their own behavior that will ensure a positive working environment for all students and teachers.
Practice and predict clean-up strategies before beginning the activity. Ask students to offer suggestions for ensuring that they will leave a clean and useable space for the next activity. Students may enjoy creating very specific clean-up roles. Once these are established, the same student-owned strategies can be used every time hands-on learning occurs.
Learning Targets
MS-PS3-3: Apply scientific principles to design, construct, and test a device that either minimizes or maximizes thermal energy transfer.
- Students will apply prior knowledge to design, construct, and test a solution that transfers energy.
- Students will apply prior knowledge to design, construct, and test a solution that can complete a circuit and manipulate the flow of electrons.
Assessment
Student Self Assessment
Student groups review their makerspace journal and summarize their learning in a group discussion
Peer Assessment
Student groups discuss and compare their findings and share different critical uses for water and methods of freshwater transportation that they discover in their research. Students should also share the difficulties that they discovered in transporting freshwater.
Teacher Assessment
Review student makerspace journal pages for formative assessment and discuss with individual groups as they work.
Conduct a whole group discussion to allow all students to share, discuss and compare their findings around different critical uses for water and methods of freshwater transportation that they discovered in their research. Students should also share about the difficulties in transporting freshwater.